Group Based Licensing – an all or none proposition…

Group based licensing provides a great deal of flexibility for administrators to automate the license assignment process.  The move from utilizing the Entra portal to the Microsoft 365 Admin Center for group based licensing has brought about several changes not only in the way license are assigned but also the backend technologies utilized to apply the licenses.

Assigning licenses to groups…

The Microsoft 365 Admin Center enables the application of groups to licenses.  Groups can be assigned to multiple licenses at the same time.  I would like to refer to this as a license template and think about it these are the licenses that this group needs to apply in order for the application to be successful. 

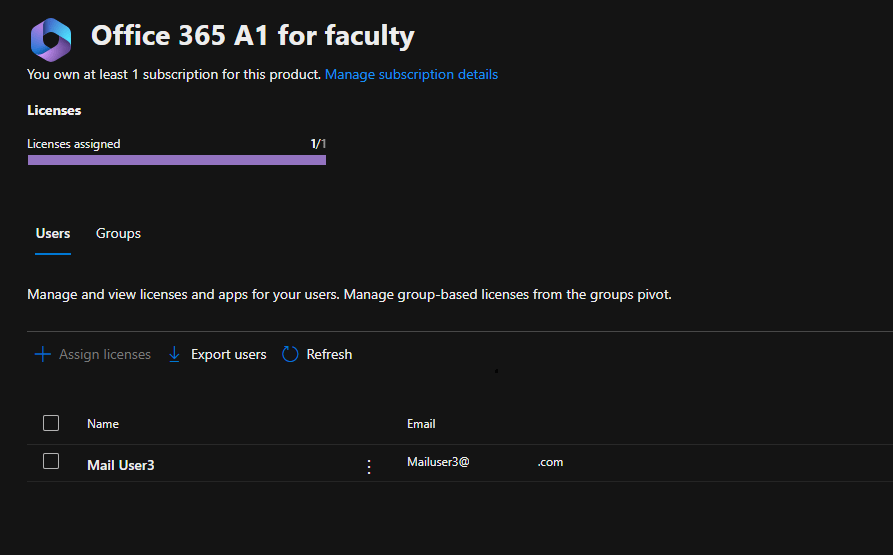
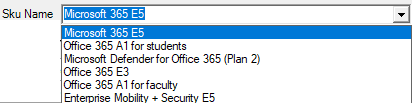
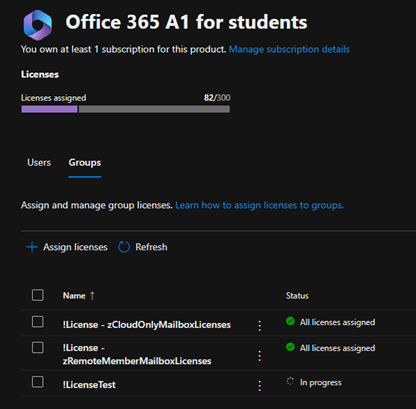
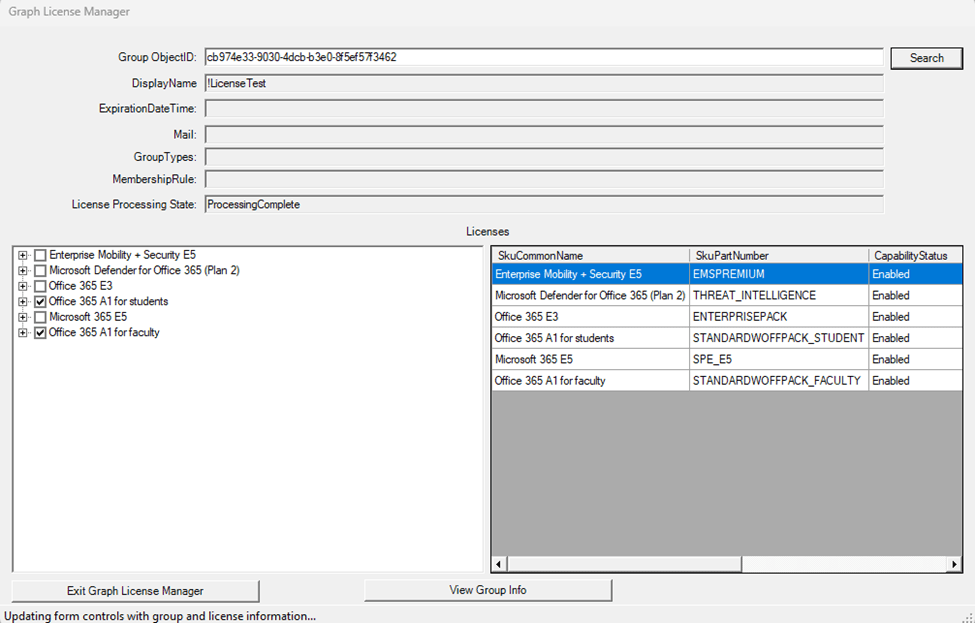
In this example I have a group !LicenseTest that applies two licenses, the Office 365 A1 for Students and Office 365 A1 for Faculty.  (Note:  In practical terms it would make no sense to use a group to assign both of these licenses but it served the purpose of this blog.)  The license template was created in the M365 Admin Center by adding the group to the licenses.

The same information is available through Microsoft Graph. 

PS C:\> Get-MgGroup -GroupId cb974e33-9030-4dcb-b3e0-8f5ef57f3462 -Property AssignedLicenses | fl AssignedLicenses


AssignedLicenses : {94763226-9b3c-4e75-a931-5c89701abe66, 314c4481-f395-4525-be8b-2ec4bb1e9d91}

Success or Failure…

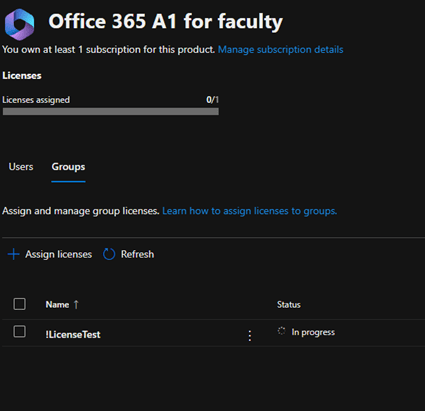
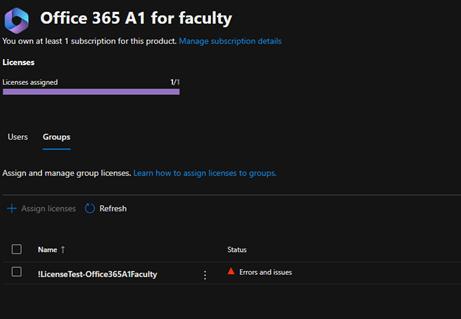
 As users are added to the group an asynchronous process within Microsoft 365 is responsible for processing all of the group based licensing.  Each license in the M365 Admin center shows the groups assigning the license and the group processing state.  In the example of our test group reviewing the license status shows the following in the M365 Admin Center.

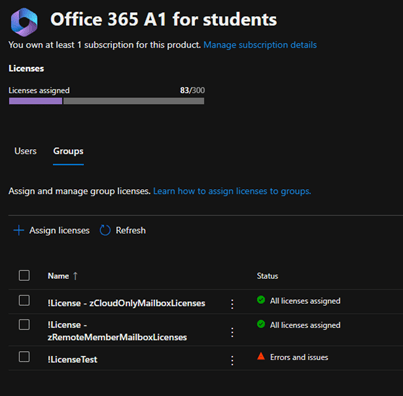
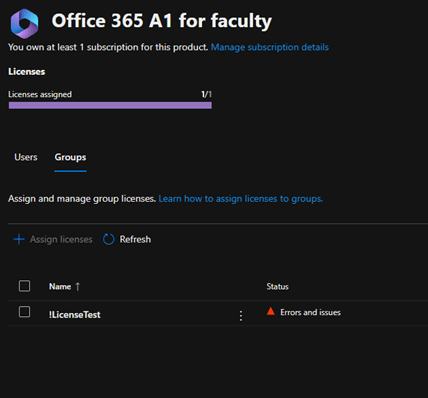
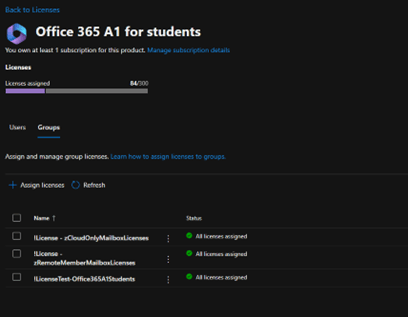
The group processing status shows license assignment failures for both licenses.  To review the errors the group is selected under the license.  For the Office 365 A1 for Students, when selecting the group and reviewing errors, the following is displayed:

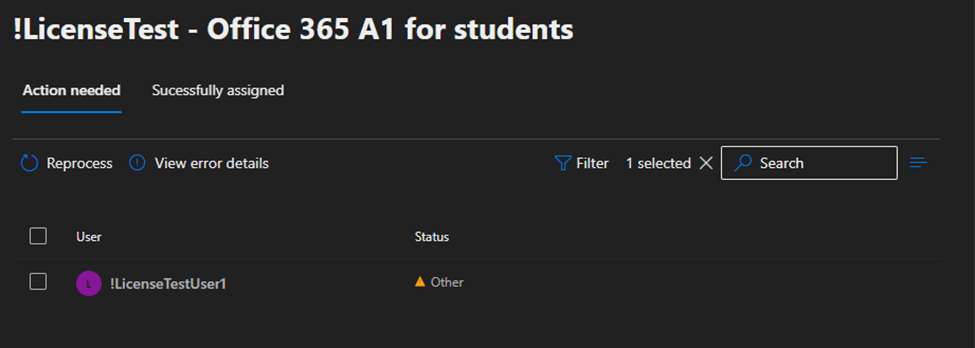
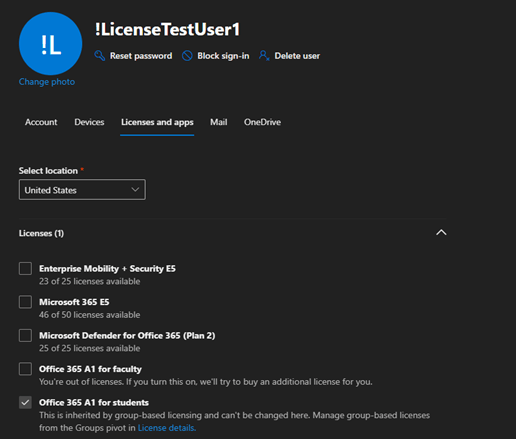
The status of the license assignment is “Other” with no further details.  For the Office 365 A1 for Faculty, when selecting the group and reviewing the errors, the following is displayed:

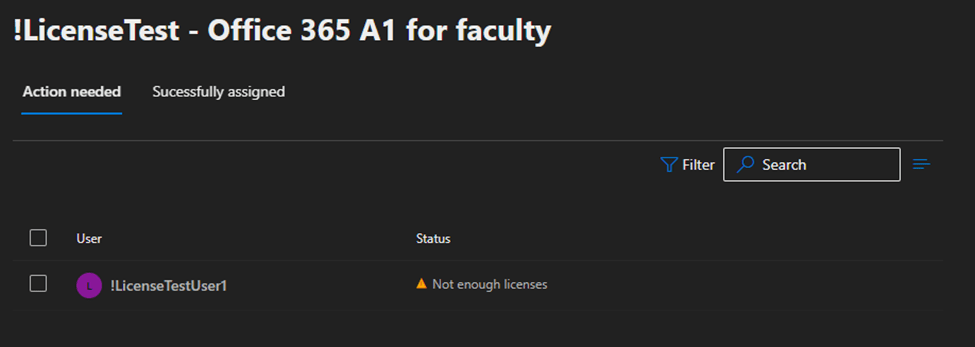
The status of the license assignment is “Not Enough Licenses”.  This error is generally self-explanatory.  At the time the license assignment was attempted there were not enough licenses to apply this license to the user.

When reviewing license assignment failures, the Entra audit logs is also extremely helpful.   Here is a sample audit log entry:

Activity
Date 1/29/2025, 11:59 AM
Activity Type Change user license
Correlation ID c71dad7e-a6e0-46b2-897c-065022231dbb
Category UserManagement
Status failure
Status reason 
Microsoft.Online.Provisioning.SubscriptionManagement.SubscriptionFullException
User Agent
Initiated by (actor)
Type Application
Display Name Microsoft Azure AD Group-Based Licensing
App ID
Service principal ID
Service principal name
Additional Details
Licensing Error Message
Not enough licenses are available to complete this operation. Purchase more licenses or remove unneeded licenses from users and groups for SKU [94763226-9b3c-4e75-a931-5c89701abe66]. Licenses being added: [94763226-9b3c-4e75-a931-5c89701abe66]

Remember earlier when I referred to putting multiple licenses on the group as a “template” this template did not apply successfully.  Under the new architecture if all the licenses that the group covers cannot be applied then no licenses are applied to the users. 

All or none…why?

There are several architectural reasons that this makes sense as well as some practical reasons.  From a practical standpoint customers very often apply licenses together so that users have a consistent functionality and experience.  For example, I recently worked with a customer that applies an F3 license to their users but also adds Exchange Plan 2 standalone for additional mailbox capacity.  If the F3 was provisioned without the associated Exchange Plan 2 the user would not receive the desired mailbox size. 

From an architectural perspective there are now more licenses that have cross dependencies on each other.  Take the example of having a Teams Audio Conferencing Standalone license that requires a teams plan from a Microsoft E3 license.  If the Microsoft E3 failed to apply this would subsequently generate a failure of the Teams Audio Conferencing license. 

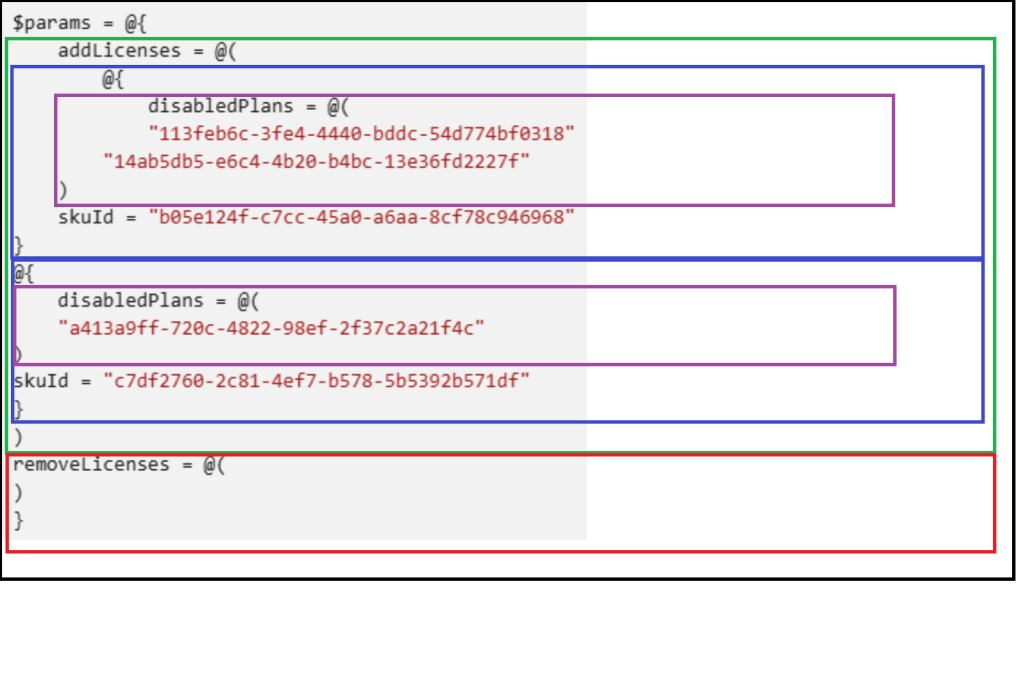
The main architectural change though that is driving this is the migration of license assignment functions to the graph interface.  When graph attempts to assign the licenses, it does so not individually but rather overall.  This can be reproduced by attempting to assign the licenses with Microsoft Graph.  Here is an example:

#Establish the body parameters hash table.
$params = @{}

#Build the add licenses array
$addLicenses = @()

#Build the remove licenses array
$removeLicenses = @()

#************************************************************************

#Build the disabled plans for the first license to be added.

$disabledPlans = @()

#Set the skuID for the first license.

$skuID = "94763226-9b3c-4e75-a931-5c89701abe66"

#Build the hash value for the added licenses.

$skuHash = @{"DisabledPlans" = $disabledPlans ; "SkuID" = $skuID}

#Add the skuHash to the array of licenses to add.

$addLicenses += $skuHash

#************************************************************************

#Build the second entry to the add licenses.

#Build the disabled plans for the second license to be added.

$disabledPlans = @()

#Set the skuID for the first license.

$skuID = "314c4481-f395-4525-be8b-2ec4bb1e9d91"

#Build the hash value for the added licenses.

$skuHash = @{"DisabledPlans" = $disabledPlans ; "SkuID" = $skuID}

#Add the skuHash to the array of licenses to add.

$addLicenses += $skuHash

#************************************************************************

#***********************
#Complete the params has table.
#***********************

$params = @{"AddLicenses" = $addLicenses ; "RemoveLicenses" = $removeLicenses}

#***********************
#Set the license on the user.
#***********************

set-mgUserLicense -userID 95b87c6b-680d-4942-8ca9-7dd25cd0c3ed -bodyParameter $params

set-mgUserLicense : Subscription with SKU 94763226-9b3c-4e75-a931-5c89701abe66 does not have any available licenses.
Status: 400 (BadRequest)
ErrorCode: Request_BadRequest
Date: 2025-01-29T17:19:56
Headers:
Transfer-Encoding             : chunked
Vary                          : Accept-Encoding
Strict-Transport-Security     : max-age=31536000
request-id                    : 9f334bdd-c0b6-44e0-a67d-de157e2b69b6
client-request-id             : 6e2f76c8-8b7a-4998-91c9-6986cad1e09d
x-ms-ags-diagnostic           : {"ServerInfo":{"DataCenter":"East
US","Slice":"E","Ring":"5","ScaleUnit":"002","RoleInstance":"BL02EPF0001DE6C"}}
x-ms-resource-unit            : 1
Cache-Control                 : no-cache
Date                          : Wed, 29 Jan 2025 17:19:56 GMT
At line:1 char:1
+ set-mgUserLicense -userID 95b87c6b-680d-4942-8ca9-7dd25cd0c3ed -bodyP ...
+ ~~~~~~~~~~~~~~~~~~~~~~~~~~~~~~~~~~~~~~~~~~~~~~~~~~~~~~~~~~~~~~~~~~~~~
    + CategoryInfo          : InvalidOperation: ({ UserId = 95b8...ionJsonSchema }:<>f__AnonymousType3`3) [Set-MgUserL
   icense_Assign], Exception
    + FullyQualifiedErrorId : Request_BadRequest,Microsoft.Graph.PowerShell.Cmdlets.SetMgUserLicense_Assign

The attempt to directly assign both licenses at the same time in a single operation failed resulting in the user having no licenses assigned.  If the license assignment attempts are performed individually one will succeed and the other will fail resulting in the user having one of the two desired licenses.

The “other” status…

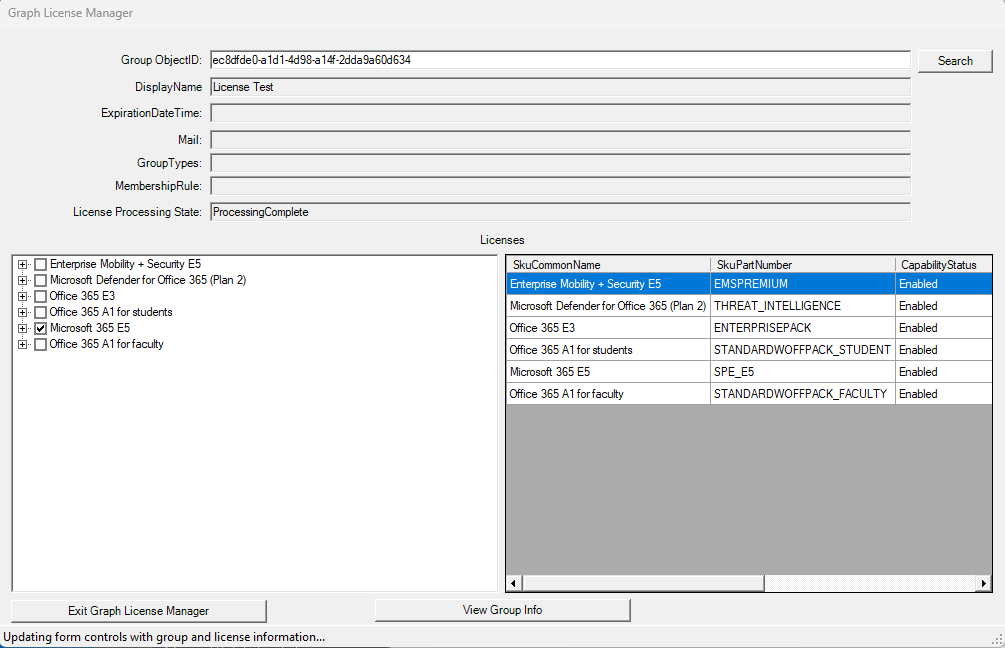
I often receive calls from customers regarding group based license failures and the “other” status.  The other status generally means that the group is assigning more than one license and another license has failed to apply.  This is sometimes hard to track down in the Microsoft 365 Admin Center as you must select each license that you have and then review the groups assigning those licenses.  There is no interface within the Microsoft 365 Admin Center that shows you all of the licenses assigned to a single group.  The GraphLicenseManager may assist in determining the source of failures.

Using Graph License Manager to review license assignment failures…

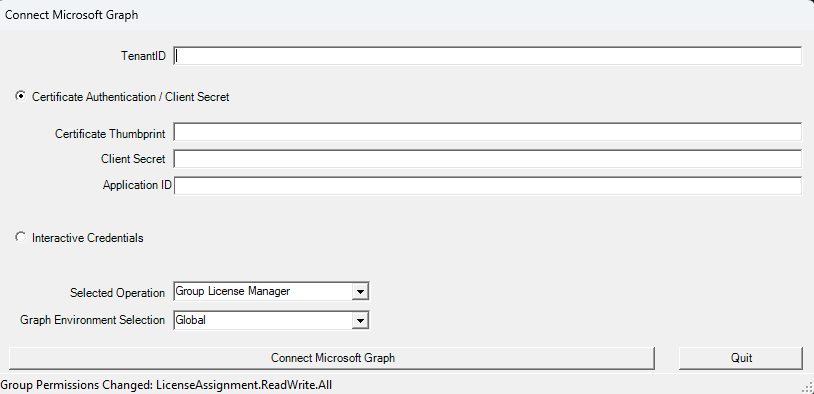
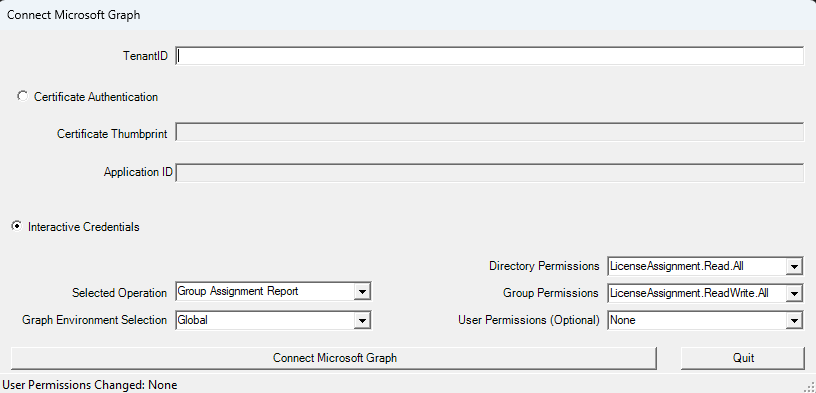
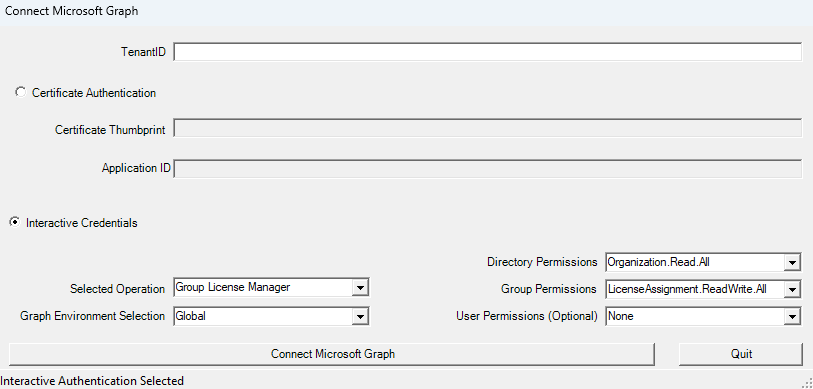
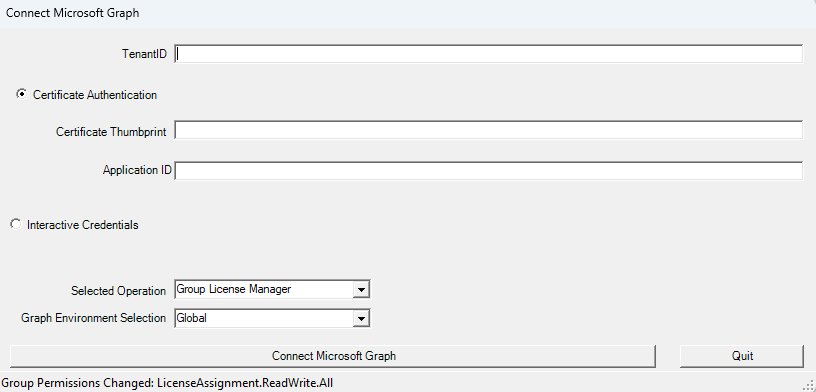
The GraphLicenseManager does have the ability to assist in tracking this down without looking at each license.  For more information on installing and using the GraphLicenseManager see the following references:

Using GraphLicenseManager to view group members and reprocess users… | TIMMCMIC

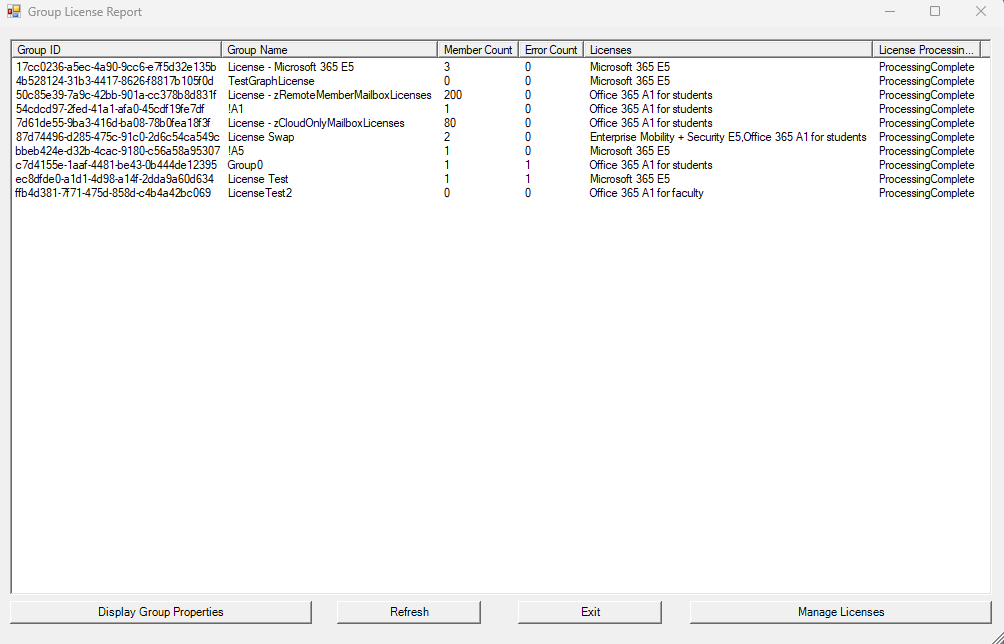
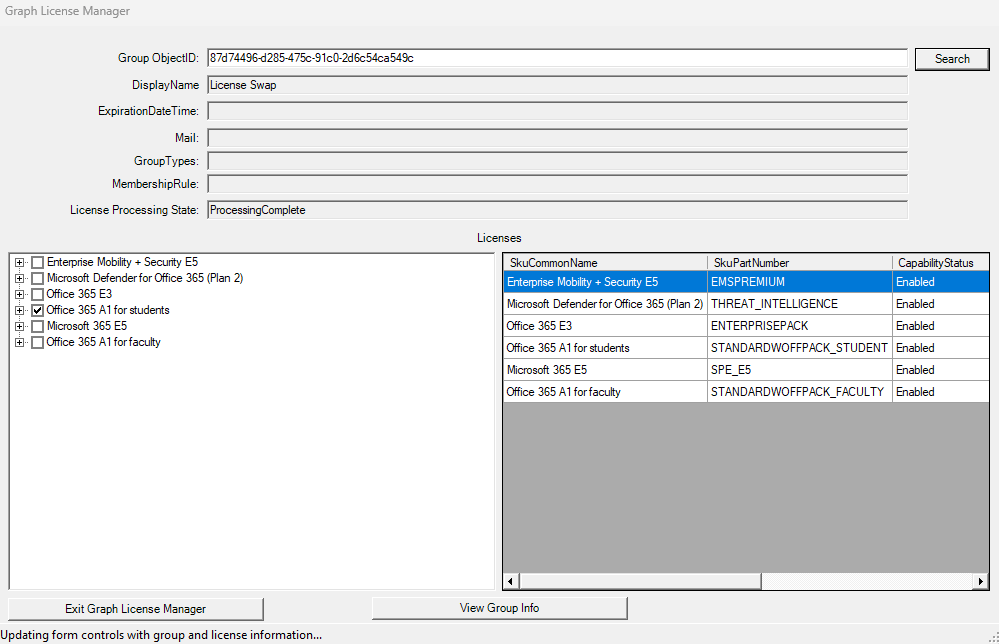
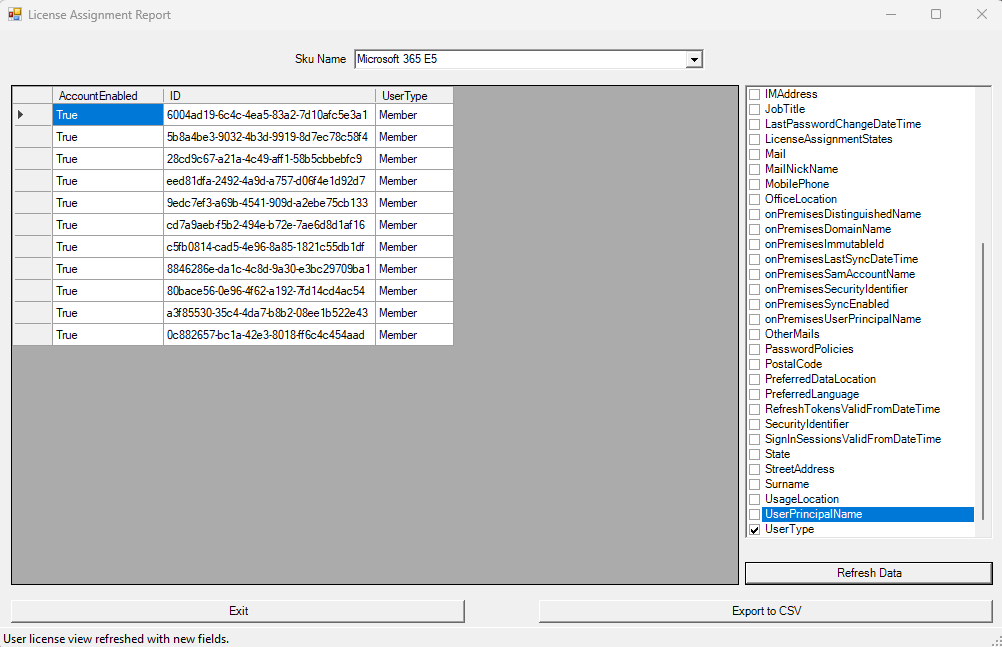
When the graph license manager is installed and configured selecting the “Group License Manager” allows you to visualize the licenses that are assigned to a group. 

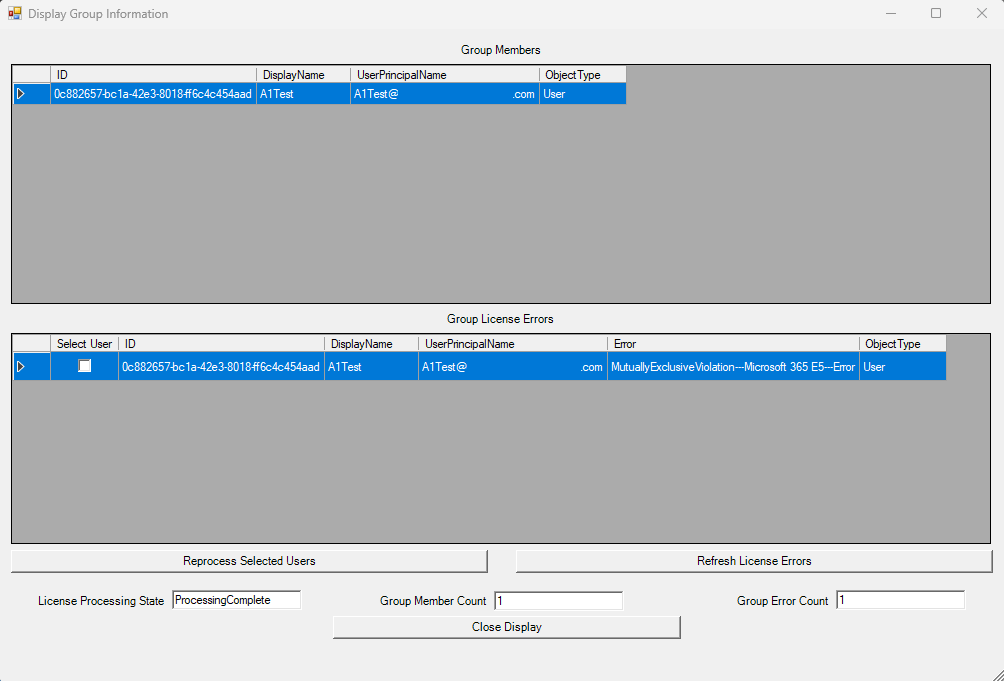
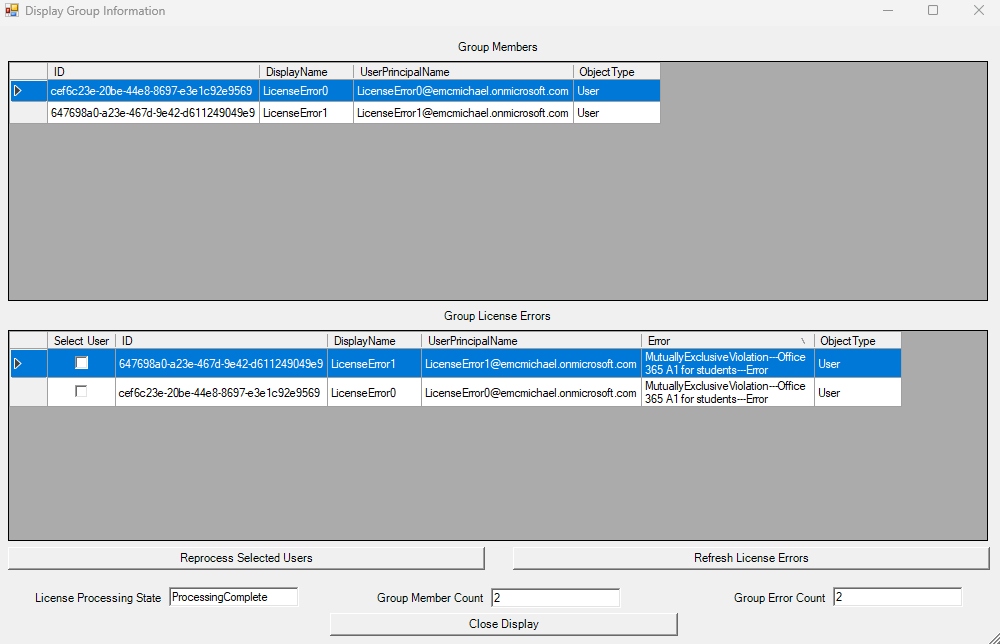
The “View Group Info” button displays information about the members of the group as well as any licensing errors associated with the users. 

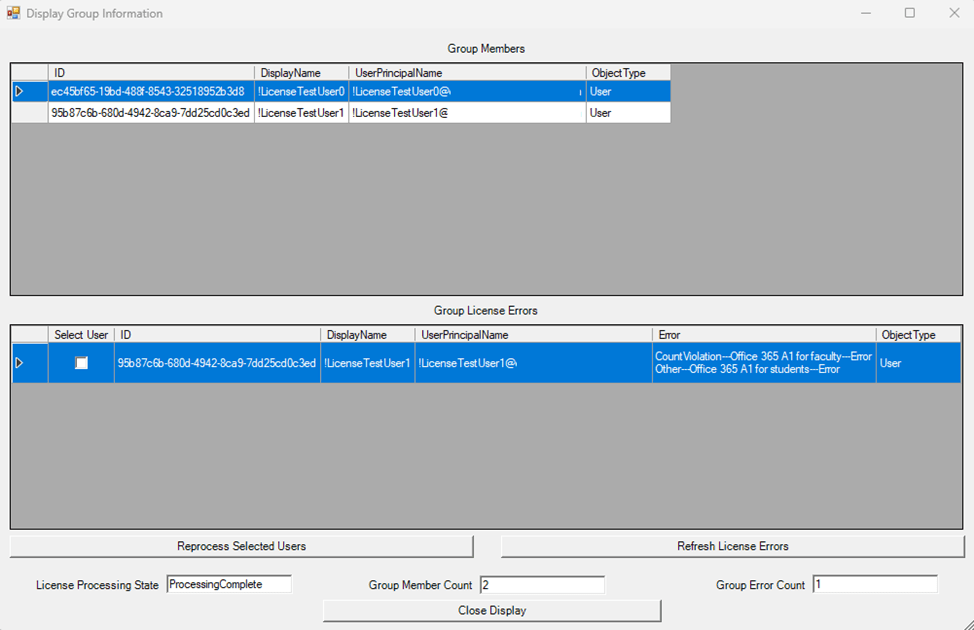
The errors column summarizes all the errors that are preventing the license assignment to the user and converts the GUIDs associated with Microsoft 365 SKUs to user readable formats. 

•	CountViolation---Office 365 A1 for Faculty---Error
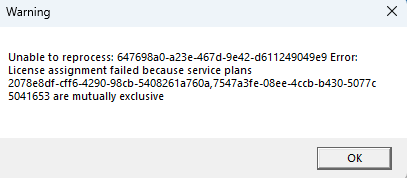
•	Other---Office 365 A1 For Students---Error

Collecting all the errors preventing license assignment makes it efficient for administrators to identify the root cause of the license assignment failure and being a reconciliation.

How to prevent a single license assignment failure from stopping other license assignment…

With the shift in architecture, it is no longer possible to have portions of the group based license apply to a user.  If the group processing the user has four licenses applied to it, all four must be successful.  This was a departure from Entra and legacy processing where a group could assign some of the licenses specified and error on others.  Is there any way to resolve this? 

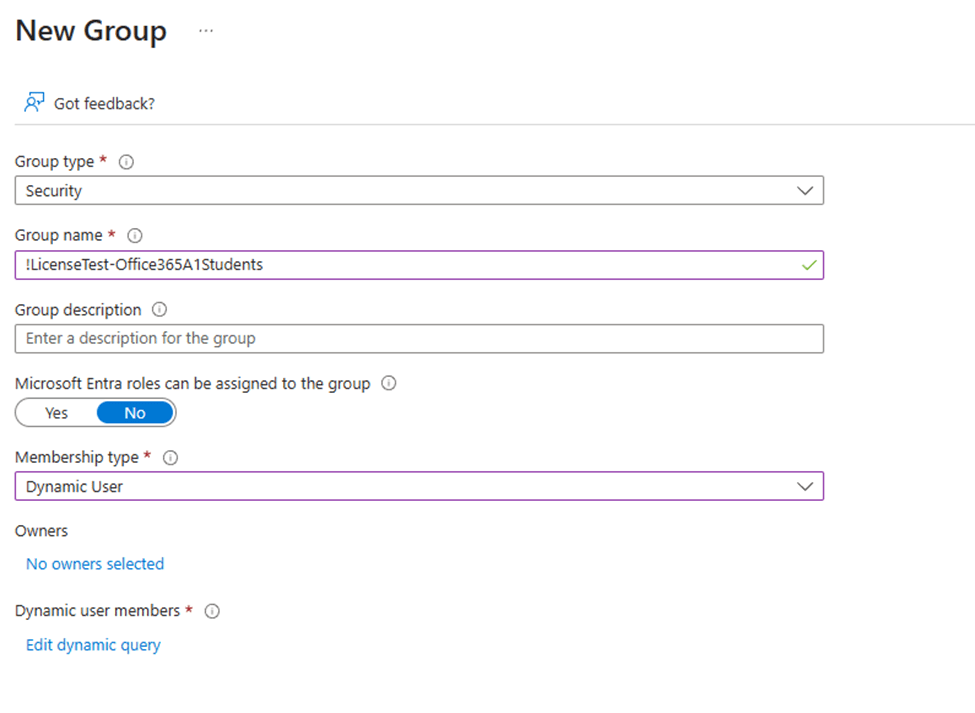
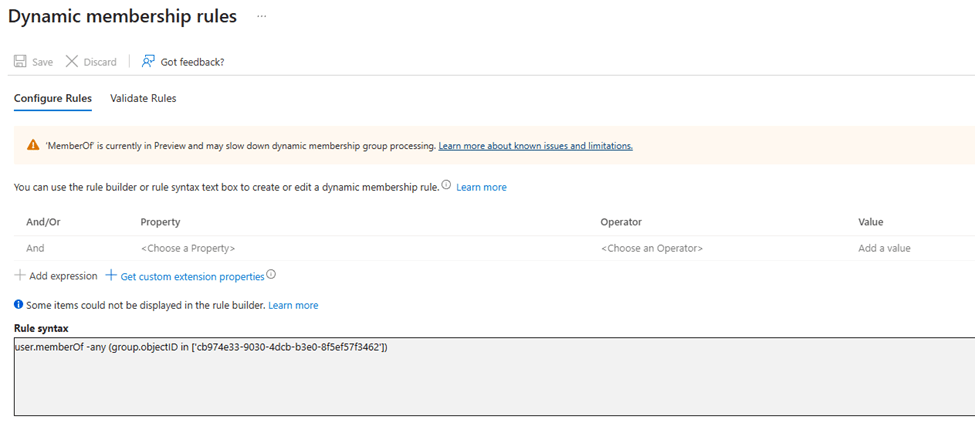
Resolving this is a matter of rethinking how license assignments are done.  One solution I have utilized uses a single group to start the license assignment but where the licenses are individually applied by other groups.  To keep the single group concept, I encourage the use of Entra dynamic groups utilizing the memberOf filter. 

Configure dynamic membership groups with the memberOf attribute in the Azure portal – Microsoft Entra ID | Microsoft Learn

Using the example that I have used previously a single license group is created !LicenseTest.  This group is where the members will be placed to receive a license.  In the EntraID Portal two dynamic groups are created, one to apply the Office 365 A1 for Faculty and the other to apply the Office 365 A1 for Students. 

Once the dynamic groups have processed their membership, they can be added to the licenses in the M365 Admin Center.  With each of the dynamic groups processing licenses individually any errors that are encountered are limited to just those groups. 

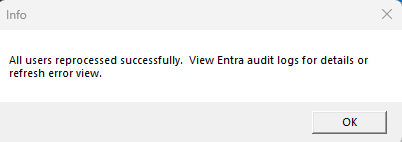
The properties of the individual user that was previously in error confirm the license successfully assigned.

Summary

Group based licensing offers a great deal of flexibility to ensure that users receive the licenses that they should.  When a group assigns multiple licenses all the licenses attached to that group must be assigned successfully in order for any licenses to be assigned.  If it becomes necessary to allow partial license assignment multiple dynamic groups can be utilized to assign individual licenses while using a single group to trigger license assignment.

GraphLicenseManager – Version 1.1.9 Updates

I recently released version 1.1.9 of GraphLicenseManager. The following features and fixes were implemented:

  • Corrected a NULL string condition when connecting to graph and utilizing the graph license manager option.
  • Corrected a condition where if the first license discovered was a single SKU + single PLAN attempting to change the licenses to a different SKU failed.
  • Provide support for client secret in addition to certificate based authentication.

Using GraphLicenseManager to report Group Based License Groups

When group based license management was available in the EntraID portal administrators had access to a variety of views for reviewing groups with licenses, their associated errors, and reprocessing users. With the move of group based licensing to the Microsoft 365 Administration Center these views have changed.

In the Microsoft 365 Administration Center there is not a single management console that shows all groups where licenses are assigned or a single summary point for group licensing errors. To review groups that assign licenses and their associated errors each SKU (License) is selected and the groups option displayed. A list of errors for each group assigning licenses is present in this view. To review the errors the group must be selected.

In version 1.1.4 of GraphLicenseManager the selected operation “Group Assignment Report” is now available.

When selecting the option Group Assignment Report the license manager will search EntraID for all groups that apply licenses. Note: This process may take some time to complete. There are no inbox filters for groups with skus assigned and all groups are enumerated. When the search has completed the group information is displayed.

The group summary view lists the group object IDs, display names, member count, any error count if users are in a license assignment error state, the friendly names of any licenses assigned, and what the group processing status is.

Selecting a group from the table enables additional options to Display Group Properties or Manage Licenses.

The display group properties selection displays the group membership and any users that are in a license assignment error state. If appropriate user permissions were selected when connecting to the license manager administrators have the ability to reprocess users that are in an error state.

The manage licenses selection displays the license management wizard. This allows you to review the licenses assigned to the group, modify license assignment on the group, and view the overall license utilization status within the organization.

When manage licenses or display group properties is selected, exiting these features returns you to the Group License Report. If changes were made the refresh button will close and re-launch the Group License Report display.

The Group License Report should give administrators a snapshot of all groups that assign licenses, their status, and easily locate groups that have license assignments to modify those assignments or review group properties and reconcile user license assignment errors.

Using GraphLicenseManager to view group members and reprocess users…

When using group based licensing errors may arise in the license assignment process. In the Microsoft 365 Administrative Center when selecting a license, expanding groups, the list of groups assigning that license are displayed along with the groups processing status.

To review the errors associated with the license assignment the group may be selected from this view. This will display the list of users that require action and provide information regarding the failure status.

In this example the license assignment is failing due to conflicting service plans. As discussed in other articles this is a common error when two license assignments are occurring and each license contains a plan that conflicts with one another. To reprocess a license assignment the users may be selected in bulk or individually and the reprocess button selected.

When reprocessing is successful the user will be removed from the actions needed dialog. If reprocessing of a user fails a red error banner is displayed.

In the M365 Admin Center when an error is encountered during reprocessing there is little diagnostic information provided as to the cause of the failure. To discover the cause of the failure the audit log entries in the Entra portal for the users must be reviewed.

In the audit log when reviewing the “change user license” activity the license error message provides the feedback necessary to understand the error.

The license can't be assigned because the user has licensed service plans that conflict with plans in the new license. Resolve these conflicting service plan pairs to solve this problem: [7547a3fe-08ee-4ccb-b430-5077c5041653, 2078e8df-cff6-4290-98cb-5408261a760a]. Licenses being added: [314c4481-f395-4525-be8b-2ec4bb1e9d91]

The current design of the M365 Admin Center does not include this verbose information requiring the administrator to utilize multiple tools to understand the nature of the failure.

In version 1.1.3 of the GraphLicenseManager the ability to review group members and reprocess individual license assignments has been added. In addition, any reprocessing failures are presented to the administrator at reprocessing time combining both reprocessing and failure assessment into the same tool.

To utilize the GraphLicenseManager to perform this work:

Set-ExecutionPolicy Unrestricted
Install-Module GraphLicenseManager
Start-GraphLicenseManager -logFolderPath c:\temp

When the GraphLicenseManager starts a logon screen is displayed to connect to Microsoft Graph. The module supports either interactive authentication or certificate based authentication.

When selecting interactive authentication, the administrator may select the scopes required to perform functions in the license manager. The default settings are the least permissions required to perform functions. When using the GraphLicenseManager to view group members, group member errors, and reprocess users the optional user permissions must be specified. Setting any user permissions will enable the option to view group membership and group processing errors. Setting user permissions to Directory.ReadWrite.All or User.ReadWrite.All will enable the reprocessing option in the group members view.

When using certificate authentication, the appropriate permissions must be assigned to the app registration created in Entra. The same permissions for interactive authentication are required for the app registration.

If no user permissions are selected the module will examine all scopes returned in the graph connection. If the scopes returned contain the necessary permissions to view group members and / or reprocess group errors those options are automatically enabled.

After completing the connection to Microsoft Graph the Group License Manager is displayed. Searching a group object id displays the licenses assigned to the group and a table of all license information within the tenant. If the necessary graph scopes are available the “View Group Info” button is enabled in the center of the manager.

Selecting the “View Group Info” button displays the “Group Information Page” Note: As this page enumerates a table of all members for review it can take some time to render the information.

The group information display shows all the members of the group, all group license errors, and basic information regarding the processing status and group statistics. In the “Group License Errors” table a user may be elected for reprocessing. If the necessary graph scopes are abled the “Reprocess Selected Users” and “Refresh License Errors” buttons are enabled.

To reprocess a user select one or more users and the reprocess selected users button.

In this example selecting a user and the reprocess option shows an error message.

This is expected since the users are in error, and nothing has been done to correct the condition. The error message provides information regarding the license plans in conflict. The guids can be searched to determine which plan and sku are generating the conflict. In this example the plans in conflict are the Yammer plans. There are multiple potential methods to resolve this issue but for the sake of this example I will simply remove the offending license.

With the conflict resolve the reprocess option may be utilized. If the license reprocessing is now successful for all users selected a success message is displayed.

To confirm that all errors on the group have been rectified the “Refresh License Errors” button is selected. This refreshes the group license errors. In this example all license errors are now clear.

I hope that by bringing together the ability to manage group licenses and group license errors into a single tool we can make the adoption and management of group-based licensing simpler and more efficient.

Using GraphLicenseManager to generate license reports…

Microsoft 365 administrators utilize a variety of tools to manage and monitor license usage and assignments. In the Microsoft 365 Admin Center administrators often review and export a list of users assigned to the different SKUs within their tenant. This is done by selecting Billing -> Licenses -> and selecting a license.

The export button allows the administrator to export to CSV the list of users assigned the license. I have recently spoken with several customers that have noticed that the export has changed the information provided. For example, in prior releases of the Microsoft 365 Admin Center the export contained the field Blocked Users (Account Enabled). This field, along with many others, are no longer present in the download offered through the portal.

With the evolving changes in the Microsoft 365 Admin Center surrounding license management and assignment the interfaces previously responsible for providing this data have been deprecated. With this deprecation arose the need to change the fields contained in the download. Unfortunately, this is not something that is administratively configured.

In order to generate the data previously available I have added functions to the GraphLicenseManager to generate the CSV files. In addition to providing some of the missing fields, I have provided an interface that allows administrators to select all single value attributes returned by get-MGUser.

To begin utilizing the GraphLicenseManager:

Set-ExecutionPolicy Unrestricted

Install-Module GraphLicenseManager

When the graph license manager is installed, the process starts with:

Start-GraphLicenseManager -logFolderPath c:\temp

The graph license manager is a combination of PowerShell and Windows Forms. When the start command is executed the login screen is displayed.

On the logon screen a TenantID is required to establish the graph connection. This can easily be obtained from the EntraID properties in the Entra Portal. To establish permissions either certificate authentication or interactive credentials may be utilized. For those interested in setting up certificate-based authentication for Microsoft Graph see:

Use Certificate Authentication for Microsoft Graph

In the selected operation drop down select “License Assignment Report”. If you are a customer in a different graph environment, use the graph environment selection dropdown to select the environment.

The license report requires a minimum of two permissions:

  • Directory Permission: Organization.Read.All
  • User Permission: User.Read

When using interactive credentials, the user may select any of the roles they qualify for. It is important to note that when establishing the graph connection if the permissions requested are not already assigned to the user an administrator may be required to provide consent to the permissions.

After selecting the authentication method, operation type, and required permissions the Connect Microsoft Graph button completes the connection.

When the connection has completed successfully the License Assignment Report wizard is displayed.

Selecting the Sku Name drop down allows the administrator to view all license assignments associated with all user skus in the tenant. The list updates dynamically with each SKU selected.

The properties dialog allows the administrator to select properties. The refresh button applies the administrator selections to the information displayed for each user.

To retain the data displayed the Export to CSV button may be utilized. When selected all data shown in the users view is exported to a CSV file within the log file directory. If exporting multiple SKUs a CSV file is created for each sku selected. NOTE: If exporting the same sku with different values any previous export for the same sku is overwritten.

When completed the exit button closes the Graph License Manager.

Using the Graph License Manager administrators can produce a variety of customized reports expanding on the information previously offered in the Microsoft 365 Admin Center.

Using graph to modify group based licenses…

Microsoft Graph provides the ability to modify licenses assigned to groups when implementing group-based licensing. The command set-MGGroupLicenses is utilized to modify the license template assigned to a group.

Set-MGGroupLicense

When creating a license template to apply or modify on the group a bodyParameters switch is utilized. Building the bodyParameters by hand can often be tricky. In this post I want to break down the structure of the bodyParameters and demonstrate how this can be built easily with Powershell.

The bodyParameters starts with a hash table that contains two array entries. The add licenses array and the remove licenses array. (Black box in figure below).

The add licenses array is an array of hash tables. (Green Box). Each hash table entry in the array is a combination of an array of plans to disable (Purple Box) and the skuID associated with those plans (Blue Box).

The remove licenses array is an array of skuIDs to remove from the group. (Red Box).

This is what the structure looks like in Microsoft’s sample documentation.

On the current group is the Office 365 A1 for Students License. This license needs to be replaced with the Microsoft 365 E5 licenses with the Information Barries and Microsoft 365 Phone System plans disabled. I also want to add the entire Microsoft 365 Defender for Office 365 (Plan 2) license.

To recap

  • Remove Licenses
    • Office 365 A1 for Students = 314c4481-f395-4525-be8b-2ec4bb1e9d91
  • Add Licenses
    • Microsoft 365 E5 = 06ebc4ee-1bb5-47dd-8120-11324bc54e06
      • Disable Microsoft 365 Phone System = 4828c8ec-dc2e-4779-b502-87ac9ce28ab7
      • Disable Information Barriers = c4801e8a-cb58-4c35-aca6-f2dcc106f287
    • Microsoft Defender for Office 365 (Plan 2) = 3dd6cf57-d688-4eed-ba52-9e40b5468c3e

To build the body parameters utilize in the set-MGGroupLicenseCommand:

#Establish the body parameters hash table.
$params = @{}

#Build the add licenses array
$addLicenses = @()

#Build the remove licenses array
$removeLicenses = @()

#************************************************************************

#Build the disabled plans for the first license to be added.

$disabledPlans = @()
$disabledPlans += "4828c8ec-dc2e-4779-b502-87ac9ce28ab7"
$disabledPlans += "c4801e8a-cb58-4c35-aca6-f2dcc106f287"

#Set the skuID for the first license.

$skuID = "06ebc4ee-1bb5-47dd-8120-11324bc54e06"

#Build the hash value for the added licenses.

$skuHash = @{"DisabledPlans" = $disabledPlans ; "SkuID" = $skuID}

#Add the skuHash to the array of licenses to add.

$addLicenses += $skuHash

#************************************************************************

#Build the second entry to the add licenses.

#Build the disabled plans for the second license to be added.

$disabledPlans = @()

#Set the skuID for the first license.

$skuID = "3dd6cf57-d688-4eed-ba52-9e40b5468c3e"

#Build the hash value for the added licenses.

$skuHash = @{"DisabledPlans" = $disabledPlans ; "SkuID" = $skuID}

#Add the skuHash to the array of licenses to add.

$addLicenses += $skuHash

#************************************************************************

#***********************
#At this time all licenses to be added have been built and added to the addArray.
#***********************

#Update the licenses to remove with the decomissioned plan.

$removeLicenses += "314c4481-f395-4525-be8b-2ec4bb1e9d91"

#***********************
#Complete the params has table.
#***********************

$params = @{"AddLicenses" = $addLicenses ; "RemoveLicenses" = $removeLicenses}

In some instances, discovering the SKU and PLAN ids utilized in the body parameters configuration can also be challenging. One of the methods I like to use to simplify process is to create a standard user in Microsoft 365 and apply the license template to the user. The license template would be the same as the template I want to assign to the group. The user can then be utilized as a template for completing the body parameters build.

#Obtain the user that has the license template to be applied.

$licenseTemplateUser = get-mgUser -userID licenseTest@domain.onmicrosoft.com -Property AssignedLicenses

#Establish the body parameters hash table.
$params = @{}

#Build the add licenses array
$addLicenses = @()

#Build the remove licenses array
$removeLicenses = @()

#************************************************************************

#Build the licenses to be added.

foreach ($sku in $licenseTemplateUser.AssignedLicenses)
{
    write-host ("Processing skuID: "+$sku.skuID)

    #Set the SKUID

    $skuID = $sku.skuID

    if ($sku.disabledPlans.count -gt 0)
    {
        write-host "The sku has disabled plans - creating disabled plans."

        foreach ($plan in $sku.disabledPlans)
        {
            write-host $plan
            $disabledPlans+=$plan
        }
    }
    else
    {
        $disabledPlans=@()
    }

    #Build the hash for the sku.

    $skuHash = @{"DisabledPlans" = $disabledPlans ; "SkuID" = $skuID}

    #Add the has to the add licenses array.

    $addLicenses += $skuHash
}

#Set any licenses to be removed.

$removeLicenses += "314c4481-f395-4525-be8b-2ec4bb1e9d91"

#***********************
#Complete the params has table.
#***********************

$params = @{"AddLicenses" = $addLicenses ; "RemoveLicenses" = $removeLicenses}

I hope that outlining the structure of the bodyParameters simplifies utilizing graph for group based license administration.

Request to change a users password…

EntraID provides methods for administrators to enable end users to manage and reset their passwords utilizing Microsoft cloud services. This feature is known as Self Service Password Reset.

Users may begin the password reset process by directly accessing the password reset URL. Microsoft Online Password Reset

The password reset process starts by requesting the user provide their sign on name and complete a character validation.

When the form is completed the next button allows the user to proceed with the process. If the account is valid, enabled for self-service password reset, and meets the authentication methods requirements for the feature the process will continue. If for some reason the users account information cannot be validated, for example they are not enabled for self-service password reset or the user has not proofed up authentication methods that would allow for self-service password reset, the following screen is displayed.

In this dialog the user has the option to “contact an administrator”. When this option is selected the process concludes with the following dialog.

When this option is selected, an email is generated to administrators of the tenant informing them of the request to reset the password. On the surface this email looks highly suspicous.

When the email is received by administrators there are often questions regarding the validity and authenticity. Here are some methods to review the email for ligitimacy.

Review the message header for basic antispam evaluation. For example, errors in the SPF record evaluation or DKIM signing of the message.

4Authentication-Resultsspf=pass (sender IP is 40.93.12.1) smtp.mailfrom=microsoftonline.com; dkim=pass (signature was verified) header.d=microsoftonline.com;dmarc=pass action=none header.from=microsoftonline.com;compauth=pass reason=100

See Anti-spam message headers in Microsoft 365 for more information on interpreting message headers in Microsoft 365.

The EntraID audit logs for the user account may also shed light into the validity of this email. When a user enters the password reset process, if the username is valid, entries are generated in the EntraID audit log.

This entry provides information that the user entered the flow and provided a user name.

Date10/16/2024, 12:59 PM
Activity TypeSelf-service password reset flow activity progress
Correlation IDc6aa42ec-e2d9-4315-8bed-3fe5953def80
CategoryUserManagement
Statussuccess
Status reasonUser submitted their user ID
User Agent
TypeUser
Display Name
Object IDcd7a9aeb-f5b2-494e-b72e-7ae6d8d1af16
IP address20.110.218.7
User Principal NameUPN

The next event in the audit log shows the source of the contact administrator dialog. In this case the user account had insufficient authentication methods to allow the user to perform their own reset. There could be other failure categories here that lead to the contact administrator dialog – this is just one.

Date10/16/2024, 12:59 PM
Activity TypeSelf-service password reset flow activity progress
Correlation IDc6aa42ec-e2d9-4315-8bed-3fe5953def80
CategoryUserManagement
Statusfailure
Status reasonUser’s account has insufficient authentication methods defined. Add authentication info to resolve this
User Agent
TypeUser
Display Name
Object IDcd7a9aeb-f5b2-494e-b72e-7ae6d8d1af16
IP address20.110.218.7
User Principal NameUPN

The audit log information should be helpful in determining not only if the email received is legitimate but also if the end user themselves triggered the password reset workflow.

If the information in the audit log and the message header checks out the legitimacy of the message maybe verified.

==================

Entire email contents below for parsing.

==================

Request to reset user’s password

The following user in your organization has requested a password reset be performed for their account:

  • UsageLocation@domain.onmicrosoft.com
  • First Name:
  • Last Name:

Consider contacting this user to validate this request is authentic before continuing.

If you have determined that this is a valid request, use your service’s admin portal (Office 365, Windows Intune, Windows Azure, etc.) to reset the password for this user.

Want to let you users reset their own passwords? Check out how you can enable password reset for users in your organization with just a few clicks.

Sincerely,

E-McMichael

==================

Entra / Azure: Searching for Microsoft IP Addresses

In a previous post I outlined a script that allows administrators to search for Microsoft 365 IP and URLs. As with Microsoft 365, Entra services also publish a list of IP addresses, and their service descriptions associated with each IP space.

Unlike Microsoft 365 the JSON files that contain this information are not made available through a web service. The files are made available through the Microsoft download catalog.

I have recently published a PowerShell module to the PowerShell gallery that automates the downloading of the Entra JSON files. Once the files have been downloaded, they may be utilized with the Office365IPAddresses script to locate an IP address within Entra services.

The AzureIPAddress script requires PowerShell 5.1. This is due to the methods utilized to capture the JSON files. To utilize the script open PowerShell 5.1 and run the following commands:

Install-Script AzureIPAddress
AzureIPAddress.ps1 -logFolderPath c:\temp

The script will locate the downloads for both Public and Government clouds and download the associated JSON files. They are placed in the logging directory in a folder called AzureIPAddress. In this example the folder is c:\temp\AzureIPAddress. (NOTE: The same log folder path must be utilized with the Office365IPAddress script in order to locate the Azure json files.)

To search for an IP address the Office365IPAddress script is utilized. Why is this not just included in the AzureIPAddress script? The ability to parse IPv4 and IPv6 addresses is more easily achieved with PowerShell 7. The same commands utilized in Office365IPAddress are not available in PowerShell 5.1. The commands in AzureIPAddress to download and parse the HTML files necessary to locate the JSON files are not available in PowerShell 7. I could have gotten creative and try to call PowerShell 7 from PowerShell 5.1 or vice versa, but that just adds potential complications. Keeping the script command separate but creating a dependency between them simplifies the process.

To search for the IP address run the following commands:

Install-Script Office365IPAddress
Install-Module PSWriteHTML
Office365IPAddress.ps1 -IPAddressToTest "52.247.151.193" -logFolderPath c:\temp -IncludeAzureSearch:$TRUE

During command execution all IP spaces associated with all Entra services in Public and Government cloud are searched. If the IP address is located in any service, the service information is logged and exported to XML. The log and XML file are contained in the specified log directory. An HTML file is also generated and displayed that provides the same information graphically for review.

If the IP address specified co-exists in any Microsoft 365 services, the service information is also displayed in the output.

This script should allow administrators to map IP addresses to Entra services.

Office 365 – Distribution List Migrations – Part 42

Increasing the success of Distribution List Migrations

When migrating a distribution list to Office 365 the DLConversionV2 module implements a normalization process for all recipients that are members of the distribution list.

The normalization process attempts to convert the recipient from an Active Directory object to an Exchange Online object. The goal of the normalization process is to ensure that we locate the correct recipient in Exchange Online when creating the distribution list and eliminate ambiguous recipient discovery. If an ambiguous recipient is located in Exchange Online this can lead to a migration failure and require the administrator to correct the condition post migration.

When a user is encountered on the properties of a distribution list being migrated the user is normalized by using the attribute msDS-ExternalDirectoryObjectID. In an Entra Connect Sync environment the msDS-ExternalDirectoryObjectID is populated with the value User_ExternalDirectoryObjectID. The ExternalDirectoryObjectID is the objectID associated with the user in EntraID. This same value is also stamped on all Exchange Online objects in the attribute ExternalDirectoryObjectID.

msDS-ExternalDirectoryObjectID = Entra ObjectID = Exchange Online ExternalDirectoryObjectID

PS C:\> Get-ADUser "DistinguishedName" -Properties msDS-ExternalDirectoryObjectID


DistinguishedName              : DistinguishedName
Enabled                        : False
GivenName                      :
msDS-ExternalDirectoryObjectID : User_8ac654f2-2125-4252-b9b0-d2219b9bb395
Name                           : Name
ObjectClass                    : user
ObjectGUID                     : ObjectGUID
SamAccountName                 : SamAccountName
SID                            : SID
Surname                        :
UserPrincipalName              : UserPrincipalName

When searching Exchange Online using the get-recipient command (or any similar get command) the ExternalDirectoryObjectID can be utilized as a recipient identifier.

In a default Entra Connect installation the attribute msDS-ExternalDirectoryObjectID is written back to Active Directory only on User object types. Groups and Contacts do not have the same attribute written back. When performing a migration if a Contact or Group is encountered the recipients are normalized to their Exchange Online counterparts through the object PrimarySMTPAddress. When locating recipients in Exchange Online get-recipient returns results for all objects that match the identifier specified. If a group has the PrimarySMTPAddress of group@contoso.com and a contact has a target address of group@contoso.com get-recipient will return two objects when specifying get-recipient -identity group@contoso.com. During a migration this can lead to a failure as more than object is returned when attempting to perform normalization.

To increase the efficiency of migrations and eliminate possible failures it is possible to enable writeback of the attribute msDS-ExternalDirectoryObjectID to both Contacts and Groups. Why is this not the default? When the writeback rules were created the goal was to optimize the number of changes written back to Active Directory. A decision was made to only populate this value on User objects as that is where it would most commonly be practical to have it. When writing back the same attribute to Groups and Contacts this allows the normalization process to extract the exact matching recipient in Exchange Online.

Migrators wishing to implement this efficiency may refer to a script published to the Powershell Gallery -> EnableCloudAnchor. This script allows administrators to create the necessary writeback rules in Entra Connect Sync to enable msDS-ExternalDirectoryObjectID on Contacts and Groups. When the script is executed two rules are created for each object type. The first rule is enabled and translates the EntraID value CloudAnchor to the msDS-ExternalDirectoryObjectID attribute. The second rule is created disabled and enables undoing all attributes written back by the script. This ensures that an undo operation is pre-staged should a rollback be necessary.

The script has several parameters to be specified:

  • ForestRootFQDN: This is the Active Directory forest root FQDN. This is utilized to locate the connector to enable writeback on.
  • StartingPrecedence: This is the starting precedence value for rule creation and must be specified as a value 0 – 99. For example, specifying a value of 25 will create the writeback rule at precedence 25 and the undo rule at precedence 26. This value is option. If not specified, the script will automatically locate the least two precedence available and automatically use them.
  • EnableContactProcessing: This enables rule creation for contacts and is the default for script execution. If enabling the rules for groups this value must be set to false.
  • EnableGroupProcessing: This enables rule creation for groups and by default is disabled. If this feature is enabled enableContactProcessing must be set to false.
  • LogFolderPath: The location of where script logging should occur.

To utilize the script on the Entra Connect server:

Install-Script EnableCloudAnchor

To create the rules for contacts utilizing auto discovered precedence:

EnableCloudAnchor.ps1 -forestRootFQDN contoso.local -logFolderPath c:\temp

To create the rules for contacts utilizing an administrator provided precedence:

EnableCloudAnchor.ps1 -forestRootFQDN contoso.local -startingPrecedence 24 -logFolderPath c:\temp

To create the rules for groups utilizing an auto discovered precedence:

EnableCloudAnchor.ps1 -forestRootFQDN contoso.local -enableContactProcessing:$FALSE -enableGroupProcessing:$TRUE -logFolderPath c:\temp

In Entra Connect the following rule is created to enable writeback of the cloud anchor attribute (only the relevant screens are displayed):

The following rule is also created in a disabled state to allow undoing the writeback operations:

If the need arises to undo the writeback the first rule would be deleted or placed into a disabled state. The disabled state flag would be unchecked on the second rule. The AuthoritativeNull value is utilized to clear an attribute entirely.

NOTE: Any modification to the rules in Entra Connect Sync will require a full synchronization to occur on the connector associated with the forest specified. This may add significant time to a synchronization option.

When the rules have successfully processed on an object the value Contact_ExternalDirectoryObjectID or Group_ExternalDirectoryObjectID may be found on the objects.

PS C:\> Get-ADObject DistinguishedName


DistinguishedName              : DistinguishedName
msDS-ExternalDirectoryObjectID : Contact_76b9cf05-510c-4fcc-a1f8-58e4cada17a6
Name                           : Name
ObjectClass                    : contact
ObjectGUID                     : ObjectGUID

When adding the msDS-ExternalDirectoryObjectID to Active Directory objects the normalization process may more accurately identify recipients in Exchange Online increasing the efficiency and success of migrations.