Featured post
Office 365 – Distribution List Migration – Version 2.0 – Table of Contents
Leave a reply
Microsoft 365 supports enabling password expiration through the Microsoft 365 admin center. Information on managing the password expiration and notifications settings can be found at Set the password expiration policy for your organization – Microsoft 365 admin | Microsoft Learn.
When using the Microsoft 365 Admin Center to manage password expiration settings the administrator has the option to set password to never expire (recommended) or set the password expiration to a set number of days. The acceptable values for password expiration range from 1 to 730.
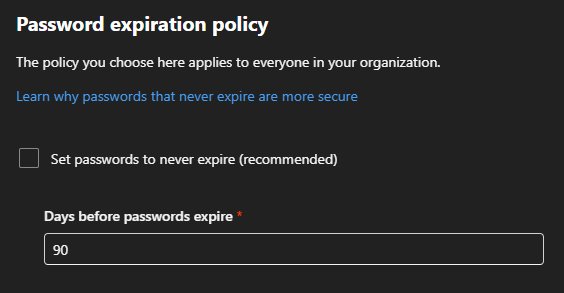
The settings in the administration center do not allow an administrator to adjust the values on a per domain basis even though this is where the password expiration value is stored. For more information on the relationship between password policies, authentication, and domains settings see Domain Authentication, User Settings, and Entra PasswordPolicies | TIMMCMIC.
When an expiration value is adjusted in the Microsoft 365 Admin Center a background process steps through each non-federated root domain and sets the password expiration values as specified in the portal. Note: Microsoft has recently received several escalations from customers indicating that this process is silently failing on larger domain counts. Please validate that the settings were successfully applied when using this feature.
The policy is not reapplied after certain domain settings are adjusted including
The most reliable method to manage the password expiration settings in Microsoft 365 is the use of Microsoft Graph. To assist in this process the M365DomainMgmt module includes a command Start-M365DomainPasswordExpirationManagement.
This command allows administrators the flexbility to:
In addition to options to enable password expiration the command also supports disabling password expiration either on all domains or administrator specified domains.
See M365DomainMgmt: A PowerShell module for assisting domain management in Microsoft 365 (Part 1) | TIMMCMIC sections “Installing the M365DomainMgmt Module” and “M365DomainMgmt and Microsoft Graph” for instructions on how to install the module and Microsoft Graph authentication prerequisites.
The minimum parameter set to run:
The optional parameter set to run:
Example 1: Set password expiration to 90 days for all domains including onmicrosoft.com domains in a global tenant using interactive authentication:
Start-M365DomainPasswordExpirationManagement -logFolderPath c:\temp -msGraphEnvironmentName "Global" -msGraphTenantID "Your Azure Tenant ID" -enableOrDisable "Enable" -expirationDays 90 -includeOnMicrosoftDomains:$TRUE -allDomains:$TRUE
Example 2: Set password expiration to 90 days for all domains including onmicrosoft.com domains in a GCC High tenant using interactive authentication:
Start-M365DomainPasswordExpirationManagement -logFolderPath c:\temp -msGraphEnvironmentName "USGov" -msGraphTenantID "Your Azure Tenant ID" -enableOrDisable "Enable" -expirationDays 90 -includeOnMicrosoftDomains:$TRUE -allDomains:$TRUE
Example 3: Set password expiration to 90 days for all domains including onmicrosoft.com domains in a Global tenant using certificate authentication:
Start-M365DomainPasswordExpirationManagement -logFolderPath c:\temp -msGraphEnvironmentName "USGov" -msGraphTenantID "Your Azure Tenant ID" -msGraphCertificateThumbPrint "ThumbPrint" -msGraphApplicationID "Application GUID" -enableOrDisable "Enable" -expirationDays 90 -includeOnMicrosoftDomains:$TRUE -allDomains:$TRUE
Example 4: Set password expiration to 90 days for all domains including onmicrosoft.com domains in a Global tenant using client secret authentication:
Start-M365DomainPasswordExpirationManagement -logFolderPath c:\temp -msGraphEnvironmentName "USGov" -msGraphTenantID "Your Azure Tenant ID" -msGraphClientSecret "ClientSecret" -msGraphApplicationID "Application GUID" -enableOrDisable "Enable" -expirationDays 90 -includeOnMicrosoftDomains:$TRUE -allDomains:$TRUE
Example 5: Set password expiration to 90 days for all domains excluding onmicrosoft.com domains in a Global tenant using interactive authentication:
Start-M365DomainPasswordExpirationManagement -logFolderPath c:\temp -msGraphEnvironmentName "Global" -msGraphTenantID "Your Azure Tenant ID" -enableOrDisable "Enable" -expirationDays 90 -allDomains:$TRUE
Example 6: Set password expiration to 90 days for specific domains in a Global tenant using interactive authentication:
Start-M365DomainPasswordExpirationManagement -logFolderPath c:\temp -msGraphEnvironmentName "Global" -msGraphTenantID "Your Azure Tenant ID" -enableOrDisable "Enable" -expirationDays 90 -domainsToModify "Domain1.com,Domain2.com,Domain3.com"
Example 7: Set password expiration to 90 days for specific domains in a Global tenant using interactive authentication (alternate method):
$domains = @()$domains += "domain1.com"$domains += "domain2.com"$domains += "domain3.com"Start-M365DomainPasswordExpirationManagement -logFolderPath c:\temp -msGraphEnvironmentName "Global" -msGraphTenantID "Your Azure Tenant ID" -enableOrDisable "Enable" -expirationDays 90 -domainsToModify $domains
Example 1: Disable for all domains including onmicrosoft.com domains in a global tenant using interactive authentication:
Start-M365DomainPasswordExpirationManagement -logFolderPath c:\temp -msGraphEnvironmentName "Global" -msGraphTenantID "Your Azure Tenant ID" -enableOrDisable "Disable" -includeOnMicrosoftDomains:$TRUE -allDomains:$TRUE
Example 2: Disable password expiration for all domains including onmicrosoft.com domains in a GCC High tenant using interactive authentication:
Start-M365DomainPasswordExpirationManagement -logFolderPath c:\temp -msGraphEnvironmentName "USGov" -msGraphTenantID "Your Azure Tenant ID" -enableOrDisable "Disable" -includeOnMicrosoftDomains:$TRUE -allDomains:$TRUE
Example 3: Disable password expiration for all domains including onmicrosoft.com domains in a Global tenant using certificate authentication:
Start-M365DomainPasswordExpirationManagement -logFolderPath c:\temp -msGraphEnvironmentName "USGov" -msGraphTenantID "Your Azure Tenant ID" -msGraphCertificateThumbPrint "ThumbPrint" -msGraphApplicationID "Application GUID" -enableOrDisable "Disable" -includeOnMicrosoftDomains:$TRUE -allDomains:$TRUE
Example 4: Disable password expiration for all domains including onmicrosoft.com domains in a Global tenant using client secret authentication:
Start-M365DomainPasswordExpirationManagement -logFolderPath c:\temp -msGraphEnvironmentName "USGov" -msGraphTenantID "Your Azure Tenant ID" -msGraphClientSecret "ClientSecret" -msGraphApplicationID "Application GUID" -enableOrDisable "Disable" -includeOnMicrosoftDomains:$TRUE -allDomains:$TRUE
Example 5: Disable password expiration for all domains excluding onmicrosoft.com domains in a Global tenant using interactive authentication:
Start-M365DomainPasswordExpirationManagement -logFolderPath c:\temp -msGraphEnvironmentName "Global" -msGraphTenantID "Your Azure Tenant ID" -enableOrDisable "Disable" -allDomains:$TRUE
Example 6: Disable password expiration for specific domains in a Global tenant using interactive authentication:
Start-M365DomainPasswordExpirationManagement -logFolderPath c:\temp -msGraphEnvironmentName "Global" -msGraphTenantID "Your Azure Tenant ID" -enableOrDisable "Disable" -domainsToModify "Domain1.com,Domain2.com,Domain3.com"
Example 7: Disable password for specific domains in a Global tenant using interactive authentication (alternate method):
$domains = @()$domains += "domain1.com"$domains += "domain2.com"$domains += "domain3.com"Start-M365DomainPasswordExpirationManagement -logFolderPath c:\temp -msGraphEnvironmentName "Global" -msGraphTenantID "Your Azure Tenant ID" -enableOrDisable "Disable" -domainsToModify $domains
When running the command the following potential errors may occur:
At the conclusion of each operation that is run an HTML file summary is generated for administrator review. The HTML summary includes the domain to be modified, the original value of the expiration period, the new value of the expiration period, and an errors column that demonstrates if any errors occuring during the operation.
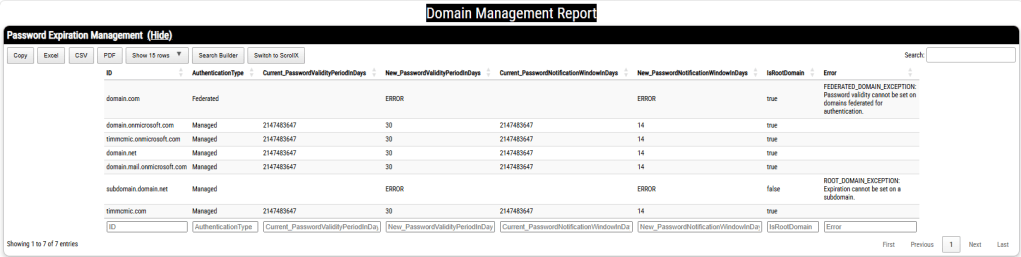
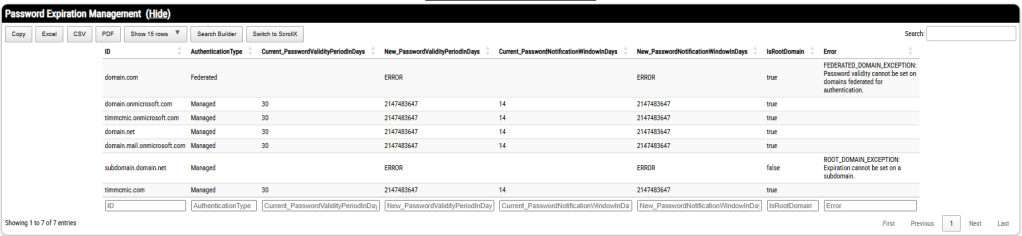

The Microsoft 365 Administration Center allows administrators to manage domains. Administrators also have the ability to move DNS namespace hosting to Microsoft 365 allowing for the creation of DNS records for external name resolution.
The onmicrosoft.com domain is automatically enabled for DNS records management in the M365 admin center. Navigating to settings, domains, and selecting the onmicrosoft.com domain accesses the properties of the domain. Selecting the DNS records option provides the management interface for creating and deleting DNS records.
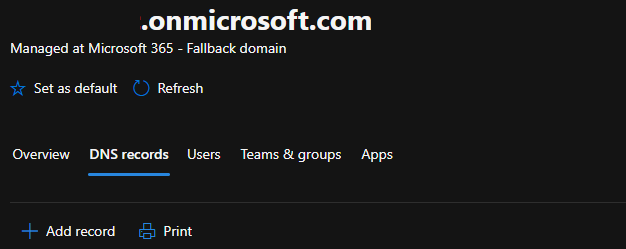
The M365 Admin centers DNS records management for onmicrosoft.com domains only allow the addition of txt record types.
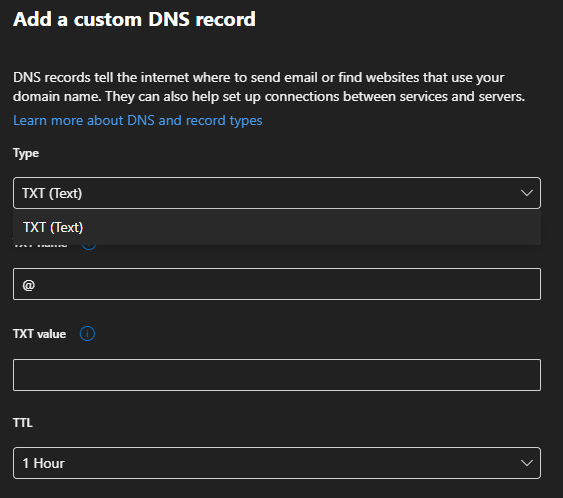
When creating a txt record in the onmicrosoft.com domain, not all txt record types are supported. If you attempt to add a txt record which is blocked for use on the onmicrosoft.com domain the following error is displayed:

“You cannot manage this record for the initial domain or one of its subdomains.”
The above error confirms that the value you are attempting to add for the text record is blocked. If a record is blocked, and is required for use with a third-party service, the third party may need to change the value of that record in order to integrate with Microsoft 365 services.
The Microsoft 365 admin center provides administrators the ability to add domains to Microsoft 365 tenants.
The M365DomainMgmt PowerShell module provides administrators a wrapper for Microsoft Graph to walk them through the domain addition. In M365DomainMgmt: A PowerShell module for assisting domain management in Microsoft 365 (Part 1) I outlined how the module can be utilized to add the domain, provide and validate the presence of public dns records, and validate the domain in a single operation. (M365DomainMgmt: A PowerShell module for assisting domain management in Microsoft 365 (Part 1) | TIMMCMIC)
There may be scenarios where administrators wish to add the domain but proceeding with verification immediately is not possible. For example, external DNS is managed by another team within the organization, and it may take some time after adding the domain and providing the external DNS records for those records to be available.
See M365DomainMgmt: A PowerShell module for assisting domain management in Microsoft 365 (Part 1) | TIMMCMIC sections “Installing the M365DomainMgmt Module” and “M365DomainMgmt and Microsoft Graph” for instructions on how to install the module and Microsoft Graph authentication prerequisites.
Example #1: Leverage interactive authentication to a global tenant
Start-M365DomainManagement -logFolderPath c:\temp -msGraphEnvironmentName "Global" -msGraphTenantID "EntraTenantIDAsGUID"
Example #2: Leveraging client secret authentication to a global tenant
Start-M365DomainManagement -logFolderPath c:\temp -msGraphEnvironmentName "Global" -msGraphTenantID "EntraTenantIDAsGUID" -msGraphClientSecret "ClientSecret" -msGraphApplicationID "EntraRegisteredAppID"
Example #3: Leverage certificate authentication to a global tenant
Start-M365DomainManagement -logFolderPath c:\temp -msGraphEnvironmentName "Global" -msGraphTenantID "EntraTenantIDAsGUID" -msGraphCertificateThumbprint "CertificateThumbprint" -msGraphApplicationID "EntraRegisteredAppID"
Example #4: Leveraging client secret authentication to a GCC High tenant
Start-M365DomainManagement -logFolderPath c:\temp -msGraphEnvironmentName "USGov" -msGraphTenantID "EntraTenantIDAsGUID" -msGraphClientSecret "ClientSecret" -msGraphApplicationID "EntraRegisteredAppID"
Example #5: Leverage interactive authentication, specify the domain name and operation to bypass interactive prompts.
Start-M365DomainManagement -logFolderPath c:\temp -msGraphEnvironmentName "Global" -msGraphTenantID "EntraTenantIDAsGUID" -domainName "domain.com" -domainOperation "NewWOConfirm"
The M365DomainMgmt module starts the domain addition process by validating the state and version of dependent PowerShell modules and noting their versions in the log file.
If a domain and domain operation are not specified as a part of the command execution a list of supported operations is provided and the desired operation is selected by number.
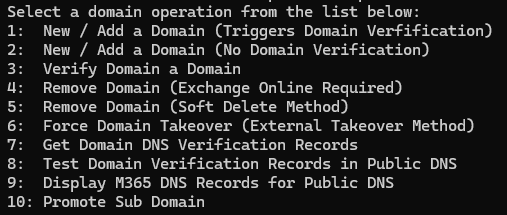
This blog post covers option 2 – New / Add Domain (No Domain Verification)
If a domain and domain operation are not specified as part of the command execution the administrator is prompted to provide the domain name interactively. Providing the domain name and pressing enter continues the commands progression.

The command progresses by performing the following operations
If the domain has been successfully added to the tenant the next step is providing the administrators with the DNS verification records for domain validation. Each domain added to a Microsoft 365 tenant has unique verification records. Both a TXT record and MX record are supplied for validation but only one record is required in external DNS for validation.

Pressing the enter key after recording the DNS validation records completes the operation.
The M365DomainMgmt module records all operation and their results to the log file created in the directory specified. The log file directory also contains all exports of Microsoft 365 object states to XML files. To allow the administrator a more accessible method of interpreting results, an HTML file is created that contains all pertinent information to the domain addition process.

This section provides the DNS verification records for external DNS.

This section provides the domain information exported after the domain was successfully found in Microsoft 365 or successfully added to Microsoft 365.

The same PowerShell module may be utilized to complete the domain verification process. Refer to M365DomainMgmt: A PowerShell module for assisting domain management in Microsoft 365 (Part 1) | TIMMCMIC which outlines option 1 to perform health checks and verification.
If you require Microsoft Support, you may open a case within the M365 admin center from the tenant where you are attempting to add the domain. If an error is encountered in the domain addition and verification process, a zip file of all diagnostic information is created automatically for you in the log file directory. This zip file contains the basic information that Microsoft Support may utilize to assist in diagnosing the domain addition failure as well as engage our engineering team for analysis should that become necessary.
The Microsoft 365 admin center provides administrators the ability to add domains to Microsoft 365 tenants. In some cases the addition operations fail, the validation option fails, or other issues are encountered when adding the domain through this administrative interface.
The M365DomainMgmt PowerShell module provides administrators a wrapper for Microsoft Graph to walk them through the domain addition and verification process. The module provides specific health checking functions when executing to highlight potential issues with adding or verifying the domain and in some cases, self-help options to remediate those issues without contacting Microsoft support.
To utilize this PowerShell module first install the module from the PowerShell Gallery.
Install-Module M365DomainMgmt
If the module is already installed or to ensure that you are running the latest version you may also run an update from the PowerShell Gallery
Update-Module M365DomainMgmt
The M365DomainMgmt module depends on Microsoft Graph in order to function. Currently the module supports WAM based interactive authentication, certificate authentication through a registered application id, or client secret authentication through a registered application id. You will need to determine the most appropriate method to connect to Microsoft Graph in order to proceed. The minimum and maximum graph scopes required for domain management is Domain.ReadWrite.All and is requested automatically by the PowerShell module. If using a registered application id where this scope is not consented to prior to execution the module will fail and provide feedback. If using interactive authentication where this scope is not consented to prior to execution the user will be prompted to consent and must have permissions to consent in order to proceed.
An example of how to establish an application ID supporting client secret authentication and the Domain.ReadWrite.All graph scope may be found here: Graph and Client Secret Authentication | TIMMCMIC
In addition to determining the type of graph authentication that will be utilized the module also requires specifying the graph environment for your connection and your entra tenant ID to ensure connections are made to the appropriate tenant.
Example #1: Leverage interactive authentication to a global tenant
Start-M365DomainManagement -logFolderPath c:\temp -msGraphEnvironmentName "Global" -msGraphTenantID "EntraTenantIDAsGUID"
Example #2: Leveraging client secret authentication to a global tenant
Start-M365DomainManagement -logFolderPath c:\temp -msGraphEnvironmentName "Global" -msGraphTenantID "EntraTenantIDAsGUID" -msGraphClientSecret "ClientSecret" -msGraphApplicationID "EntraRegisteredAppID"
Example #3: Leverage certificate authentication to a global tenant
Start-M365DomainManagement -logFolderPath c:\temp -msGraphEnvironmentName "Global" -msGraphTenantID "EntraTenantIDAsGUID" -msGraphCertificateThumbprint "CertificateThumbprint" -msGraphApplicationID "EntraRegisteredAppID"
Example #4: Leveraging client secret authentication to a GCC High tenant
Start-M365DomainManagement -logFolderPath c:\temp -msGraphEnvironmentName "USGov" -msGraphTenantID "EntraTenantIDAsGUID" -msGraphClientSecret "ClientSecret" -msGraphApplicationID "EntraRegisteredAppID"
Example #5: Leverage interactive authentication, specify the domain name and operation to bypass interactive prompts.
Start-M365DomainManagement -logFolderPath c:\temp -msGraphEnvironmentName "Global" -msGraphTenantID "EntraTenantIDAsGUID" -domainName "domain.com" -domainOperation "New"
Example #6: Utilize a custom dns server for external dns queries.
Start-M365DomainManagement -logFolderPath c:\temp -msGraphEnvironmentName "Global" -msGraphTenantID "EntraTenantIDAsGUID" -customDNSServer 1.1.1.1
The M365DomainMgmt module starts the domain addition process by validating the state and version of dependent PowerShell modules and noting their versions in the log file.
If a domain and domain operation are not specified as a part of the command execution a list of supported operations is provided and the desired operation is selected by number.
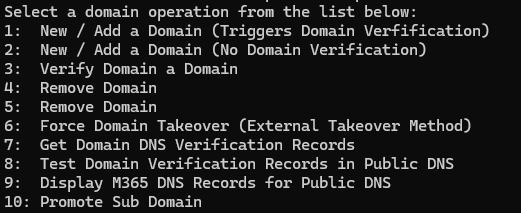
This blog post covers option 1 – New / Add a Domain (Triggers Domain Verification)
If a domain and domain operation are not specified as part of the command execution the administrator is prompted to provide the domain name interactively. Providing the domain name and pressing enter continues the commands progression.
The command progresses by performing the following operations
If the domain has been successfully added to the tenant the next step is providing the administrators with the DNS verification records for domain validation. Each domain added to a Microsoft 365 tenant has unique verification records. Both a TXT record and MX record are supplied for validation but only one record is required in external DNS for validation.
The command assumes that the administrator will be placing these records in external DNS immediately. When the records have been confirmed committed to external DNS pressing enter continues the domain verification operation.
Here is an example of placing the TXT verification record in a GoDaddy DNS hosted domain.

Pressing enter continues the domain verification process. The domain verification process continues by having the module query the DNS servers configured on the host machine for the presence of the DNS text record. If the DNS verification records are not found an error is displayed.

The command sleeps for 5 minutes and checks an additional 30 minutes for the presence of the DNS verification records.

If the DNS verification records are not found within 30 minutes the command errors and provides feedback to the administrator. Note: The amount of time for public DNS records to replicate may not occur within this 30-minute window. The command can be rerun selecting option 1 to repeat the verification process after manually verifying the records are present in external DNS. If internal DNS forwarders or caching prevent discovery of newly created DNS records specifying a -customDNSServer and a known accessible external resolver may allow this test to complete successfully.
With DNS record validation completed the domain verification process is finalized. This process entails:
The M365DomainMgmt module records all operation and their results to the log file created in the directory specified. The log file directory also contains all exports of Microsoft 365 object states to XML files. To allow the administrator a more accessible method of interpreting results, an HTML file is created that contains all pertinent information to the domain addition and verification process.

This section provides the DNS verification records for external DNS.
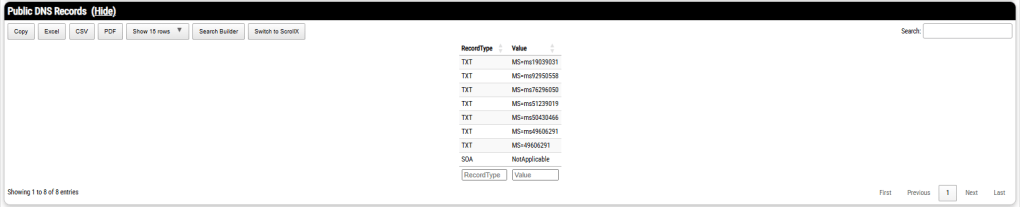
This section provides the public DNS records discovered during the last external DNS query. This is the information that was utilized for the evaluation of the dns verification records.
This section provides the domain information exported after the domain was successfully found in Microsoft 365 or successfully added to Microsoft 365.

This section provides the domain information exported after the domain was successfully verified. This confirms that the domain addition process succeeded and the domain is available for use in Microsoft 365.

This table provides the DNS records from Microsoft 365 that administrators may place in external dns to adopt Microsoft 365 services. Note: Your dns records may vary if you are utilizing third party mx services or if you are in a hybrid environment hosting mailboxes in on premises installations.
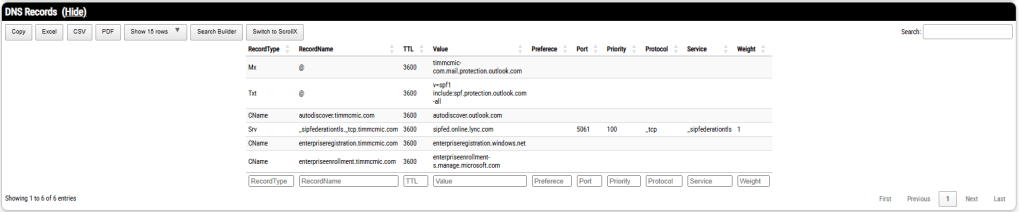
This list provides domain information regarding unmanaged or viral tenants. This information is helpful in assisting Microsoft support in situations where domain validation does not succeed successfully.

If you require Microsoft Support, you may open a case within the M365 admin center from the tenant where you are attempting to add the domain. If an error is encountered in the domain addition and verification process, a zip file of all diagnostic information is created automatically for you in the log file directory. This zip file contains the basic information that Microsoft Support may utilize to assist in diagnosing the domain addition failure as well as engage our engineering team for analysis should that become necessary.
In a previous blog post, I wrote about the group-based licensing model being an all or none proposition.
Group Based Licensing – an all or none proposition… | TIMMCMIC
When I wrote this post the majority of escalations I was receiving were had a common theme. A group assigned more than one licenses and one of the licenses in the group had no more available licenses.
Recently, I’ve received several escalations where the symptoms are the same but the circumstances are different. A review of the audit logs associated with the users who fail to receive a license indicates that not enough licenses exist. The failure though is not that the license is valid with zero licenses, but one of the licenses on the group is in a suspended or warning status.
Customers may, during a renewal, upgrade the licenses that they have purchased. For example, a renewal may include upgrading from M365 E3 licenses to M365 E5 licenses. Depending on when the renewal is processed, it is possible that the licenses will overlap. The E5 will become active before the E3 expires.
When licenses overlap, group based licensing provides an excellent opportunity to add the new license while still retaining the old license on the user. Although I prefer swapping the licenses personally, many organizations desire to have the dual license assignment to introduce the E5 before removing the E3. Note: This works as long as there is no overlapping service plans.
The issue is that the E3 licenses, in this example, is not removed from the group prior to it entering a suspended status. When a license has entered a suspended status, although it remains valid within the tenant no further license assignments will occur. Therefore, the all or none implementation of group based licensing occurs and new users added to the group receive no licenses. The audit log error leads you to believe that you are out of a specific license, yet when looking at the new license you are assigning there are plenty of free licenses available. Suspended licenses have a count of zero regardless of how many were available at the time the license went into a suspended state.
If you are leveraging a migration between licenses using the dual license approach, it is important that the original licenses be removed from the group prior to the license entering a suspended state. Although the service will eventually clean up all expired licenses from the tenant, while the license exists in a suspended state and appears on a group license assignment will stop.
Microsoft recently enabled the domains tab in GCC High tenants. This has brought parity to the management capabilities for domains between commercial and GCC High tenants.
It’s finally here! The domains tab in GCC High… | TIMMCMIC
Microsoft 365 GCC High Tenants and Missing Domains | TIMMCMIC
In recent weeks I have worked with several GCC High customers that have opened cases due to the DNS errors that are present in the M365 Admin centers domain tabs. The domains tab in the M365 admin center attempts to compare a tenants DNS records to those discovered in public DNS and highlight potential issues.
DNS Errors and Warnings in the Office 365 Portal | Microsoft Learn
There are several reasons that customers may have DNS errors listed in the M365 admin center. For example, if you still have an Exchange on-premises installation your autodiscover record may point to this installation – that is perfectly acceptable. The health checks contained within the M365 admin center assume a Microsoft 365 exclusive installation.
For GCC High customers the circumstances are slightly different. Prior to the implementation of the domains tab GCC High customers were advised to calculate their DNS records manually.
Enable autodiscovery of Intune enrollment server – Microsoft Intune | Microsoft Learn
If you had previously adopted GCC High and followed the published guidance above, you will automatically have DNS errors in the M365 Admin center. The new DNS records published in the M365 admin center for GCC High customers follow the same format now as the commercial records.
Here is a summary table of before and after based on the domain contoso.us
| Record Type | Record Name | Old Value | New Value |
| MX | N/A | contoso.mail.protection.office365.us | contoso-us.mail.protection.office365.us |
| TXT | N/A | v=spf1 include:spf.protection.office365.us -all | v=spf1 include:spf.protection.office365.us -all |
| CNAME | autodiscover.contoso.us | autodiscover.office365.us | autodiscover.office365.us |
| SRV | _sipfederationtls.contoso.us | sipfed.online.gov.skypeforbusiness.us | sipfed.online.lync.com |
| CNAME | enterpriseenrollment.contoso.us | enterpriseenrollment-s.manage.microsoft.us | enterpriseenrollment-s.manage.microsoft.us |
| CNAME | enterpriseregistration.contoso.us | enterpriseregistration.windows.net | enterpriseregistration.microsoftonline.us |
The entries in the table above that are bolded represent the difference between our manual calculate guidance and the DNS records that are published in the M365 admin center. You can additionally review the records provisioned for your tenant by using the Microsoft Graph command Get-MgDomainServiceConfigurationRecord. Get-MgDomainServiceConfigurationRecord (Microsoft.Graph.Identity.DirectoryManagement) | Microsoft Learn
Is it necessary to change the DNS records for tenants that are already established? No – it is not necessary to change the DNS records at this time. The DNS records calculated manually will continue to function for GCC High customers. Customers may choose to update to the new records now that they are available for conformity to what is published within their tenant. I would recommend for new domains added to GCC High tenants that the new DNS record formats be utilized. This will help prevent issues with automatic DNS checks in the M365 admin center when adding the domain.
For as long as I can remember the domains tab in the Microsoft 365 Administration Center for GCC-High tenants was intentionally hidden. I have previously written this article highlighting this and explaining the background -> Microsoft 365 GCC High Tenants and Missing Domains | TIMMCMIC.
Now that the domains tab is present administrators have access to the proper and accurate DNS records associated with the domains successfully verified in the tenant. One thing that Microsoft 365 administrators are noting is that the DNS records recommended do not match the previous documentation published here -> Domain Name System (DNS) records for Office 365 Government Community Cloud (GCC) High – Microsoft 365 Enterprise | Microsoft Learn. Administrators are noting differences in the MX records and enterprise enrollment cnames.
In our prior guidance administrators had to calculate the MX record manually for GCC High adoption. This process was simplified to take the onmicrosoft.us domain name prefix and append it to the known suffix for Exchange Online. This same MX record would then be utilized for all domains registered in the GCC High tenant. With the presence of the domains tab the MX records are now calculated in the same fashion as commercial tenants. This format follows domain-com.mail.protection.office365.us. For existing tenants, it is not a requirement to update or change the MX records as this time. For new tenants, I would recommend following the format displayed in the Microsoft 365 Admin Center.
Our prior guidance for DNS records also did not address enterprise enrollment and automatic Intune discovery. Administrators would have had to refer to separate documentation for the correct CNAME records for enterprise enrollment. This CNAME record is now included automatically in the domains tab – dns records display.
In addition to the domains tab now being present, accurate records are returned by the Microsoft Graph command to enumerate DNS records. Get-MgDomainServiceConfigurationRecord (Microsoft.Graph.Identity.DirectoryManagement) | Microsoft Learn (Get-MgDomainServiceConfigurationRecord (Microsoft.Graph.Identity.DirectoryManagement) | Microsoft Learn) will enumerate DNS records for you. It’s important to note that some records enumerated have been deprecated such as the MSOID record.
Microsoft provides a variety of consumer services that are accessed through a “Microsoft Account”. It is possible for a Microsoft 365 customer to have utilized their email address to sign up for Microsoft consumer services.
When a user has both a Microsoft 365 Identity and a Microsoft consumer identity, they are prompted to select a work or school account or personal account when signing into Microsoft services.
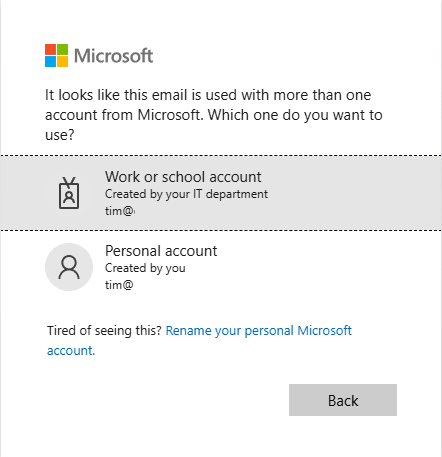
Creating a consumer or personal account using a domain that is registered in Microsoft 365 is now blocked and has been for several years. In many cases if a Microsoft 365 customer has both a personal and work or school account, they set it up prior to when this block was put in place. Here is a sample error that someone receives today when trying to utilize a domain registered in Microsoft 365 to establish a consumer account:
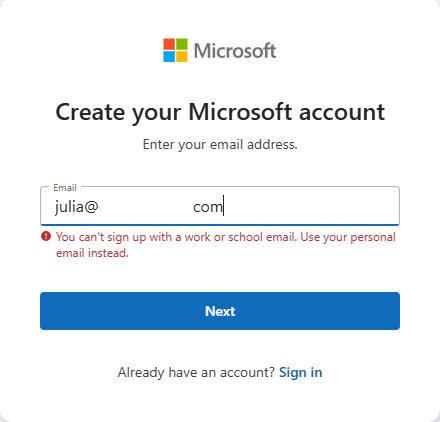
Microsoft does not provide the ability for administrators to compel a user to change the identity of a consumer account. We do provide guidance for users that want to change their personal account identity to either stop being prompted to select an account or to simply disconnect the relationship between the two identities. Change the email address or phone number for your Microsoft account – Microsoft Support
In general, users that have both a personal and Microsoft 365 account do not have issues utilizing both services with the same address. I have seen some issues though that cause concern, such as users receiving unusual sign in activity notices in their corporate mailboxes when the activity is actually related to their consumer identity. Microsoft account unusual sign-in activity | TIMMCMIC
I have worked on several escalations recently where customers have asked to quantify the number of consumer accounts that are related to Microsoft 365 identities. The goal of the project is to proactively reach out to these users and provide them guidance on how to follow the account rename process.
To provide administrators with an option to audit their consumer accounts I have published AuditConsumerAccounts to the PowerShell Gallery. Audit consumer accounts is a PowerShell module that allows administrators to gather all identities and addresses from EntraID and perform an audit against Microsoft consumer account information. At the conclusion of the audit a report is generated that lists any consumer accounts discovered as well as any accounts that an error was encountered.
AuditConsumerAccounts supports a variety of graph authentication methods. If the account list to be audited is greater than 50 members it is recommended to utilize a graph connection method that relies on an app registration within the tenant. This allows the module to batch users into smaller groups for testing rather than iterate through users sequentially.
Administrators also have the flexibility to define the scope of addresses they would like to test for consumer identities. By default, the objects user principal name is always included for testing. The module also supports the ability to add just primary SMTP addresses for testing or add all user proxy addresses for testing. In most environments the user principal name and primary smtp address are the same resulting in only a single address being verified. The module also supports testing only for a specific domain across the address set based on a list of domains provided at runtime. Note: The domains must be registered as domains within the tenant to utilize this feature.
AuditConsumerAccounts tests the entire organization by default. The command also supports providing a graph filter to scope a query of objects against EntraID or allows administrators to specify a list of user identities to specifically test. This is helpful if you are only interested in auditing a subset of your users.
AuditConsumerAccounts provides additional security flexibility by allowing the caller to specify the permissions required to both read domains and read user information. For information on the permissions set required for domains see Get domain – Microsoft Graph v1.0 | Microsoft Learn and for permissions sets required for users see Get user – Microsoft Graph v1.0 | Microsoft Learn
To start using AuditConsumerAccounts run PowerShell 7.6.1 as administrator and run the following command:
Install-Module AuditConsumerAccounts
When the module has been successfully installed the start-AuditConsumerAccounts command is utilized to begin the audit process. Here are some examples:
Start an audit of all accounts and all proxy addresses using graph interactive authentication.
$logFolderPath = "c:\temp"$tenantID = "EntraTenantID" #This is your Entra Tenant ID$environment = "Global" #Acceptable values Global,USGov,USDOD,China$userPermission = "Directory.ReadWrite.All" #Acceptable values User.Read.All,User.ReadWrite.All,Directory.Read.All,Directory.ReadWrite.All$domainPermission = "Domain.ReadWrite.All" #Acceptable values Domain.Read.All,Domain.ReadWrite.Allstart-auditConsumerAccounts -logFolderPath $logFolderPath -msGraphTenantID $tenantID -msGraphEnvironment $environment -msGraphDomainPermissions $domainPermission -msGraphUserPermissions $userPermission
Start an audit of all accounts and all proxy addresses using graph client secret authentication.
$logFolderPath = "c:\temp"$tenantID = "EntraTenantID" #This is your Entra Tenant ID$appID = "App registration ID"$clientSecret = "Client secret assigned to app registration"$environment = "Global" #Acceptable values Global,USGov,USDOD,China$userPermission = "Directory.ReadWrite.All" #Acceptable values User.Read.All,User.ReadWrite.All,Directory.Read.All,Directory.ReadWrite.All$domainPermission = "Domain.ReadWrite.All" #Acceptable values Domain.Read.All,Domain.ReadWrite.Allstart-auditConsumerAccounts -logFolderPath $logFolderPath -msGraphTenantID $tenantID -msGraphEnvironment $environment -msGraphDomainPermissions $domainPermission -msGraphUserPermissions $userPermission -msGraphClientSecret $clientSecret -msGraphApplicationID $appID
Start an audit of all accounts and all proxy addresses using graph certificate authentication.
$logFolderPath = "c:\temp"$tenantID = "EntraTenantID" #This is your Entra Tenant ID$appID = "App registration ID"$certificateThumpprint = "Cert thumbprint assigned to app registration"$environment = "Global" #Acceptable values Global,USGov,USDOD,China$userPermission = "Directory.ReadWrite.All" #Acceptable values User.Read.All,User.ReadWrite.All,Directory.Read.All,Directory.ReadWrite.All$domainPermission = "Domain.ReadWrite.All" #Acceptable values Domain.Read.All,Domain.ReadWrite.Allstart-auditConsumerAccounts -logFolderPath $logFolderPath -msGraphTenantID $tenantID -msGraphEnvironment $environment -msGraphDomainPermissions $domainPermission -msGraphUserPermissions $userPermission -msGraphCertificateThumbprint $certificateThumbprint -msGraphApplicationID $appID
Start an audit of all accounts and only primary proxy addresses using graph client secret authentication. This is just one example, -testPrimarySMTPOnly:$TRUE can be added to any command using any authentication type.
$logFolderPath = "c:\temp"$tenantID = "EntraTenantID" #This is your Entra Tenant ID$appID = "App registration ID"$clientSecret = "Client secret assigned to app registration"$environment = "Global" #Acceptable values Global,USGov,USDOD,China$userPermission = "Directory.ReadWrite.All" #Acceptable values User.Read.All,User.ReadWrite.All,Directory.Read.All,Directory.ReadWrite.All$domainPermission = "Domain.ReadWrite.All" #Acceptable values Domain.Read.All,Domain.ReadWrite.Allstart-auditConsumerAccounts -logFolderPath $logFolderPath -msGraphTenantID $tenantID -msGraphEnvironment $environment -msGraphDomainPermissions $domainPermission -msGraphUserPermissions $userPermission -msGraphClientSecret $clientSecret -msGraphApplicationID $appID -testPrimarySMTPOnly:$TRUE
Start an audit of select accounts using a graph filter and using graph client secret authentication. This is just one example, -msGraphRecipientFilter can be added to any command using any authentication type.
$logFolderPath = "c:\temp"$tenantID = "EntraTenantID" #This is your Entra Tenant ID$appID = "App registration ID"$clientSecret = "Client secret assigned to app registration"$environment = "Global" #Acceptable values Global,USGov,USDOD,China$userPermission = "Directory.ReadWrite.All" #Acceptable values User.Read.All,User.ReadWrite.All,Directory.Read.All,Directory.ReadWrite.All$domainPermission = "Domain.ReadWrite.All" #Acceptable values Domain.Read.All,Domain.ReadWrite.All$graphFilter = "startsWith(DisplayName, 'a')"start-auditConsumerAccounts -logFolderPath $logFolderPath -msGraphTenantID $tenantID -msGraphEnvironment $environment -msGraphDomainPermissions $domainPermission -msGraphUserPermissions $userPermission -msGraphClientSecret $clientSecret -msGraphApplicationID $appID -msGraphRecipientFilter $graphFilter
Start an audit of select accounts by providing an array of user identities in the format of Azure Object IDs or User Principal Names. -bringYourOwnAddresses can be utilized with any graph authentication type and will test all addresses on the user by default unless -testPrimarySMTPOnly:$TRUE is also specified. This example uses graph client secret authentication.
#Define an array of addresses$addressesToTest=@()#Add users to the array to test either manually or through some other export / import.$addressesToTest += "user1@domain.com"$addressesToTest += "user2@domain.com"$addressesToTest += "user3@domain.com"$logFolderPath = "c:\temp"$tenantID = "EntraTenantID" #This is your Entra Tenant ID$appID = "App registration ID"$clientSecret = "Client secret assigned to app registration"$environment = "Global" #Acceptable values Global,USGov,USDOD,China$userPermission = "Directory.ReadWrite.All" #Acceptable values User.Read.All,User.ReadWrite.All,Directory.Read.All,Directory.ReadWrite.All$domainPermission = "Domain.ReadWrite.All" #Acceptable values Domain.Read.All,Domain.ReadWrite.Allstart-auditConsumerAccounts -logFolderPath $logFolderPath -msGraphTenantID $tenantID -msGraphEnvironment $environment -msGraphDomainPermissions $domainPermission -msGraphUserPermissions $userPermission -msGraphClientSecret $clientSecret -msGraphApplicationID $appID -bringYourOwnAddresses $addressesToTest
Start an audit of select domains by providing an array of domains. -bringYourOwnDomains can be utilized with any graph authentication type and will test all addresses that match the domain by default unlesss -testPrimarySMTPOnly:$TRUE is also specified.
#Define an array of domains.$domainsToTest = @()#Add domains to the array to test. #These domains must be registered in the tenant that you are authenticating to.$domainsToTest += "domain.com"$domainsToTest += "domain2.com"$logFolderPath = "c:\temp"$tenantID = "EntraTenantID" #This is your Entra Tenant ID$appID = "App registration ID"$clientSecret = "Client secret assigned to app registration"$environment = "Global" #Acceptable values Global,USGov,USDOD,China$userPermission = "Directory.ReadWrite.All" #Acceptable values User.Read.All,User.ReadWrite.All,Directory.Read.All,Directory.ReadWrite.All$domainPermission = "Domain.ReadWrite.All" #Acceptable values Domain.Read.All,Domain.ReadWrite.Allstart-auditConsumerAccounts -logFolderPath $logFolderPath -msGraphTenantID $tenantID -msGraphEnvironment $environment -msGraphDomainPermissions $domainPermission -msGraphUserPermissions $userPermission -msGraphClientSecret $clientSecret -msGraphApplicationID $appID -bringYourOwnDomains $domainsToTest
When the command is executed a graph connection using the specified authentication type is automatically performed. The scopes specified in the execution are verified as present after the connection has successfully been made. If the connection is unsuccessful or the scopes are not present the command will fail.
Once the graph connection is established, a call is made to extract all domain information from the tenant. If a custom domains list is provided, the list is validated to ensure the domains are registered in the tenant.
When the domains have been validated, the next step is to pull the users from EntraID. By default, all users are pulled unless a filter is specified or a list of addresses is specified. Guest accounts are automatically excluded from testing.
When the list of users has been gathered the command starts creating objects representing address combinations to test. As indicated user principal names are always included for testing as well as all proxy addresses on the user unless -testPrimarySMTPOnly:$TRUE is specified. The script automatically removes any addresses on a user that are not at domains registered in Microsoft 365. At the conclusion of list generation, the list is filtered to remove duplicates from being tested.
At this time further testing depends on the graph authentication type and number of objects to test. If the authentication type is not interactive and the number of users to test is greater than 50, the list of addresses is broken up into groups of 50. The script will then recursively create jobs to test users in batches of 50, with 5 concurrent jobs running at any one time. Each job sleeps for 1 second after each user validation with the entire job sleeping randomly between 5 – 10 minutes at the conclusion of testing 50 users. This is required to avoid service side throttling when attempting bulk user evaluation. A new job is created as jobs finish until all jobs representing all of the users have completed. If interactive authentication is utilized or the user count is less than 50 the list of users is iterated through sequentially until all testing has completed.
When the command finishes auditing all details of the audit are exported to an XML file located in the log file directory. An HTML report is also created and displayed to the administrator. The report contains three sections. The first section is the list of consumer accounts identified, the second section is a list of account test errors, and the last section is the timeline of testing.
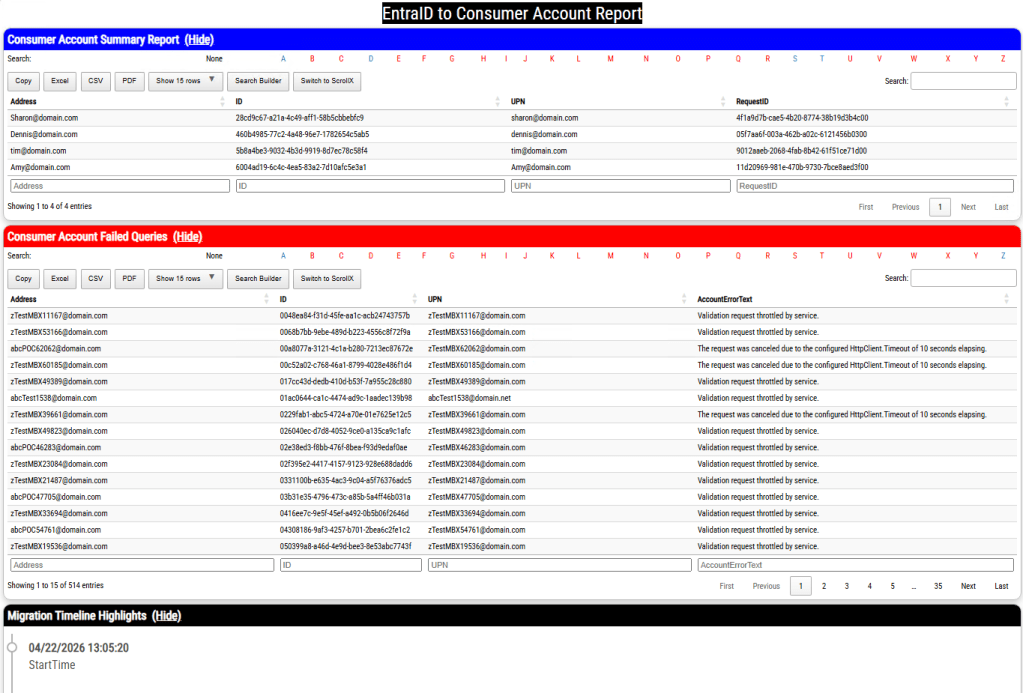
It is expected to have a list of accounts that fail to audit either due to HTTP call timeouts or an audit backoff from the service. The command exports all failed accounts to a separate file that allows administrators to retry the reporting operations on these accounts. Here is an example using graph client secret authentication:
#Import the list of failed accounts from the first run.$failedAccounts = import-cliXML -path "c:\temp\AuditConsumerAccounts\AuditConsumerAccounts-ConsumerAccountsErrors.xml"$logFolderPath = "c:\temp2" #USE A DIFFERENT LOG DIRECTORY TO NOT OVERWRITE ALREADY GATHERED DATA$tenantID = "EntraTenantID" #This is your Entra Tenant ID$appID = "App registration ID"$clientSecret = "Client secret assigned to app registration"$environment = "Global" #Acceptable values Global,USGov,USDOD,China$userPermission = "Directory.ReadWrite.All" #Acceptable values User.Read.All,User.ReadWrite.All,Directory.Read.All,Directory.ReadWrite.All$domainPermission = "Domain.ReadWrite.All" #Acceptable values Domain.Read.All,Domain.ReadWrite.Allstart-auditConsumerAccounts -logFolderPath $logFolderPath -msGraphTenantID $tenantID -msGraphEnvironment $environment -msGraphDomainPermissions $domainPermission -msGraphUserPermissions $userPermission -msGraphClientSecret $clientSecret -msGraphApplicationID $appID -bringYourOwnAddresses $failedAccounts
The auditing process can take a long time to complete, and this is expected. In testing to complete 140,000 address tests took 3 days 6 hours to complete. The list of throttled or failed HTTP calls averaged 500 in these repeated tests.
With the auditing process complete administrators may now understand the scope of commercial accounts present and if they desire to do so develop a targeted communications campaign to assist these users in updating their identities to no longer have a relationship to registered addresses in Microsoft 365.
Microsoft Graph supports multiple methods to authenticate to EntraID to perform graph functions. One method of connecting is to utilize client secret authentication. This process is a little different than interactive authentication or certificate authentication.
The client secret authentication process begins with creating an app registration in Entra ID. To create the app registration:
To create the app registration:

When the application registration has been completed successfully you are automatically taken to the app registration. At this time copy the Application (Client) ID as this will be required for further operations.
To enable the application registration to perform work API permissions for Microsoft Graph must be added. To add api permissions:

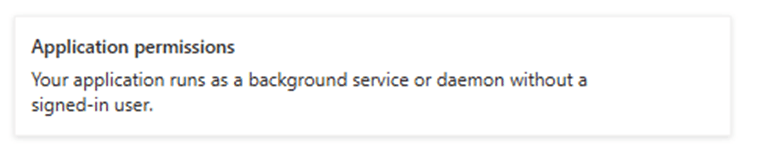
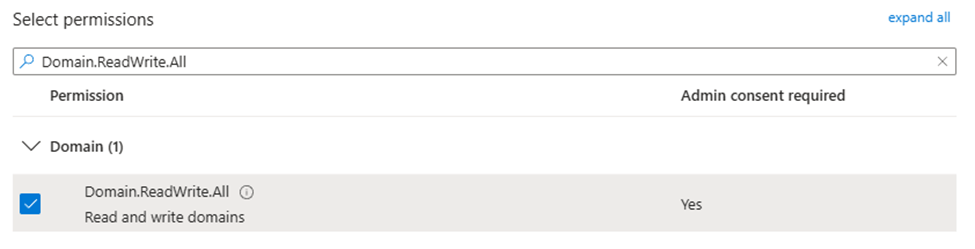
When permissions have been added to an app registration, they do not become active until someone with permissions to grant consent provides consent. On the API permissions page is an option “Grant Consent for TenantName”. It is important that after assigning API permissions this option is selected to grant consent and active the permissions.

The final step in the process is to create the client secret. To create the client secret:
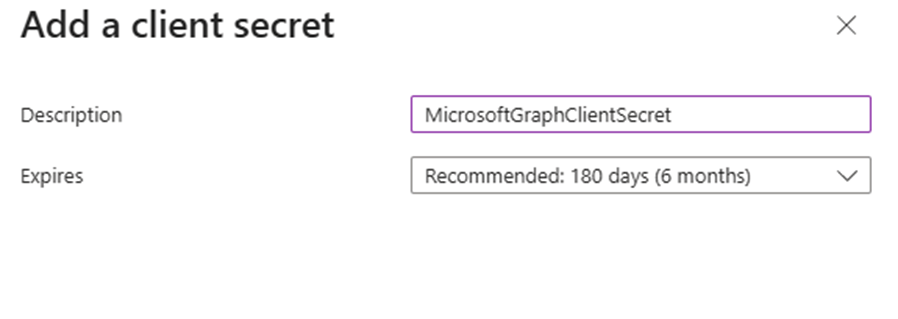
The client secret is now displayed. There is a copy button to the right of the VALUE field. Select copy and save this value in another location. This will be your only opportunity to see the value of the secret created.
***WARNING*** Treat this value as you would any privileged account password. This value combined with the application ID will allow any administrator access to this application and all permissions assigned.
To connect to Microsoft Graph utilizing client secret authentication:
#Ensure that all graph modules are up to date.#Note that this process can take an extended period of time depending on the number of graph modules installedGet-InstalledModule Microosft.Graph.* | update-Module -force -confirm:$FALSE
#The variables referenced below will require you to fill in the blanks with information obtained in previous steps.#Define the environment you are connecting to.#Global / World Wide = Global#GCC High = USGov#DOD = USGovDOD#China = China$environmentName = Global#Obtain the azure tenant ID where you will be authentication and use it here.$tenantID = "AzureTenantIDGUID"#Set the application ID of the app registration that was copied earlier.$appID = "YourAppRegistrationID"#Set the client secret$clientSecret = "YourAppClientSecret"#Establish the client secret password.$securePassword = ConvertTo-SecureString -string $clientSecret -asPlainText -force#Establih the secret credential.$clientSecretCredential = New-Object -typeName System.Management.Automation.PSCredential -argumentList $appID,$securePassword #Create the connection to Microsoft Graphconnect-MGGraph -environmentName $environmentName -tenantID $tenantID -clientSecretCredential $clientSecretCredential
If the connection is successful, you are now using Microsoft Graph with client secret authentication and with the permissions granted to the app registration utilized.
PasswordPolicies in Microsoft EntraID allow administrators to control the application of password expiration or strong password requirements across their M365 tenant. In this article I want to explore PasswordPolicies configurations and how settings interact with authentication types, domains, and individual users.
Microsoft Entra ID password expiration is a per domain setting. Each registered and verified root domain can have unique password expiration policies applied to them, while sub-domains will inherit the password policy from its parent. The settings that control password expiration are PasswordNotificationWindowInDays and PasswordValidityPeriodInDays.
In Microsoft 365 the default settings for all domains are that the PasswordNotificationWindowInDays and PasswordValidityPeriodInDays is NULL meaning password expiration is not enabled for tenants created after 2021.
As the admin, you can make user passwords expire after a certain number of days, or set passwords to never expire. By default, passwords are set to never expire for your organization.Using Get-MGDomain the password expiration settings can be verified:
PS C:\> get-mgDomain -DomainId domain.net | select-object PasswordNotificationWindowInDays,PasswordValidityPeriodInDays | fl


PasswordNotificationWindowInDays :
PasswordValidityPeriodInDays     :
This also corresponds to the password expiration settings in the Microsoft 365 Admin Center showing NULL values.
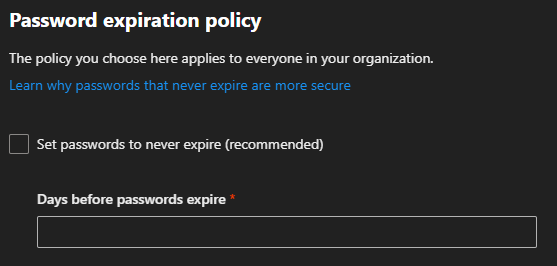
If your tenant was created prior to 2021 your password expiration period by default is 90 days. Tenants created after 2021 have passwords set to never expire by default regardless of the checkbox in the M365 Admin Center password expiration policy user interface.

Default value: No expiration. If the tenant was created before 2021, it has a 90 day expiration value by default. You can check current policy with Get-MgDomain.
The value is configurable by using the Update-MgDomain cmdlet from the Microsoft Graph module for PowerShell.The M365 admin center has a single setting to manage the password expiration policy. This setting does not distinguish between domains and modification of these settings triggers changes across all domains registered in Microsoft 365.
Setting the property “days before passwords expire” adjusts the PasswordValidityPeriodInDays across all eligable domains.
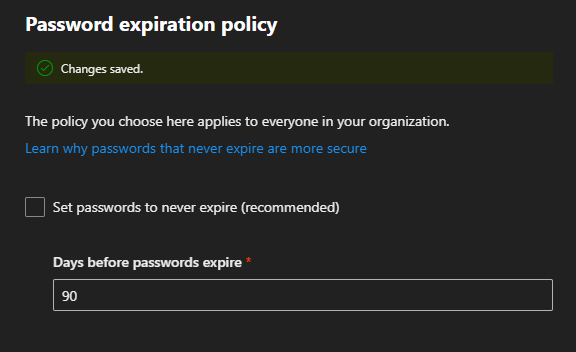
Using Get-MGDomain the password expiration settings can be verified.
Id                               : domain.com
AuthenticationType               : Federated
IsDefault                        : False
PasswordNotificationWindowInDays :
PasswordValidityPeriodInDays     :

Id                               : domain.onmicrosoft.com
AuthenticationType               : Managed
IsDefault                        : True
PasswordNotificationWindowInDays :
PasswordValidityPeriodInDays     :

Id                               : domain.net
AuthenticationType               : Managed
IsDefault                        : False
PasswordNotificationWindowInDays : 30
PasswordValidityPeriodInDays     : 90

Id                               : subdomain.domain.net
AuthenticationType               : Managed
IsDefault                        : False
PasswordNotificationWindowInDays :
PasswordValidityPeriodInDays     :

Id                               : domain2.onmicrosoft.com
AuthenticationType               : Managed
IsDefault                        : False
PasswordNotificationWindowInDays : 30
PasswordValidityPeriodInDays     : 90

Id                               : domain.mail.onmicrosoft.com
AuthenticationType               : Managed
IsDefault                        : False
PasswordNotificationWindowInDays : 30
PasswordValidityPeriodInDays : 90When setting a password expiration window in the M365 Admin Center certain domains are excluded from having their settings automatically set. These include
Federated Domain
Domains that are federated for authentication do not support password expiration in Microsoft 365. All determinants for password expiration are made through the federated authentication process. For example, users federated through Active Directory Federation Services and utilizing Active Directory for authentication would have their passwords expired by on-premises Active Directory and rely on ADFS to handle the password expiration.
Get-MGDomain -domainID domain.com | select-object ID,AuthenticationType,IsDefault,PasswordNotificationWindowInDays,PasswordValidityPeriodInDays

Id                               : domain.com
AuthenticationType               : Federated
IsDefault                        : False
PasswordNotificationWindowInDays :
PasswordValidityPeriodInDays     :
Default Domain
The default domain serves as the domain name utilized on Microsoft 365 objects when no domain is specified or no custom domain is registered.
Get-MGDomain -domainID domain.onmicrosoft.com | select-object ID,AuthenticationType,IsDefault,PasswordNotificationWindowInDays,PasswordValidityPeriodInDays

Id                               : domain.onmicrosoft.com
AuthenticationType               : Managed
IsDefault                        : True
PasswordNotificationWindowInDays :
PasswordValidityPeriodInDays     :
Root Domain
When a subdomain is added to Microsoft 365 where the root domain is already present and registered, a property on the sub-domain is automatically set called root domain. This automatically inherits authentication and password expiration settings that are set on the root domain. If custom authentication or password expiration settings are required for child domains, the root domain property must be cleared.
Get-MGDomain -domainID subdomain.domain.net | select-object ID,AuthenticationType,IsDefault,PasswordNotificationWindowInDays,PasswordValidityPeriodInDays

Id                               : subdomain.domain.net
AuthenticationType               : Managed
IsDefault                        : False
PasswordNotificationWindowInDays :
PasswordValidityPeriodInDays     :

Get-MgDomainRootDomain -DomainId subdomain.domain.net | select-object ID,AuthenticationType,IsDefault,PasswordNotificationWindowInDays,PasswordValidityPeriodInDays | fl

Id                               : domain.net
AuthenticationType               : Managed
IsDefault                        : False
PasswordNotificationWindowInDays : 30
PasswordValidityPeriodInDays     : 90
Domains Added after adjusting settings in the M365 Admin Center
If a domain is added after the expiration period is established in the M365 Admin Center, these domains do not get the PasswordNotificationWindowInDays automatically set.
new-mgDomain -Id newdomain.net

Get-MgDomain -DomainId newdomain.net | select-object ID,AuthenticationType,IsDefault,PasswordNotificationWindowInDays,PasswordValidityPeriodInDays | fl


Id                               : newdomain.net
AuthenticationType               : Managed
IsDefault                        : False
PasswordNotificationWindowInDays :
PasswordValidityPeriodInDays     :
Domains Converted from Federated Authentication to Managed Authentication
In M365 we allow administrators to change the authentication type of a domain from Federated Authentication to Managed Authentication. When setting the password expiration time in the M365 Admin Center any domains that are federated are skipped and the settings are not applied. Additionally, when a domain authentication type is converted from Federated back to Managed, the password expiration settings are not automatically applied.
Get-MGDomain -domainID domain.com | select-object ID,AuthenticationType,IsDefault,PasswordNotificationWindowInDays,PasswordValidityPeriodInDays

Id                               : domain.com
AuthenticationType               : Federated
IsDefault                        : False
PasswordNotificationWindowInDays :
PasswordValidityPeriodInDays     :

Update-MgDomain -DomainId domain.com -AuthenticationType Managed

Get-MgDomain -DomainId domain.com | select-object ID,AuthenticationType,IsDefault,PasswordNotificationWindowInDays,PasswordValidityPeriodInDays | fl


Id                               : domain.com
AuthenticationType               : Managed
IsDefault                        : False
PasswordNotificationWindowInDays :
PasswordValidityPeriodInDays :It is Microsoft’s recommendation that customers disable password expiration in Microsoft 365.
Current research strongly indicates that mandated password changes do more harm than good. They drive users to choose weaker passwords, reuse passwords, or update old passwords in ways that are easily guessed by hackers. We recommend enabling multi-factor authentication. To learn more about password policy, check out Password policy recommendations.If a tenant is in the default state, the PasswordValidityPeriodInDays is NULL demonstrating that password expiration is disabled. When selecting the option “Set password to never expire (recommended)” the value 2147483647 is stamped on each domain where password expiration may be enabled. The value 2147483647 is 5883516.8410959 years, effectively disabling any password expiration prompts. (This also happens to be the max value that PasswordValidityPeriodInDays can be set to.)
Get-MgDomain -DomainId domain.net | select-object ID,AuthenticationType,IsDefault,PasswordNotificationWindowInDays,PasswordValidityPeriodInDays | fl


Id                               : domain.net
AuthenticationType               : Managed
IsDefault                        : False
PasswordNotificationWindowInDays : 30
PasswordValidityPeriodInDays : 2147483647Microsoft Graph provides administrators with the ability to manage password expiration at a more granular level. The command Update-MGDomain allows specifying a custom expiration period on an individual domain.
#Note:  Password notification window in days currently does not do anything but must be specified when running the command.  Users are no longer notified of pending password expiration in Microsoft 365 interfaces.

Update-MgDomain -DomainId domain.net -PasswordValidityPeriodInDays "45" -PasswordNotificationWindowInDays "15"
Microsoft Graph does not allow you to update the settings on domain that is enabled for federated authentication following the same rules as the M365 Admin Center.
Update-MgDomain -DomainId domain.com -PasswordValidityPeriodInDays "45" -PasswordNotificationWindowInDays "15"
Update-MgDomain : Domain operation is not allowed.
Microsoft graph will not allow you to update the password expiration days on a subdomain where root domain is populated.
Update-MgDomain -DomainId subdomain.e-domain.net -PasswordValidityPeriodInDays "45" -PasswordNotificationWindowInDays "15"
Update-MgDomain : Domain operation is not allowed.
Microsoft graph will allow you to set a password expiration days on the default domain even though the M365 Admin Center skips this domain.
In the previous section we introduced the settings on domains for password expiration. Every user that is provisioned in Microsoft 365 has a user principal name which incorporates one of the verified domains. The user’s domain settings determine the password policy that is applied to the user in conjunctions with the user’s individual password policy setting.
It may become necessary to manage the password policies of individual users. For example, you may have a service account tied to a domain where password expiration is enabled but you do not want the password to expire on that account. Microsoft Graph provides administrators with the ability to manage a user’s password policy settings through the Update-MGUser command. The ability to run this command on an individual user depends on the domain’s authentication type. Let’s explore how a domain’s authentication type influences the ability to manage a user’s password policies.
In some installations administrators wish to have the Microsoft 365 password expire at or near the same time as the on-premises Active Directory password expires. By default, the password expiration time is not a value that synchronizes between Active Directory and Microsoft 365.
Directory synchronization provides an optional feature that administrators may enabled named CloudPasswordPolicyForPasswordSyncedUsersEnabled.
When the CloudPasswordPolicyForPasswordSyncedUsersEnabled is set to false, any directory synchronized user automatically has their password policies set to DisablePasswordExpiration. We will explore later how this can be modified for individual users based on the domain’s authentication type.
When this feature is enabled, the following changes occur:
New Users
Previously Synchronized Users
It is extremely important to note that the password expiration period in Microsoft 365 is always evaluated against the last password change timestamp. There are several operations that could occur at any time that may reset user’s password in EntraID without any password change operation occuring on premises. For example, if a new Entra Connect server is introduced and password hash synchronization is enabled, all password hashes are synchronized effectively changing the expiration date between Active Directory and EntraID.
The password polices attribute may have a different default state depending on whether the user is a cloud only user or if the user is directory synchronized. Additionally, if the user is directory synchronized the default password policies state may change depending on the dir sync features enabled.
The password policies attribute has a value of NULL, None, or DisablePasswordExpiration. NULL or NONE are equivalent and will result in the cloud password expiring for managed domains based on the domains settings. The value DisablePasswordExpiration will prevent the users account from expiring the password based on the managed domains settings. If a password policy is set to DisablePasswordExpiration and later the password should expire, setting the password policies to NONE will expire the user’s password.
It may be possible that a user’s password policies attribute differs from the states outlined below. If the domain was managed, password policies were adjusted on users, and then the domain was converted to federated the password policies do not change. If the user was utilizing a federated domain UPN suffix and was then changed to a managed domain suffix the password policies attribute could be edited. This value will not change states as the user’s UPN suffix changes between federated and managed domains or managed domains to federated domains.
Cloud Only User / Managed Domain
PS C:\> get-mgUser -UserId CloudOnlyManaged@domain.net -Property PasswordPolicies | select -ExpandProperty PasswordPolicies
PS C:\>
Directory Synchronized User / CloudPasswordPolicyForPasswordSyncedUsersEnabled FALSE / Federated Domain
get-mgUser -UserId FederatedUser1@domain.com -Property PasswordPolicies | select -ExpandProperty PasswordPolicies
DisablePasswordExpiration
Directory Synchronized User / CloudPasswordPolicyForPasswordSyncedUsersEnabled FALSE / Managed Domain
get-mgUser -UserId ManagedUser1@e-mcmichael.net -Property PasswordPolicies | select -ExpandProperty PasswordPolicies
DisablePasswordExpiration
Directory Synchronized User / CloudPasswordPolicyForPasswordSyncedUsersEnabled TRUE / Federated Domain (Post Password Change)
get-mgUser -UserId FederatedUser1@domain.com -Property PasswordPolicies | select -ExpandProperty PasswordPolicies
None
Directory Synchronized User / CloudPasswordPolicyForPasswordSynchronizedUsersEnabled TRUE / Managed Domain (Post Password Change)
get-mgUser -UserId ManagedUser1@domain.net -Property PasswordPolicies | select -ExpandProperty PasswordPolicies
None
Directory Synchronized NEW User / CloudPasswordPolicyForPasswordSynchronizedUsersEnabled TRUE / Managed Domain
get-mgUser -UserId ManagedUser3@e-mcmichael.net -Property PasswordPolicies | select -ExpandProperty PasswordPolicies
PS C:\>
Directory Synchronized NEW User / CloudPasswordPolicyForPasswordSynchronizedUsersEnabled TRUE / Federated Domain
get-mgUser -UserId FederatedUser3@e-mcmichael.com -Property PasswordPolicies | select -ExpandProperty PasswordPolicies
PS C:\>When a user is created with a domain that utilizes federated authentication the ability to manage the PasswordPolicies attribute is limited.
When using Update-MGUser to set the PasswordPolicies attribute to NONE an error is encountered:
Update-MgUser -UserId FederatedUser1@domain.com -PasswordPolicies None
Update-MgUser : Unable to update the specified properties for on-premises mastered Directory Sync objects or objects
currently undergoing migration.
We note that update-MGUser is not supported on federated domains in the following article.

 Note

The Update-MgUser PowerShell command doesn't work on federated domains.
The error returned though is misleading. Based on the error provided one would believe that the passwordPolicies attributes is locked because the object is enabled for directory synchronization. This is not correct the actual error is because the user is set with a domain that is enabled for federated authentication. At the time of publishing our internal engineering groups are reviewing this error and working to make it more accurately reflect the underlying reason.
When using Update-MGUser to set the PasswordPolicies attribute to DisablePasswordExpiration the command completes successfully although in this example it is setting a value that already exists therefore performing no actions on the user object. (See Why did certain scenarios for the federated users work if the commands if update-MGUser does not work on federated domains? below for further explanation.)
Update-MgUser -UserId FederatedUser1@domain.com -PasswordPolicies DisablePasswordExpirationEntraID allows administrators to test managed authentication without fully converting a federated domain. This feature is known as Managed Authentication Staged Rollout. For more information on managed authentication staged rollout please review: https://learn.microsoft.com/en-us/entra/identity/hybrid/connect/how-to-connect-staged-rollout
When a user is enabled for staged rollout certain password expiration policies apply to the user. Attempting to use Update-MGUser to set the password policies to NONE fails for the same reason as a Federated user.
Update-MgUser -UserId FederatedUser2@domain.com -PasswordPolicies None
Update-MgUser : Unable to update the specified properties for on-premises mastered Directory Sync objects or objects
currently undergoing migration.When a user is created with a domain that utilizes managed authentication the password policies attribute can be fully managed. Here are some examples:
Cloud Only User / Managed Authentication
get-mgUser -UserId CloudOnlyManaged@domain.net -Property PasswordPolicies | select -ExpandProperty PasswordPolicies

#Null Return#

update-mgUser -UserId CloudOnlyManaged@domain.net -PasswordPolicies "DisablePasswordExpiration"

get-mgUser -UserId CloudOnlyManaged@domain.net -Property PasswordPolicies | select -ExpandProperty PasswordPolicies
DisablePasswordExpiration
Directory Synchronized User / CloudPasswordPolicyForPasswordSyncedUsersEnabled FALSE/ Managed Authentication
get-mgUser -UserId ManagedUser1@domain.net -Property PasswordPolicies | select -ExpandProperty PasswordPolicies
DisablePasswordExpiration

update-mgUser -UserId ManagedUser1@domain.net -PasswordPolicies None

get-mgUser -UserId ManagedUser1@domain.net -Property PasswordPolicies | select -ExpandProperty PasswordPolicies
NoneThe results are the same as CloudPasswordPolicyForPasswordSyncedUsersEnabled FALSE.
If attempting to set the value to NONE the command succeeds as the value was already set to NONE as a result of the feature enablement and subsequent password reset.
Update-MgUser -UserId FederatedUser1@domain.com -PasswordPolicies NoneIf attempting to set the value to DisablePasswordExpiration the command fails.
Update-MgUser -UserId FederatedUser1@domain.com -PasswordPolicies DisablePasswordExpiration
Update-MgUser : Unable to update the specified properties for on-premises mastered Directory Sync objects or objects
currently undergoing migration.The results are the same as “Setting PasswordPolicies and Federated Domain Authentication (CloudPasswordPolicyForPasswordSyncedUsersEnabled TRUE)” outlined in the previous section.
The results are the same as “Setting Password Policies and Managed Domain Authentication (CloudPasswordPolicyForPasswordSyncedUsersEnabled FALSE)” outlined in a previous section.
get-mgUser -UserId ManagedUser3@domain.net -Property PasswordPolicies | select -ExpandProperty PasswordPolicies

update-MGUser -UserId ManagedUser3@domain.net -PasswordPolicies "DisablePasswordExpiration"

get-mgUser -UserId ManagedUser3@domain.net -Property PasswordPolicies | select -ExpandProperty PasswordPolicies
DisablePasswordExpiration

update-MGUser -UserId ManagedUser3@domain.net -PasswordPolicies "None"

get-mgUser -UserId ManagedUser3@domain.net -Property PasswordPolicies | select -ExpandProperty PasswordPolicies
NoneIn the federated scenario the only time that the command did not error was when it was setting a value that already existed on the object. For example, DisablePasswordExpiration was already set to running Update-MGUser -passwordPolicies DisablePasswordExpiration succeeded. When a graph call is made to set an attribute that already exists on the object with the same value the underlying API is not invoked. The call is then “successful” even though no attempt to change the value occurred.
https://docs.azure.cn/en-us/entra/identity/authentication/concept-password-ban-bad-combined-policy

