Tag Archives: cloud

Auditing Consumer Accounts

Microsoft provides a variety of consumer services that are accessed through a “Microsoft Account”. It is possible for a Microsoft 365 customer to have utilized their email address to sign up for Microsoft consumer services.

When a user has both a Microsoft 365 Identity and a Microsoft consumer identity, they are prompted to select a work or school account or personal account when signing into Microsoft services.

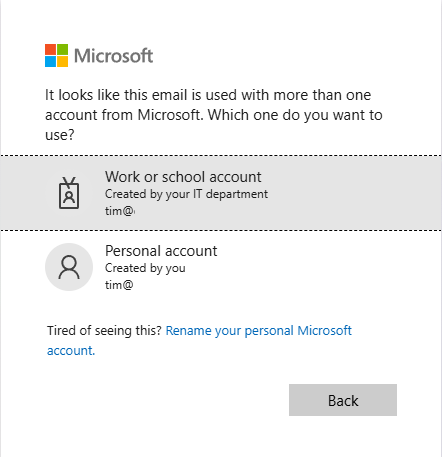
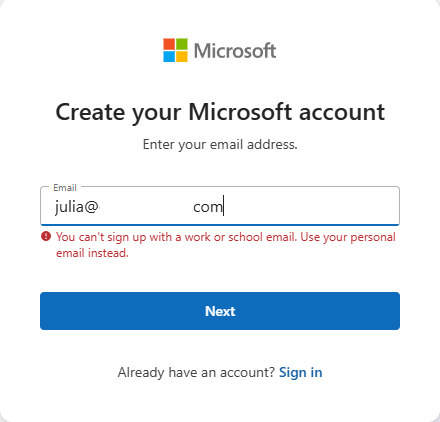
Creating a consumer or personal account using a domain that is registered in Microsoft 365 is now blocked and has been for several years. In many cases if a Microsoft 365 customer has both a personal and work or school account, they set it up prior to when this block was put in place. Here is a sample error that someone receives today when trying to utilize a domain registered in Microsoft 365 to establish a consumer account:

Microsoft does not provide the ability for administrators to compel a user to change the identity of a consumer account. We do provide guidance for users that want to change their personal account identity to either stop being prompted to select an account or to simply disconnect the relationship between the two identities. Change the email address or phone number for your Microsoft account – Microsoft Support

In general, users that have both a personal and Microsoft 365 account do not have issues utilizing both services with the same address. I have seen some issues though that cause concern, such as users receiving unusual sign in activity notices in their corporate mailboxes when the activity is actually related to their consumer identity. Microsoft account unusual sign-in activity | TIMMCMIC

I have worked on several escalations recently where customers have asked to quantify the number of consumer accounts that are related to Microsoft 365 identities. The goal of the project is to proactively reach out to these users and provide them guidance on how to follow the account rename process.

To provide administrators with an option to audit their consumer accounts I have published AuditConsumerAccounts to the PowerShell Gallery. Audit consumer accounts is a PowerShell module that allows administrators to gather all identities and addresses from EntraID and perform an audit against Microsoft consumer account information. At the conclusion of the audit a report is generated that lists any consumer accounts discovered as well as any accounts that an error was encountered.

AuditConsumerAccounts supports a variety of graph authentication methods. If the account list to be audited is greater than 50 members it is recommended to utilize a graph connection method that relies on an app registration within the tenant. This allows the module to batch users into smaller groups for testing rather than iterate through users sequentially.

Administrators also have the flexibility to define the scope of addresses they would like to test for consumer identities. By default, the objects user principal name is always included for testing. The module also supports the ability to add just primary SMTP addresses for testing or add all user proxy addresses for testing. In most environments the user principal name and primary smtp address are the same resulting in only a single address being verified. The module also supports testing only for a specific domain across the address set based on a list of domains provided at runtime. Note: The domains must be registered as domains within the tenant to utilize this feature.

AuditConsumerAccounts tests the entire organization by default. The command also supports providing a graph filter to scope a query of objects against EntraID or allows administrators to specify a list of user identities to specifically test. This is helpful if you are only interested in auditing a subset of your users.

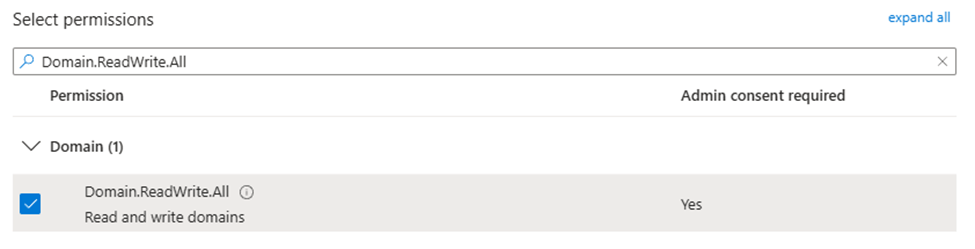
AuditConsumerAccounts provides additional security flexibility by allowing the caller to specify the permissions required to both read domains and read user information. For information on the permissions set required for domains see Get domain – Microsoft Graph v1.0 | Microsoft Learn and for permissions sets required for users see Get user – Microsoft Graph v1.0 | Microsoft Learn

To start using AuditConsumerAccounts run PowerShell 7.6.1 as administrator and run the following command:

Install-Module AuditConsumerAccounts

When the module has been successfully installed the start-AuditConsumerAccounts command is utilized to begin the audit process. Here are some examples:

Start an audit of all accounts and all proxy addresses using graph interactive authentication.

$logFolderPath = "c:\temp"
$tenantID = "EntraTenantID" #This is your Entra Tenant ID
$environment = "Global" #Acceptable values Global,USGov,USDOD,China
$userPermission = "Directory.ReadWrite.All" #Acceptable values User.Read.All,User.ReadWrite.All,Directory.Read.All,Directory.ReadWrite.All
$domainPermission = "Domain.ReadWrite.All" #Acceptable values Domain.Read.All,Domain.ReadWrite.All
start-auditConsumerAccounts -logFolderPath $logFolderPath -msGraphTenantID $tenantID -msGraphEnvironment $environment -msGraphDomainPermissions $domainPermission -msGraphUserPermissions $userPermission

Start an audit of all accounts and all proxy addresses using graph client secret authentication.

$logFolderPath = "c:\temp"
$tenantID = "EntraTenantID" #This is your Entra Tenant ID
$appID = "App registration ID"
$clientSecret = "Client secret assigned to app registration"
$environment = "Global" #Acceptable values Global,USGov,USDOD,China
$userPermission = "Directory.ReadWrite.All" #Acceptable values User.Read.All,User.ReadWrite.All,Directory.Read.All,Directory.ReadWrite.All
$domainPermission = "Domain.ReadWrite.All" #Acceptable values Domain.Read.All,Domain.ReadWrite.All
start-auditConsumerAccounts -logFolderPath $logFolderPath -msGraphTenantID $tenantID -msGraphEnvironment $environment -msGraphDomainPermissions $domainPermission -msGraphUserPermissions $userPermission -msGraphClientSecret $clientSecret -msGraphApplicationID $appID

Start an audit of all accounts and all proxy addresses using graph certificate authentication.

$logFolderPath = "c:\temp"
$tenantID = "EntraTenantID" #This is your Entra Tenant ID
$appID = "App registration ID"
$certificateThumpprint = "Cert thumbprint assigned to app registration"
$environment = "Global" #Acceptable values Global,USGov,USDOD,China
$userPermission = "Directory.ReadWrite.All" #Acceptable values User.Read.All,User.ReadWrite.All,Directory.Read.All,Directory.ReadWrite.All
$domainPermission = "Domain.ReadWrite.All" #Acceptable values Domain.Read.All,Domain.ReadWrite.All
start-auditConsumerAccounts -logFolderPath $logFolderPath -msGraphTenantID $tenantID -msGraphEnvironment $environment -msGraphDomainPermissions $domainPermission -msGraphUserPermissions $userPermission -msGraphCertificateThumbprint $certificateThumbprint -msGraphApplicationID $appID

Start an audit of all accounts and only primary proxy addresses using graph client secret authentication. This is just one example, -testPrimarySMTPOnly:$TRUE can be added to any command using any authentication type.

$logFolderPath = "c:\temp"
$tenantID = "EntraTenantID" #This is your Entra Tenant ID
$appID = "App registration ID"
$clientSecret = "Client secret assigned to app registration"
$environment = "Global" #Acceptable values Global,USGov,USDOD,China
$userPermission = "Directory.ReadWrite.All" #Acceptable values User.Read.All,User.ReadWrite.All,Directory.Read.All,Directory.ReadWrite.All
$domainPermission = "Domain.ReadWrite.All" #Acceptable values Domain.Read.All,Domain.ReadWrite.All
start-auditConsumerAccounts -logFolderPath $logFolderPath -msGraphTenantID $tenantID -msGraphEnvironment $environment -msGraphDomainPermissions $domainPermission -msGraphUserPermissions $userPermission -msGraphClientSecret $clientSecret -msGraphApplicationID $appID -testPrimarySMTPOnly:$TRUE

Start an audit of select accounts using a graph filter and using graph client secret authentication. This is just one example, -msGraphRecipientFilter can be added to any command using any authentication type.

$logFolderPath = "c:\temp"
$tenantID = "EntraTenantID" #This is your Entra Tenant ID
$appID = "App registration ID"
$clientSecret = "Client secret assigned to app registration"
$environment = "Global" #Acceptable values Global,USGov,USDOD,China
$userPermission = "Directory.ReadWrite.All" #Acceptable values User.Read.All,User.ReadWrite.All,Directory.Read.All,Directory.ReadWrite.All
$domainPermission = "Domain.ReadWrite.All" #Acceptable values Domain.Read.All,Domain.ReadWrite.All
$graphFilter = "startsWith(DisplayName, 'a')"
start-auditConsumerAccounts -logFolderPath $logFolderPath -msGraphTenantID $tenantID -msGraphEnvironment $environment -msGraphDomainPermissions $domainPermission -msGraphUserPermissions $userPermission -msGraphClientSecret $clientSecret -msGraphApplicationID $appID -msGraphRecipientFilter $graphFilter

Start an audit of select accounts by providing an array of user identities in the format of Azure Object IDs or User Principal Names. -bringYourOwnAddresses can be utilized with any graph authentication type and will test all addresses on the user by default unless -testPrimarySMTPOnly:$TRUE is also specified. This example uses graph client secret authentication.

#Define an array of addresses
$addressesToTest=@()
#Add users to the array to test either manually or through some other export / import.
$addressesToTest += "user1@domain.com"
$addressesToTest += "user2@domain.com"
$addressesToTest += "user3@domain.com"
$logFolderPath = "c:\temp"
$tenantID = "EntraTenantID" #This is your Entra Tenant ID
$appID = "App registration ID"
$clientSecret = "Client secret assigned to app registration"
$environment = "Global" #Acceptable values Global,USGov,USDOD,China
$userPermission = "Directory.ReadWrite.All" #Acceptable values User.Read.All,User.ReadWrite.All,Directory.Read.All,Directory.ReadWrite.All
$domainPermission = "Domain.ReadWrite.All" #Acceptable values Domain.Read.All,Domain.ReadWrite.All
start-auditConsumerAccounts -logFolderPath $logFolderPath -msGraphTenantID $tenantID -msGraphEnvironment $environment -msGraphDomainPermissions $domainPermission -msGraphUserPermissions $userPermission -msGraphClientSecret $clientSecret -msGraphApplicationID $appID -bringYourOwnAddresses $addressesToTest

Start an audit of select domains by providing an array of domains. -bringYourOwnDomains can be utilized with any graph authentication type and will test all addresses that match the domain by default unlesss -testPrimarySMTPOnly:$TRUE is also specified.

#Define an array of domains.
$domainsToTest = @()
#Add domains to the array to test.
#These domains must be registered in the tenant that you are authenticating to.
$domainsToTest += "domain.com"
$domainsToTest += "domain2.com"
$logFolderPath = "c:\temp"
$tenantID = "EntraTenantID" #This is your Entra Tenant ID
$appID = "App registration ID"
$clientSecret = "Client secret assigned to app registration"
$environment = "Global" #Acceptable values Global,USGov,USDOD,China
$userPermission = "Directory.ReadWrite.All" #Acceptable values User.Read.All,User.ReadWrite.All,Directory.Read.All,Directory.ReadWrite.All
$domainPermission = "Domain.ReadWrite.All" #Acceptable values Domain.Read.All,Domain.ReadWrite.All
start-auditConsumerAccounts -logFolderPath $logFolderPath -msGraphTenantID $tenantID -msGraphEnvironment $environment -msGraphDomainPermissions $domainPermission -msGraphUserPermissions $userPermission -msGraphClientSecret $clientSecret -msGraphApplicationID $appID -bringYourOwnDomains $domainsToTest

When the command is executed a graph connection using the specified authentication type is automatically performed. The scopes specified in the execution are verified as present after the connection has successfully been made. If the connection is unsuccessful or the scopes are not present the command will fail.

Once the graph connection is established, a call is made to extract all domain information from the tenant. If a custom domains list is provided, the list is validated to ensure the domains are registered in the tenant.

When the domains have been validated, the next step is to pull the users from EntraID. By default, all users are pulled unless a filter is specified or a list of addresses is specified. Guest accounts are automatically excluded from testing.

When the list of users has been gathered the command starts creating objects representing address combinations to test. As indicated user principal names are always included for testing as well as all proxy addresses on the user unless -testPrimarySMTPOnly:$TRUE is specified. The script automatically removes any addresses on a user that are not at domains registered in Microsoft 365. At the conclusion of list generation, the list is filtered to remove duplicates from being tested.

At this time further testing depends on the graph authentication type and number of objects to test. If the authentication type is not interactive and the number of users to test is greater than 50, the list of addresses is broken up into groups of 50. The script will then recursively create jobs to test users in batches of 50, with 5 concurrent jobs running at any one time. Each job sleeps for 1 second after each user validation with the entire job sleeping randomly between 5 – 10 minutes at the conclusion of testing 50 users. This is required to avoid service side throttling when attempting bulk user evaluation. A new job is created as jobs finish until all jobs representing all of the users have completed. If interactive authentication is utilized or the user count is less than 50 the list of users is iterated through sequentially until all testing has completed.

When the command finishes auditing all details of the audit are exported to an XML file located in the log file directory. An HTML report is also created and displayed to the administrator. The report contains three sections. The first section is the list of consumer accounts identified, the second section is a list of account test errors, and the last section is the timeline of testing.

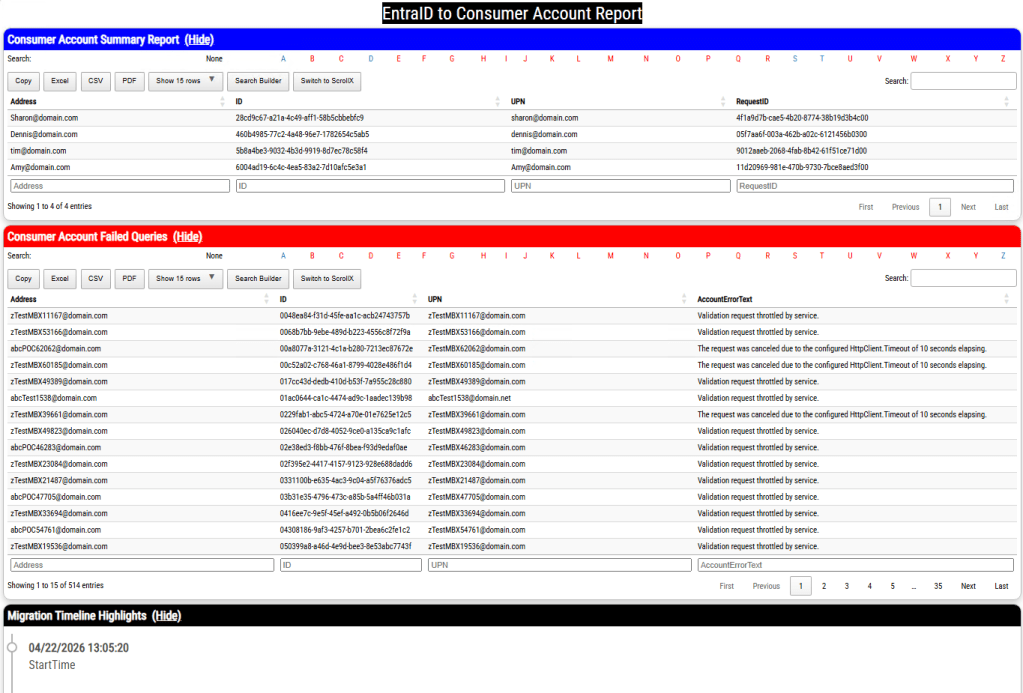
It is expected to have a list of accounts that fail to audit either due to HTTP call timeouts or an audit backoff from the service. The command exports all failed accounts to a separate file that allows administrators to retry the reporting operations on these accounts. Here is an example using graph client secret authentication:

#Import the list of failed accounts from the first run.
$failedAccounts = import-cliXML -path "c:\temp\AuditConsumerAccounts\AuditConsumerAccounts-ConsumerAccountsErrors.xml"
$logFolderPath = "c:\temp2" #USE A DIFFERENT LOG DIRECTORY TO NOT OVERWRITE ALREADY GATHERED DATA
$tenantID = "EntraTenantID" #This is your Entra Tenant ID
$appID = "App registration ID"
$clientSecret = "Client secret assigned to app registration"
$environment = "Global" #Acceptable values Global,USGov,USDOD,China
$userPermission = "Directory.ReadWrite.All" #Acceptable values User.Read.All,User.ReadWrite.All,Directory.Read.All,Directory.ReadWrite.All
$domainPermission = "Domain.ReadWrite.All" #Acceptable values Domain.Read.All,Domain.ReadWrite.All
start-auditConsumerAccounts -logFolderPath $logFolderPath -msGraphTenantID $tenantID -msGraphEnvironment $environment -msGraphDomainPermissions $domainPermission -msGraphUserPermissions $userPermission -msGraphClientSecret $clientSecret -msGraphApplicationID $appID -bringYourOwnAddresses $failedAccounts

The auditing process can take a long time to complete, and this is expected. In testing to complete 140,000 address tests took 3 days 6 hours to complete. The list of throttled or failed HTTP calls averaged 500 in these repeated tests.

With the auditing process complete administrators may now understand the scope of commercial accounts present and if they desire to do so develop a targeted communications campaign to assist these users in updating their identities to no longer have a relationship to registered addresses in Microsoft 365.

Graph and Client Secret Authentication

Microsoft Graph supports multiple methods to authenticate to EntraID to perform graph functions. One method of connecting is to utilize client secret authentication. This process is a little different than interactive authentication or certificate authentication.

The client secret authentication process begins with creating an app registration in Entra ID. To create the app registration:

To create the app registration:

  • Select New registration
  • In the name field I recommend something intuitive – for example MicrosoftGraphClientSecretAuth
  • Do not change any other fields.
  • Select the register button to complete creating the app registration.

When the application registration has been completed successfully you are automatically taken to the app registration. At this time copy the Application (Client) ID as this will be required for further operations.

To enable the application registration to perform work API permissions for Microsoft Graph must be added. To add api permissions:

  • Under Manage -> API Permissions
  • Select the add permission button.
  • Select Microsoft Graph
  • Select Application Permissions for the application permission type
  • In the search box type the permission that you are looking for.
    • For example, if modifying a domain type Domain.ReadWrite.All
    • In the permissions list this searches for all relevant permissions.
    • In this example you would expand domains and select Domain.ReadWrite.All
  • Select the add permission button when all of the permissions have been added that are required for your graph work.

When permissions have been added to an app registration, they do not become active until someone with permissions to grant consent provides consent. On the API permissions page is an option “Grant Consent for TenantName”. It is important that after assigning API permissions this option is selected to grant consent and active the permissions.

The final step in the process is to create the client secret. To create the client secret:

  • Select Manage -> Certificates & Secrets
  • Select New client secret
  • In the description I recommend something intuitive – for example – “MicrosoftGraphClientSecret”
  • Adjust the expiration to an acceptable time limit – I recommend the default of 180 days.
  • Select the Add button to complete the client secret.

The client secret is now displayed. There is a copy button to the right of the VALUE field. Select copy and save this value in another location. This will be your only opportunity to see the value of the secret created.

***WARNING*** Treat this value as you would any privileged account password. This value combined with the application ID will allow any administrator access to this application and all permissions assigned.

To connect to Microsoft Graph utilizing client secret authentication:

#Ensure that all graph modules are up to date.
#Note that this process can take an extended period of time depending on the number of graph modules installed
Get-InstalledModule Microosft.Graph.* | update-Module -force -confirm:$FALSE

#The variables referenced below will require you to fill in the blanks with information obtained in previous steps.
#Define the environment you are connecting to.
#Global / World Wide = Global
#GCC High = USGov
#DOD = USGovDOD
#China = China
$environmentName = Global
#Obtain the azure tenant ID where you will be authentication and use it here.
$tenantID = "AzureTenantIDGUID"
#Set the application ID of the app registration that was copied earlier.
$appID = "YourAppRegistrationID"
#Set the client secret
$clientSecret = "YourAppClientSecret"
#Establish the client secret password.
$securePassword = ConvertTo-SecureString -string $clientSecret -asPlainText -force
#Establih the secret credential.
$clientSecretCredential = New-Object -typeName System.Management.Automation.PSCredential -argumentList $appID,$securePassword
#Create the connection to Microsoft Graph
connect-MGGraph -environmentName $environmentName -tenantID $tenantID -clientSecretCredential $clientSecretCredential

If the connection is successful, you are now using Microsoft Graph with client secret authentication and with the permissions granted to the app registration utilized.

Domain Authentication, User Settings, and Entra PasswordPolicies

PasswordPolicies in Microsoft EntraID allow administrators to control the application of password expiration or strong password requirements across their M365 tenant. In this article I want to explore PasswordPolicies configurations and how settings interact with authentication types, domains, and individual users.

Background – PasswordPolices Management and Domains

Microsoft Entra ID password expiration is a per domain setting. Each registered and verified root domain can have unique password expiration policies applied to them, while sub-domains will inherit the password policy from its parent. The settings that control password expiration are PasswordNotificationWindowInDays and PasswordValidityPeriodInDays.

Tenant Defaults

In Microsoft 365 the default settings for all domains are that the PasswordNotificationWindowInDays and PasswordValidityPeriodInDays is NULL meaning password expiration is not enabled for tenants created after 2021.

https://learn.microsoft.com/en-us/microsoft-365/admin/manage/set-password-expiration-policy?view=o365-worldwide

As the admin, you can make user passwords expire after a certain number of days, or set passwords to never expire. By default, passwords are set to never expire for your organization.

Using Get-MGDomain the password expiration settings can be verified:

PS C:\> get-mgDomain -DomainId domain.net | select-object PasswordNotificationWindowInDays,PasswordValidityPeriodInDays | fl


PasswordNotificationWindowInDays :
PasswordValidityPeriodInDays     :

This also corresponds to the password expiration settings in the Microsoft 365 Admin Center showing NULL values.

If your tenant was created prior to 2021 your password expiration period by default is 90 days. Tenants created after 2021 have passwords set to never expire by default regardless of the checkbox in the M365 Admin Center password expiration policy user interface.

https://learn.microsoft.com/en-us/entra/identity/authentication/concept-sspr-policy#password-policies-that-only-apply-to-cloud-user-accounts

Default value: No expiration. If the tenant was created before 2021, it has a 90 day expiration value by default. You can check current policy with Get-MgDomain.
The value is configurable by using the Update-MgDomain cmdlet from the Microsoft Graph module for PowerShell.

Enabling password expiration in the M365 Admin Center

The M365 admin center has a single setting to manage the password expiration policy. This setting does not distinguish between domains and modification of these settings triggers changes across all domains registered in Microsoft 365.

Setting the property “days before passwords expire” adjusts the PasswordValidityPeriodInDays across all eligable domains.

Using Get-MGDomain the password expiration settings can be verified.

Id                               : domain.com
AuthenticationType               : Federated
IsDefault                        : False
PasswordNotificationWindowInDays :
PasswordValidityPeriodInDays     :

Id                               : domain.onmicrosoft.com
AuthenticationType               : Managed
IsDefault                        : True
PasswordNotificationWindowInDays :
PasswordValidityPeriodInDays     :

Id                               : domain.net
AuthenticationType               : Managed
IsDefault                        : False
PasswordNotificationWindowInDays : 30
PasswordValidityPeriodInDays     : 90

Id                               : subdomain.domain.net
AuthenticationType               : Managed
IsDefault                        : False
PasswordNotificationWindowInDays :
PasswordValidityPeriodInDays     :

Id                               : domain2.onmicrosoft.com
AuthenticationType               : Managed
IsDefault                        : False
PasswordNotificationWindowInDays : 30
PasswordValidityPeriodInDays     : 90

Id                               : domain.mail.onmicrosoft.com
AuthenticationType               : Managed
IsDefault                        : False
PasswordNotificationWindowInDays : 30
PasswordValidityPeriodInDays     : 90

Enabling password expiration in the M365 Admin Center – Domain Exceptions

When setting a password expiration window in the M365 Admin Center certain domains are excluded from having their settings automatically set. These include

  • Domains that are Federated for authentication
  • Any domains with the default flag set
  • Any sub domains where the root domain property is set
  • New domains added after the password expiration policy was enabled
  • Domains converted from federated to managed authentication

Federated Domain

Domains that are federated for authentication do not support password expiration in Microsoft 365. All determinants for password expiration are made through the federated authentication process. For example, users federated through Active Directory Federation Services and utilizing Active Directory for authentication would have their passwords expired by on-premises Active Directory and rely on ADFS to handle the password expiration.

Get-MGDomain -domainID domain.com | select-object ID,AuthenticationType,IsDefault,PasswordNotificationWindowInDays,PasswordValidityPeriodInDays

Id                               : domain.com
AuthenticationType               : Federated
IsDefault                        : False
PasswordNotificationWindowInDays :
PasswordValidityPeriodInDays     :

Default Domain

The default domain serves as the domain name utilized on Microsoft 365 objects when no domain is specified or no custom domain is registered.

Get-MGDomain -domainID domain.onmicrosoft.com | select-object ID,AuthenticationType,IsDefault,PasswordNotificationWindowInDays,PasswordValidityPeriodInDays

Id                               : domain.onmicrosoft.com
AuthenticationType               : Managed
IsDefault                        : True
PasswordNotificationWindowInDays :
PasswordValidityPeriodInDays     :

Root Domain

When a subdomain is added to Microsoft 365 where the root domain is already present and registered, a property on the sub-domain is automatically set called root domain. This automatically inherits authentication and password expiration settings that are set on the root domain. If custom authentication or password expiration settings are required for child domains, the root domain property must be cleared.

Get-MGDomain -domainID subdomain.domain.net | select-object ID,AuthenticationType,IsDefault,PasswordNotificationWindowInDays,PasswordValidityPeriodInDays

Id                               : subdomain.domain.net
AuthenticationType               : Managed
IsDefault                        : False
PasswordNotificationWindowInDays :
PasswordValidityPeriodInDays     :

Get-MgDomainRootDomain -DomainId subdomain.domain.net | select-object ID,AuthenticationType,IsDefault,PasswordNotificationWindowInDays,PasswordValidityPeriodInDays | fl

Id                               : domain.net
AuthenticationType               : Managed
IsDefault                        : False
PasswordNotificationWindowInDays : 30
PasswordValidityPeriodInDays     : 90

Domains Added after adjusting settings in the M365 Admin Center

If a domain is added after the expiration period is established in the M365 Admin Center, these domains do not get the PasswordNotificationWindowInDays automatically set.

new-mgDomain -Id newdomain.net

Get-MgDomain -DomainId newdomain.net | select-object ID,AuthenticationType,IsDefault,PasswordNotificationWindowInDays,PasswordValidityPeriodInDays | fl


Id                               : newdomain.net
AuthenticationType               : Managed
IsDefault                        : False
PasswordNotificationWindowInDays :
PasswordValidityPeriodInDays     :

Domains Converted from Federated Authentication to Managed Authentication

In M365 we allow administrators to change the authentication type of a domain from Federated Authentication to Managed Authentication. When setting the password expiration time in the M365 Admin Center any domains that are federated are skipped and the settings are not applied. Additionally, when a domain authentication type is converted from Federated back to Managed, the password expiration settings are not automatically applied.

Get-MGDomain -domainID domain.com | select-object ID,AuthenticationType,IsDefault,PasswordNotificationWindowInDays,PasswordValidityPeriodInDays

Id                               : domain.com
AuthenticationType               : Federated
IsDefault                        : False
PasswordNotificationWindowInDays :
PasswordValidityPeriodInDays     :

Update-MgDomain -DomainId domain.com -AuthenticationType Managed

Get-MgDomain -DomainId domain.com | select-object ID,AuthenticationType,IsDefault,PasswordNotificationWindowInDays,PasswordValidityPeriodInDays | fl


Id                               : domain.com
AuthenticationType               : Managed
IsDefault                        : False
PasswordNotificationWindowInDays :
PasswordValidityPeriodInDays     :

Setting passwords to never expire in the M365 Admin Center

It is Microsoft’s recommendation that customers disable password expiration in Microsoft 365.

https://learn.microsoft.com/en-us/microsoft-365/admin/manage/set-password-expiration-policy?view=o365-worldwide

Current research strongly indicates that mandated password changes do more harm than good. They drive users to choose weaker passwords, reuse passwords, or update old passwords in ways that are easily guessed by hackers. We recommend enabling multi-factor authentication. To learn more about password policy, check out Password policy recommendations.

If a tenant is in the default state, the PasswordValidityPeriodInDays is NULL demonstrating that password expiration is disabled. When selecting the option “Set password to never expire (recommended)” the value 2147483647 is stamped on each domain where password expiration may be enabled. The value 2147483647 is 5883516.8410959 years, effectively disabling any password expiration prompts. (This also happens to be the max value that PasswordValidityPeriodInDays can be set to.)

Get-MgDomain -DomainId domain.net | select-object ID,AuthenticationType,IsDefault,PasswordNotificationWindowInDays,PasswordValidityPeriodInDays | fl


Id                               : domain.net
AuthenticationType               : Managed
IsDefault                        : False
PasswordNotificationWindowInDays : 30
PasswordValidityPeriodInDays     : 2147483647

Setting password expiration using Microsoft Graph

Microsoft Graph provides administrators with the ability to manage password expiration at a more granular level. The command Update-MGDomain allows specifying a custom expiration period on an individual domain.

#Note:  Password notification window in days currently does not do anything but must be specified when running the command.  Users are no longer notified of pending password expiration in Microsoft 365 interfaces.

Update-MgDomain -DomainId domain.net -PasswordValidityPeriodInDays "45" -PasswordNotificationWindowInDays "15"

Microsoft Graph does not allow you to update the settings on domain that is enabled for federated authentication following the same rules as the M365 Admin Center.

Update-MgDomain -DomainId domain.com -PasswordValidityPeriodInDays "45" -PasswordNotificationWindowInDays "15"
Update-MgDomain : Domain operation is not allowed.

Microsoft graph will not allow you to update the password expiration days on a subdomain where root domain is populated.

Update-MgDomain -DomainId subdomain.e-domain.net -PasswordValidityPeriodInDays "45" -PasswordNotificationWindowInDays "15"
Update-MgDomain : Domain operation is not allowed.

Microsoft graph will allow you to set a password expiration days on the default domain even though the M365 Admin Center skips this domain.

Background – Password Policies Management and Users

In the previous section we introduced the settings on domains for password expiration. Every user that is provisioned in Microsoft 365 has a user principal name which incorporates one of the verified domains. The user’s domain settings determine the password policy that is applied to the user in conjunctions with the user’s individual password policy setting.

It may become necessary to manage the password policies of individual users. For example, you may have a service account tied to a domain where password expiration is enabled but you do not want the password to expire on that account. Microsoft Graph provides administrators with the ability to manage a user’s password policy settings through the Update-MGUser command. The ability to run this command on an individual user depends on the domain’s authentication type. Let’s explore how a domain’s authentication type influences the ability to manage a user’s password policies.

CloudPasswordPolicyForPasswordSyncedUsersEnabled

In some installations administrators wish to have the Microsoft 365 password expire at or near the same time as the on-premises Active Directory password expires. By default, the password expiration time is not a value that synchronizes between Active Directory and Microsoft 365.

Directory synchronization provides an optional feature that administrators may enabled named CloudPasswordPolicyForPasswordSyncedUsersEnabled.

https://learn.microsoft.com/en-us/entra/identity/hybrid/connect/how-to-connect-password-hash-synchronization

When the CloudPasswordPolicyForPasswordSyncedUsersEnabled is set to false, any directory synchronized user automatically has their password policies set to DisablePasswordExpiration. We will explore later how this can be modified for individual users based on the domain’s authentication type.

When this feature is enabled, the following changes occur:

New Users

  • All new users synchronized after the feature is enabled will have the PasswordPolicies attribute not set. (NULL = NONE).

Previously Synchronized Users

  • The user changes their password on premises due to password expiration or another password change requirement.
  • Password hash synchronization writes the password hash to Entra ID.
  • The users default value of DisablePasswordExpiration is now re-written to None
    • Note: Enabling this feature does not convert all users to expire passwords, the conversion only occurs as a result of on-premises password change.
  • Microsoft 365 will not evaluate the last password change timestamp and the expiration period and prompt the user for password changes when the passwords have expired.

It is extremely important to note that the password expiration period in Microsoft 365 is always evaluated against the last password change timestamp. There are several operations that could occur at any time that may reset user’s password in EntraID without any password change operation occuring on premises. For example, if a new Entra Connect server is introduced and password hash synchronization is enabled, all password hashes are synchronized effectively changing the expiration date between Active Directory and EntraID.

Default State: Password Policies Attribute

The password polices attribute may have a different default state depending on whether the user is a cloud only user or if the user is directory synchronized. Additionally, if the user is directory synchronized the default password policies state may change depending on the dir sync features enabled.

The password policies attribute has a value of NULL, None, or DisablePasswordExpiration. NULL or NONE are equivalent and will result in the cloud password expiring for managed domains based on the domains settings. The value DisablePasswordExpiration will prevent the users account from expiring the password based on the managed domains settings. If a password policy is set to DisablePasswordExpiration and later the password should expire, setting the password policies to NONE will expire the user’s password.

It may be possible that a user’s password policies attribute differs from the states outlined below. If the domain was managed, password policies were adjusted on users, and then the domain was converted to federated the password policies do not change. If the user was utilizing a federated domain UPN suffix and was then changed to a managed domain suffix the password policies attribute could be edited. This value will not change states as the user’s UPN suffix changes between federated and managed domains or managed domains to federated domains.

Cloud Only User / Managed Domain

PS C:\> get-mgUser -UserId CloudOnlyManaged@domain.net -Property PasswordPolicies | select -ExpandProperty PasswordPolicies
PS C:\>

Directory Synchronized User / CloudPasswordPolicyForPasswordSyncedUsersEnabled FALSE / Federated Domain

get-mgUser -UserId FederatedUser1@domain.com -Property PasswordPolicies | select -ExpandProperty PasswordPolicies
DisablePasswordExpiration

Directory Synchronized User / CloudPasswordPolicyForPasswordSyncedUsersEnabled FALSE / Managed Domain

get-mgUser -UserId ManagedUser1@e-mcmichael.net -Property PasswordPolicies | select -ExpandProperty PasswordPolicies
DisablePasswordExpiration

Directory Synchronized User / CloudPasswordPolicyForPasswordSyncedUsersEnabled TRUE / Federated Domain (Post Password Change)

get-mgUser -UserId FederatedUser1@domain.com -Property PasswordPolicies | select -ExpandProperty PasswordPolicies
None

Directory Synchronized User / CloudPasswordPolicyForPasswordSynchronizedUsersEnabled TRUE / Managed Domain (Post Password Change)

get-mgUser -UserId ManagedUser1@domain.net -Property PasswordPolicies | select -ExpandProperty PasswordPolicies
None

Directory Synchronized NEW User / CloudPasswordPolicyForPasswordSynchronizedUsersEnabled TRUE / Managed Domain

get-mgUser -UserId ManagedUser3@e-mcmichael.net -Property PasswordPolicies | select -ExpandProperty PasswordPolicies
PS C:\>

Directory Synchronized NEW User / CloudPasswordPolicyForPasswordSynchronizedUsersEnabled TRUE / Federated Domain

get-mgUser -UserId FederatedUser3@e-mcmichael.com -Property PasswordPolicies | select -ExpandProperty PasswordPolicies
PS C:\>

Setting PasswordPolicies and Federated Domain Authentication (CloudPasswordPolicyForPasswordSyncedUsersEnabled FALSE)

When a user is created with a domain that utilizes federated authentication the ability to manage the PasswordPolicies attribute is limited.

When using Update-MGUser to set the PasswordPolicies attribute to NONE an error is encountered:

Update-MgUser -UserId FederatedUser1@domain.com -PasswordPolicies None
Update-MgUser : Unable to update the specified properties for on-premises mastered Directory Sync objects or objects
currently undergoing migration.

We note that update-MGUser is not supported on federated domains in the following article.

https://learn.microsoft.com/en-us/entra/identity/hybrid/connect/how-to-connect-password-hash-synchronization

 Note

The Update-MgUser PowerShell command doesn't work on federated domains.

The error returned though is misleading. Based on the error provided one would believe that the passwordPolicies attributes is locked because the object is enabled for directory synchronization. This is not correct the actual error is because the user is set with a domain that is enabled for federated authentication. At the time of publishing our internal engineering groups are reviewing this error and working to make it more accurately reflect the underlying reason.

When using Update-MGUser to set the PasswordPolicies attribute to DisablePasswordExpiration the command completes successfully although in this example it is setting a value that already exists therefore performing no actions on the user object. (See Why did certain scenarios for the federated users work if the commands if update-MGUser does not work on federated domains? below for further explanation.)

Update-MgUser -UserId FederatedUser1@domain.com -PasswordPolicies DisablePasswordExpiration

Setting Password Policies, Federated Domain Authentication, with Managed Authentication Staged Rollout (CloudPasswordPolicyForPasswordSyncedUsersEnabled FALSE)

EntraID allows administrators to test managed authentication without fully converting a federated domain. This feature is known as Managed Authentication Staged Rollout. For more information on managed authentication staged rollout please review: https://learn.microsoft.com/en-us/entra/identity/hybrid/connect/how-to-connect-staged-rollout

When a user is enabled for staged rollout certain password expiration policies apply to the user. Attempting to use Update-MGUser to set the password policies to NONE fails for the same reason as a Federated user.

Update-MgUser -UserId FederatedUser2@domain.com -PasswordPolicies None
Update-MgUser : Unable to update the specified properties for on-premises mastered Directory Sync objects or objects
currently undergoing migration.

Setting Password Policies and Managed Domain Authentication (CloudPasswordPolicyForPasswordSyncedUsersEnabled FALSE)

When a user is created with a domain that utilizes managed authentication the password policies attribute can be fully managed. Here are some examples:

Cloud Only User / Managed Authentication

get-mgUser -UserId CloudOnlyManaged@domain.net -Property PasswordPolicies | select -ExpandProperty PasswordPolicies

#Null Return#

update-mgUser -UserId CloudOnlyManaged@domain.net -PasswordPolicies "DisablePasswordExpiration"

get-mgUser -UserId CloudOnlyManaged@domain.net -Property PasswordPolicies | select -ExpandProperty PasswordPolicies
DisablePasswordExpiration

Directory Synchronized User / CloudPasswordPolicyForPasswordSyncedUsersEnabled FALSE/ Managed Authentication

get-mgUser -UserId ManagedUser1@domain.net -Property PasswordPolicies | select -ExpandProperty PasswordPolicies
DisablePasswordExpiration

update-mgUser -UserId ManagedUser1@domain.net -PasswordPolicies None

get-mgUser -UserId ManagedUser1@domain.net -Property PasswordPolicies | select -ExpandProperty PasswordPolicies
None

Setting PasswordPolicies and Federated Domain Authentication (CloudPasswordPolicyForPasswordSyncedUsersEnabled TRUE)

The results are the same as CloudPasswordPolicyForPasswordSyncedUsersEnabled FALSE.

If attempting to set the value to NONE the command succeeds as the value was already set to NONE as a result of the feature enablement and subsequent password reset.

Update-MgUser -UserId FederatedUser1@domain.com -PasswordPolicies None

If attempting to set the value to DisablePasswordExpiration the command fails.

Update-MgUser -UserId FederatedUser1@domain.com -PasswordPolicies DisablePasswordExpiration
Update-MgUser : Unable to update the specified properties for on-premises mastered Directory Sync objects or objects
currently undergoing migration.

Setting Password Policies, Federated Domain Authentication, with Managed Authentication Staged Rollout (CloudPasswordPolicyForPasswordSyncedUsersEnabled TRUE)

The results are the same as “Setting PasswordPolicies and Federated Domain Authentication (CloudPasswordPolicyForPasswordSyncedUsersEnabled TRUE)” outlined in the previous section.

Setting Password Policies and Managed Domain Authentication (CloudPasswordPolicyForPasswordSyncedUsersEnabled TRUE)

The results are the same as “Setting Password Policies and Managed Domain Authentication (CloudPasswordPolicyForPasswordSyncedUsersEnabled FALSE)” outlined in a previous section.

get-mgUser -UserId ManagedUser3@domain.net -Property PasswordPolicies | select -ExpandProperty PasswordPolicies

update-MGUser -UserId ManagedUser3@domain.net -PasswordPolicies "DisablePasswordExpiration"

get-mgUser -UserId ManagedUser3@domain.net -Property PasswordPolicies | select -ExpandProperty PasswordPolicies
DisablePasswordExpiration

update-MGUser -UserId ManagedUser3@domain.net -PasswordPolicies "None"

get-mgUser -UserId ManagedUser3@domain.net -Property PasswordPolicies | select -ExpandProperty PasswordPolicies
None

Why did certain scenarios for the federated users work if the commands if update-MGUser does not work on federated domains?

In the federated scenario the only time that the command did not error was when it was setting a value that already existed on the object. For example, DisablePasswordExpiration was already set to running Update-MGUser -passwordPolicies DisablePasswordExpiration succeeded. When a graph call is made to set an attribute that already exists on the object with the same value the underlying API is not invoked. The call is then “successful” even though no attempt to change the value occurred.

Quick Reference Table

  • Cloud Only User
    • Managed Authentication
      • Default Value: NULL
      • Update-MGUser Accepted Values: DisablePasswordExpiration or NONE
  • Directory Synchronized User
    • CloudPasswordPolicyForPasswordSyncedUsersEnabled FALSE
      • Managed Authentication
        • Default Value: DisablePasswordExpiration
          • Update-MGUser Accepted Values: DisablePasswordExpiration or NONE
      • Federated Authentication
        • Default Value: DisablePasswordExpiration
        • Update-MGUser Accepted Values: No accepted values
    • CloudPasswordPolicyForPasswordSyncedUsersEnabled TRUE
      • Default Values All Authentication Types
        • Prior to password hash synchronization: DisablePasswordExpiration or NONE
        • Post password hash synchronization: None
        • New account creation post enablement: NULL
      • Managed Authentication
        • Update-MGUser Accepted Values: DisablePasswordExpiration or None
      • Federated Authentication
        • Update-MGUser Accepted Values: No accepted values

References

https://docs.azure.cn/en-us/entra/identity/authentication/concept-password-ban-bad-combined-policy

https://learn.microsoft.com/en-us/powershell/module/microsoft.graph.users/update-mguser?view=graph-powershell-1.0

https://learn.microsoft.com/en-us/powershell/module/microsoft.graph.identity.directorymanagement/get-mgdomain?view=graph-powershell-1.0

https://learn.microsoft.com/en-us/microsoft-365/admin/manage/set-password-expiration-policy?view=o365-worldwide

https://learn.microsoft.com/en-us/entra/identity/hybrid/connect/how-to-connect-password-hash-synchronization

https://learn.microsoft.com/en-us/microsoft-365/admin/add-users/set-password-to-never-expire?view=o365-worldwide

https://learn.microsoft.com/en-us/powershell/module/microsoft.graph.users/get-mguser?view=graph-powershell-1.0

https://learn.microsoft.com/en-us/powershell/module/microsoft.graph.identity.directorymanagement/update-mgdomain?view=graph-powershell-1.0

Thoughts on Microsoft 365 and Domain Federation

This week I was working with a customer that converted a domain from federated authentication to managed authentication for the purposes of testing the transition. This is not an uncommon occurrence, as many customers that utilized federated authentication often combine it with Password Hash Synchronization to provide a measure of redundancy for authentication in the event that their federated authentication provider is no longer available.

At the time that I was engaged the customer was raising an escalation on how to convert the domain back to federated authentication. To convert the domain to managed authentication the customer utilized Update-MGDomain -domainID “Domain” -authenticationType “Managed”. This is an appropriate method to convert the domain from federated to managed authentication. The customer was attempting to use Update-MGDomain -domainID “Domain” -authenticationType “Federated” and received the following error

update-MGDomain -DomainId "domain.net" -AuthenticationType "Federated"

update-MGDomain : Changing authenticationType from Managed to Federated is currently not supported.
Status: 400 (BadRequest)

The documentation for Update-MGDomain does list “Federated” as an authentication type.

https://learn.microsoft.com/en-us/powershell/module/microsoft.graph.identity.directorymanagement/update-mgdomain?view=graph-powershell-1.0

Technically this is correct, the command does evaluate and return an authentication type of Federated but cannot be utilized on its own to convert a domain from managed to federated authentication. Federating a domain requires information and attributes beyond what Update-MGDomain accepts.

This leads to a conversation regarding the “supported” method to federate a domain with Microsoft 365. Our response was to utilize Entra Connect and the integration with ADFS. There is not though a specific document that says this is the “supported” method. If there’s no documentation how do we come to conclusion this is the “supported” method.

Prior to the integration of ADFS with Entra Connect customers had access to a command convert-MSOLDomainToFederated. This command was designed to be run on ADFS and not only converted the domain to federation in EntraID by stamping the appropriate federation attributes but also created a generic federation trust within ADFS. In many cases the generic federation trust that was created did not reflect the same settings that customers utilized for synchronization, such as sourceAnchor, UPN, device registration etc. In the most simplest scenarios, it worked fine but more advanced scenarios it did not support.

The Convert-MSOLDomainToFederated has since been deprecated and has no equivalent graph replacement. This leaves Entra Connect an attractive alternative to federating a domain. Using Entra Connect has several benefits over other options. When using Entra Connect the ADFS farm is registered with the installation. As changes to configurations occur Entra Connect will automatically update the properties of the federation trust. It automates the addition of ADFS and WAP servers to existing farms and supports full certificate management capabilities. One of the drawbacks is that converting a domain to federated from managed authentication is a per domain process. It works well for single domains but not necessarily for 100s of domains.

Microsoft Graph supports the ability to convert a domain to federated authentication through the new-MGDomainFederationConfiguration command.

https://learn.microsoft.com/en-us/powershell/module/microsoft.graph.identity.directorymanagement/new-mgdomainfederationconfiguration?view=graph-powershell-1.0

As long as the administrator is aware of the appropriate values this command can be utilized to convert the domain. This also assumes that the federation trust that exists in ADFS has been created in a manner that fully supports Microsoft 365.

What is the recommendation if we have to convert to managed authentication in an emergency?

If the ADFS environment, Active Directory, or network infrastructure becomes compromised many customers rely on the conversion to managed authentication to restore access to their cloud services. When password hash synchronization has been enabled this is an easy and quick transition. When the recovery actions have been completed, I recommend utilizing the Entra Connect installation to re-federate a minimum of two domains. This ensures that the federation settings within Microsoft 365 have accurate values and the federation trust in ADFS is created in a manner supporting Microsoft 365. For additional domains Microsoft graph can be utilized to pull the federation settings from the converted domains and other domains federated with New-MGDomainFederationConfiguration.

Insufficient privileges when setting a user license

Set-MGUserLicense allows administrators to utilize Microsoft Graph to set a users licenses. https://learn.microsoft.com/en-us/powershell/module/microsoft.graph.users.actions/set-mguserlicense?view=graph-powershell-1.0 Set-MGUserLicense leverages the user:AssignLicense graph interface to manage the users licenses. https://learn.microsoft.com/en-us/graph/api/user-assignlicense?view=graph-rest-1.0&tabs=http

I recently worked a customer escalation where when executing set-MGUserLicense the following error was noted:

Authorization_RequestDenied,Microsoft.Graph.PowerShell.Cmdlets.SetMgUserLicense_AssignExpanded
Set-MgUserLicense : Insufficient privileges to complete the operation.

Status: 403 (Forbidden)
ErrorCode: Authorization_RequestDenied

When Microsoft Graph returns an insufficient privileges error message this generally means that the permissions scopes required either do not exist on the user or graph application registration running the command. According to the user:AssignLicense interface documentation the minimum required permission is LicenseAssignment.ReadWrite.All and the maximum permissions are User.ReadWrite.All and Directory.ReadWrite.All.

Graph provides a method to review the context of the authentication as well as the scopes authorized using Get-MGContext. https://learn.microsoft.com/en-us/powershell/module/microsoft.graph.authentication/get-mgcontext?view=graph-powershell-1.0. When reviewing the scopes post authentication the following was displayed:

Get-MgContext | Select-Object -ExpandProperty Scopes

DeviceManagementManagedDevices.Read.All
UserAuthenticationMethod.Read.All
User.ReadWrite.All
Policy.ReadWrite.ApplicationConfiguration
Application.ReadWrite.All
Group.Read.All
Directory.ReadWrite.All
Directory.Read.All
User.Read.All
GroupMember.Read.All
DeviceManagementRBAC.Read.All
DeviceManagementManagedDevices.ReadWrite.All
Mail.Send
Organization.Read.All
AuditLog.Read.All
Policy.Read.All
DeviceManagementManagedDevices.PrivilegedOperations.All

The maximum scopes required are present for the graph connection, yet the insufficient privileges error continues. The following command was being utilized to set the users licenses:

Set-MGUserLicense -userID 'ObjectID' -AddLicenses @{SkuId = '38b434d2-a15e-4cde-9a98-e737c75623e1'} -RemoveLicenses @()

When reviewing the SKU ID this SKU ID is associated with a Visio Plan 2 sku. (https://learn.microsoft.com/en-us/entra/identity/users/licensing-service-plan-reference). If you pay close attention to the table, you will see that the product name is Visio Plan 2, but the String ID is Visio_Plan2_Dept. The insufficient privileges is actually a red herring in terms of how we would normally interpret this error. In this case the insufficient privileges are not derived from lacking graph scopes but rather from the fact that this sku cannot be directly assigned to a user. A department sku can only be assigned by the Microsoft License Manager which is a self-service license acquisition process by the user.

To correct the insufficient privileges error the correct Visio Plan 2 sku was specified.

External domain takeover and Microsoft Graph

When attempting to prove ownership of a domain administrators sometimes encounter a scenario where the domain is associated with another tenant. It is possible that the domain is associated with an unmanaged (viral) tenant within Microsoft 365.

We provide documentation to administrators on how to convert the unmanaged tenant to managed and then remove the domain. https://learn.microsoft.com/en-us/entra/identity/users/domains-admin-takeover

The external takeover method relies on Microsoft Graph to complete the process. Unfortunately, the instructions currently contained in our published guidance no longer work. In this post I want to provide updated guidance on how to utilize graph to perform the external takeover method.

In order to preform an external takeover the account or graph application that you are using must have the appropriate rights for domain management. Information on domain verify can the permissions supported may be found here: https://learn.microsoft.com/en-us/graph/api/domain-verify?view=graph-rest-1.0&tabs=http. In this instance Domain.ReadWrite.All are the only permissions supported. Please note that consent may be required in order to add these permissions.

Prior to performing the external admin takeover, the domain will need to be added to the tenant and the appropriate DNS records for validation in place.

To perform the process of the external takeover we will:

  • Connect to Microsoft Graph and specify the minimum permissions required.
  • Create a URL to call domain verify.
  • Create body parameters to include with the domain verify post that force takeover is specified.
  • Invoke the graph method and capture the results.

The code is as follows:

Connect-MGGraph -scopes "Domain.ReadWrite.All"

$domainID = "domainToTakeOver.com"

$uri = "https://graph.microsoft.com/v1.0/domains/$domainID/verify"

$body = @ { forceTakeover = $true } | ConverTo-JSON

$response = Invoke-MGGraphRequest -Method POST -uri $uri -Body $body

$response | ConvertTo-JSON

$response

The response should contain a success or failure message.

Converting Direct Assigned Licenses to Group Assigned Licenses

In Microsoft 365 users may be assigned the same license both direct and through group-based licensing.  For organizations that are converting to group-based licensing this is not an uncommon scenario to ensure that users do not lose access to the service during the transition to group-based assignments.  When a license is assigned to user both direct and through group-based licensing only a single license is consumed. 

Managing direct and group based license assignment in the M365 Admin Center…

In the M365 Admin Center if a group-based license is assigned to the user the option to manage that individual license is greyed out.  A note is displayed “this is inherited by group-based licensing and can’t be changed here.  Manage group-based licenses from the Groups pivot in license details.”  If the user also had a direct assigned license this prevents the removal of the direct assigned license from the users’ properties.

The M365 Admin Center also allows expansion of individual licenses and displaying the users that have the license assigned.  Administrators also have the ability to assign and unassign licenses from this view. 

If you select the user that has both a direct and group-based license assignment and select unassign license an error is displayed.

When a user has both a direct and group-based license assignment the directly assigned license cannot be managed in the M365 Admin Center.

Using Graph to Manage Direct License Assignment

Get-MGUser provides the properties AssignedLicenses and LicenseAssignmentStates.  The license assignment states provides information regarding the licenses assigned to the user and how those licenses are assigned.

PS C:\> Get-MgUser -UserId "!LicenseTestUser2@domain" -Property AssignedLicenses, LicenseAssignmentStates, DisplayName | Select-Object DisplayName, AssignedLicenses -ExpandProperty LicenseAssignmentStates  | fl


DisplayName          : !LicenseTestUser2
AssignedLicenses     : {314c4481-f395-4525-be8b-2ec4bb1e9d91}
AssignedByGroup      : 519fe352-6f2d-4022-973e-ad72c5bcf63d
DisabledPlans        : {882e1d05-acd1-4ccb-8708-6ee03664b117}
Error                : None
LastUpdatedDateTime  : 2/3/2025 1:08:24 PM
SkuId                : 314c4481-f395-4525-be8b-2ec4bb1e9d91
State                : Active
AdditionalProperties : {}

DisplayName          : !LicenseTestUser2
AssignedLicenses     : {314c4481-f395-4525-be8b-2ec4bb1e9d91}
AssignedByGroup      :
DisabledPlans        : {}
Error                : None
LastUpdatedDateTime  : 2/3/2025 1:05:23 PM
SkuId                : 314c4481-f395-4525-be8b-2ec4bb1e9d91
State                : Active
AdditionalProperties : {}

In this case the user has two license assignments for the license 314c4481-f395-4525-be8b-2ec4bb1e9d91.  The first state has AssignedByGroup 519fe352-6f2d-4022-973e-ad72c5bcf63d and the second state shows no AssignedByGroup.  This demonstrates that the user has both a group and direct license assignment. 

With the inability to manage the direct assigned license in the M365 Admin Center if the desire is to remove the direct assigned license graph must be utilized.  Here is an example of removing the direct assigned license.  (See Using graph to modify group based licenses… | TIMMCMIC for how to build the body parameters section.)

#Establish the body parameters hash table.
$params = @{}
#Build the add licenses array
$addLicenses = @()

#Build the remove licenses array
$removeLicenses = @()
$disabledPlans = @()
$removeLicenses += "314c4481-f395-4525-be8b-2ec4bb1e9d91"
$params = @{"AddLicenses" = $addLicenses ; "RemoveLicenses" = $removeLicenses}
Set-MgUserLicense -UserId "!LicenseTestUser2@domain" -BodyParameter $params

When the command completes successfully repeating the get displays the following results.

PS C:\> Get-MgUser -UserId "!LicenseTestUser2@domain" -Property AssignedLicenses, LicenseAssignmentStates, DisplayName | Select-Object DisplayName, AssignedLicenses -ExpandProperty LicenseAssignmentStates  | fl


DisplayName          : !LicenseTestUser2
AssignedLicenses     : {314c4481-f395-4525-be8b-2ec4bb1e9d91}
AssignedByGroup      : 519fe352-6f2d-4022-973e-ad72c5bcf63d
DisabledPlans        : {882e1d05-acd1-4ccb-8708-6ee03664b117}
Error                : None
LastUpdatedDateTime  : 2/3/2025 1:08:24 PM
SkuId                : 314c4481-f395-4525-be8b-2ec4bb1e9d91
State                : Active
AdditionalProperties : {}

This output confirms that the user has a single license assignment state and that the license is assigned by a group.

Summary

When a direct and group-based license exists on the user the direct license assignment cannot be managed in the M365 Admin Center.  To migrate to group-based licensing the direct assigned license can be removed using Microsoft Graph. 

Entra / Azure: Searching for Microsoft IP Addresses

In a previous post I outlined a script that allows administrators to search for Microsoft 365 IP and URLs. As with Microsoft 365, Entra services also publish a list of IP addresses, and their service descriptions associated with each IP space.

Unlike Microsoft 365 the JSON files that contain this information are not made available through a web service. The files are made available through the Microsoft download catalog.

I have recently published a PowerShell module to the PowerShell gallery that automates the downloading of the Entra JSON files. Once the files have been downloaded, they may be utilized with the Office365IPAddresses script to locate an IP address within Entra services.

The AzureIPAddress script requires PowerShell 5.1. This is due to the methods utilized to capture the JSON files. To utilize the script open PowerShell 5.1 and run the following commands:

Install-Script AzureIPAddress
AzureIPAddress.ps1 -logFolderPath c:\temp

The script will locate the downloads for both Public and Government clouds and download the associated JSON files. They are placed in the logging directory in a folder called AzureIPAddress. In this example the folder is c:\temp\AzureIPAddress. (NOTE: The same log folder path must be utilized with the Office365IPAddress script in order to locate the Azure json files.)

To search for an IP address the Office365IPAddress script is utilized. Why is this not just included in the AzureIPAddress script? The ability to parse IPv4 and IPv6 addresses is more easily achieved with PowerShell 7. The same commands utilized in Office365IPAddress are not available in PowerShell 5.1. The commands in AzureIPAddress to download and parse the HTML files necessary to locate the JSON files are not available in PowerShell 7. I could have gotten creative and try to call PowerShell 7 from PowerShell 5.1 or vice versa, but that just adds potential complications. Keeping the script command separate but creating a dependency between them simplifies the process.

To search for the IP address run the following commands:

Install-Script Office365IPAddress
Install-Module PSWriteHTML
Office365IPAddress.ps1 -IPAddressToTest "52.247.151.193" -logFolderPath c:\temp -IncludeAzureSearch:$TRUE

During command execution all IP spaces associated with all Entra services in Public and Government cloud are searched. If the IP address is located in any service, the service information is logged and exported to XML. The log and XML file are contained in the specified log directory. An HTML file is also generated and displayed that provides the same information graphically for review.

If the IP address specified co-exists in any Microsoft 365 services, the service information is also displayed in the output.

This script should allow administrators to map IP addresses to Entra services.

Office 365 – Distribution List Migration Version 2.0 – Part 40

Offering a new alternative for nested group migrations…

Distribution lists offer administrators the opportunity to nest within each other. As a part of distribution list migrations all child groups must be migrated prior to the parent group being migrated.

In the case of a single migration, if the parent is selected for migration and contains children, the migration will fail and the logs will indicate that a child group was found and must be migrated first.

In the case of multiple migrations, if the parent is attempted first before a child for migration, the parent will be scheduled for retry. After a migration pass has been attempted against each group, the parent distribution lists are retried if the child was included in the migration batch. 

I recently had a customer that presented an interesting scenario. They have a parent distribution list that contains multiple children. The children lists membership is managed by another product that only has on-premises integration. In this customer instance they desired to migrate the parent distribution list but retain the children on premises. The child distribution lists would continue to be managed through their third party system. Both the parent and child distribution lists were synchronized to Office 365 and available in Exchange Online.

They proposed a solution where they would remove the children distribution lists and then migrate the parent. Post migration, in Exchange Online, they would add the children distribution lists back as members. This is not blocked, synchronized distribution lists can be added as members of a cloud only distribution group. 

This obviously is a manual process and could lead to things being missed. Plus, what fun is a manual process when we could easily code a solution to support it 🙂

In version 2.9.8.24 a new switch has been introduced to SINGLE distribution list migrations. The switch is not available in multiple or multiple machine migrations. The switch is “-skipNestedGroupCheck”. When this switch is specified as a part of a migration if a mail enabled child group is found as a member of the distribution list to be migrated the migration is allowed to proceed. Instead of logging an error the mail enabled child distribution list is added as a valid recipient and as long as the recipient can be located in Office 365 the migration will proceed. At the end of the migration the synchronized child distribution lists are added as members of the migrated cloud distribution lists. 

At the conclusion of the migration the mail disabled group remains on premises. The membership of the mail disabled group remains the same. If at a later time a child distribution list is migrated the module already supports reviewing all cloud only distribution groups for membership. This group will be found as a member of the previously migrated group and the group membership should be retained.

Are there any mail flow considerations when doing this? The answer is yes! If you are not utilizing the -enableHybridMailFlow switch on premises Exchange Servers will continue to receive email at all child distribution lists. The parent distribution lists address will no longer be available on premises, therefore any email that relied on the expansion of the parent distribution list would fail.

If -enableHybridMailFlow is utilized the following mail flow route ensures that all group, including the non-migrated child distribution lists, receive the message.

  • The email is received by the on premises Exchange Server (parent@contoso.com).
  • Parent@contoso.com resolves to the dynamic distribution list created by -enableHybridMailFlow.
  • Dynamic distribution list expansion occurs and resolves to the single mail contact parent-migratedByScript@contoso.com
  • The mail contact parent-migratedByScript@contoso.com has a target address parent@contoso.mail.onmicrosoft.com. This address is resolved.
  • Mail flows through the hybrid connector and arrives in Office 365.
  • Parent@contoso.mail.onmicrosoft.com resolves to the migrated distribution list parent@contoso.com.
  • The migrated distribution list parent@contoso.com is expanded and includes child distribution lists.
  • The child distribution lists are now expanded.

I hope this new switch adds some additional flexibility and opens new scenarios for migration!