Office 365 – Distribution List Migration – Version 2.0 – Table of Contents
Leave a reply
It may become necessary to purge an object an Entra Connect connector space. A connector space exists for each directory that is added to an Entra Connect installation. Typical installations have two connector spaces, one for the local Active Directory and the other for Entra ID. More complex installations may have more than one connector space for Active Director.
When a user object is synchronized to Entra ID the Active Directory attributes are read into the Active Directory connector space. When the object is successfully written to Entra ID, the Entra ID attributes are read into the Entra ID connector space.
In some instances, it becomes necessary to purge the information within a connector space in order to fix a synchronization issue. Purging an object from a connector space allows the Entra Connect process to re-read the objects properties from the directory where the deletion occurred. For example, purging an object from the Active Directory and Entra ID connector spaces will force the object to be re-read from both directories and sync operation performed on the refreshed attributes. It is also possible to remove an object from either of the connector spaces without removing it from both.
To facilitate this process, I have released a script to the Powershell Gallery that automates the remove of the object from one or both connector spaces. The script offers several options to execute.
To save this script to your entra connect server perform the following:
Install-Script Reset-EntraConnectObjectThis saves the scripts to the local path.
The script provides a variety of options for execution each performing slightly different functions.
This option is used when the Active Directory and Entra Connect distinguished names are both known. This information is generally obtained from a metaverse search and copying the respective distinguished names from the connector spaces. When executed the connector space objects are extracted by distinguished name and a deletion from the connector spaces is processed. A single item synchronization is automatically triggered to refresh each connector space with the objects properies.
reset-EntraConnectObject.ps1 -logFolderPath c:\temp -EntraDN "CN={4272736E37395A7742456D3474535578366A746558413D3D}" -ADObjectDN "CN=Tim McMichael,OU=Users,OU=Objects,DC=home,DC=domain,DC=com"This option is used when only Active Directory information is known, and an object deletion should occur from both the Active Directory and Entra connector spaces. When executed an Active Directory call is made to locate the user by either distinguished name, objectGUID, or mail attribute. This call is made using the specified domain controller and credentials. When the user is located the sourceAnchor for the Entra Connect installation is determined and the Entra ID distinguished name is automatically calculated. A deletion from each connector space is processed. A single item synchronization is automatically triggered to refresh each connector space with the object properties. This is helpful if you only have access to the Active Directory information or are unable to perform a metaverse search to determine distinguished name values.
#If get-credential returns an error message "Get-Credential : Cannot process command because of one or more missing mandatory parameters: Credential" do the following:

Set-ItemProperty "HKLM:\SOFTWARE\Microsoft\PowerShell\1\ShellIds" -Name "ConsolePrompting" -Value $True
Option 2A: Remove object by Active Directory Distinguished Name
#The following instructions locate the object by Active Directory Distinguished Name

$cred = get-credential #Provide credential of person with rights to read attributes from active directory

$globalCatalogServer = "DC.domain.com" #FQDN of a global catalog server

$DN = "CN=Tim McMichael,OU=Users,OU=Objects,DC=home,DC=domain,DC=com"

reset-EntraConnectObject.ps1 -logFolderPath c:\temp -ADObjectDN $dn -globalCatalogServer $globalCatalogServer -activeDirectoryCredential $cred
Option 2B: Remove object by Active Directory Mail Attribute
#The following instructions locate the object by Active Directory Mail Attribute

$cred = get-credential #Provide credential of person with rights to read attributes from active directory

$mail = "tim@domain.com" #Active directory mail attribute

$globalCatalogServer = "DC.Domain.com"

reset-EntraConnectObject.ps1 -logFolderPath c:\temp -ADObjectmail $mail -activeDirectoryCredential $cred -globalCatalogServer $globalCatalogServer
Option 2C: Remove object by Active Directory ObjectGUID
#The following instructions locate the object by Active Directory objectGUID

$cred = get-credential #Provide credential of person with rights to read attributes from active directory

$globalCatalogServer = "DC.domain.com" #FQDN of a global catalog server

$objectGUID = "ef27bb06-70d6-4904-b8b5-2531ea3b5e5c"

reset-EntraConnectObject.ps1 -logFolderPath c:\temp -ADObjectGUID $objectGUID -activeDirectoryCredential $cred -globalCatalogServer $globalCatalogServerThis option is utilized when you only want to purge information from the Active Directory connector space. Generally, this is reserved for specific scenarios under the guidance of support. It functions in the same manner as Option 2 with the exception that no Entra ID distinguished name is calculated.
Option 3A: Remove object by Active Directory Distinguished Name
#The following instructions locate the object by Active Directory Distinguished Name

$cred = get-credential #Provide credential of person with rights to read attributes from active directory

$globalCatalogServer = "DC.domain.com" #FQDN of a global catalog server

$DN = "CN=Tim McMichael,OU=Users,OU=Objects,DC=home,DC=domain,DC=com"

reset-EntraConnectObject.ps1 -logFolderPath c:\temp -ADObjectDN $dn -globalCatalogServer $globalCatalogServer -activeDirectoryCredential $cred -calculateEntraDN:$FALSE
Option 3B: Remove object by Active Directory Mail Attribute
#The following instructions locate the object by Active Directory Mail Attribute

$cred = get-credential #Provide credential of person with rights to read attributes from active directory

$mail = "tim@domain.com" #Active directory mail attribute

$globalCatalogServer = "DC.Domain.com"

reset-EntraConnectObject.ps1 -logFolderPath c:\temp -ADObjectmail $mail -activeDirectoryCredential $cred -globalCatalogServer $globalCatalogServer -calculateEntraDN:$FALSE
Option 3C: Remove object by Active Directory ObjectGUID
#The following instructions locate the object by Active Directory objectGUID

$cred = get-credential #Provide credential of person with rights to read attributes from active directory

$globalCatalogServer = "DC.domain.com" #FQDN of a global catalog server

$objectGUID = "ef27bb06-70d6-4904-b8b5-2531ea3b5e5c"

reset-EntraConnectObject.ps1 -logFolderPath c:\temp -ADObjectGUID $objectGUID -activeDirectoryCredential $cred -globalCatalogServer $globalCatalogServer -calculateEntraDN:$FALSEThis option is utilized when you only want to purge information from the Entra ID connector space. Generally, this is reserved for specific scenarios under the guidance of support. The Entra ID distinguished name is determined by locating the object in the connector space and copying the distinguished name value. Note that this option triggers a delta synchronization when the process is complete.
$dn = "CN={4272736E37395A7742456D3474535578366A746558413D3D}"
reset-EntraConnectObject.ps1 -logFolderPath c:\temp -EntraDN $dnThis option is utilized when more than one Active Directory connector space is present. If the script detects the presence of more than on Active Directory connector space an error is returned. The connector space name must be specified when running the command to ensure that the desired object is deleted. Depending on the scenario it may be necessary to not perform the single item sync until an object is deleted from all connector spaces.
In this example the user exists in the Active Directory home.domain.com and domain.local. (This is typical for example in a resource forest scenario). To complete purge this object the object must be purged from three connector spaces. The distinguished names were obtained through a metaverse search.
The first command purges the object from one Active Directory connector space and the Entra ID connector space. Note that single object sync is not performed as the object still exists in the second Active Directory connector space.
The second command purges the object from the second Active Directory connector space. At the conclusion of this command the full object sync should be allowed to run (which is the default).
I recommend running these as a single code block to eliminate the possibility that a sync cycle could occur inbetween.
#Establish the DN for the first forest.
$adDN = "CN=Tim McMichael,OU=Users,OU=Objects,DC=home,DC=domain,DC=com"

#Establish the DN for the second forest.
$otherADDN = "CN=Tim McMichael,OU=Users,OU=Objects,DC=domain,DC=local"

#Establish the EntraDN from the metaverse search.
$entraDN = "CN={4272736E37395A7742456D3474535578366A746558413D3D}"

#Provide the connector name for the first forest.
$adConnectorName = "domain.com"

#Provide the connector name for the second forest.
$otherADConnectorName = "domain.local"

#Remove the object from the entra connector space
reset-EntraConnectObject.ps1 -logFolderPath c:\temp -entraDN $entraDN

#Remove the object from the first active directory forest.
reset-EntraConnectObject.ps1 -logFolderPath c:\temp -ADObjectDN $adDN -skipSingleItemSync:$TRUE -ADConnectorName $adConnectorName -calculateEntraDN:$FALSE

#Remove the object from the second active directory forest and perform a single object sync.
reset-EntraConnectObject.ps1 -logFolderPath c:\temp -ADObjectDN $otherADDN -CalculateEntraDN:$FALSE -ADConnectorName $otherADConnectorNameFor each operation run a folder is created in the log path directory specified. The folder is a file date time stamp. Inside this folder is the operation log file and XML file extractions of all objects discovered during the connector space deletions. If a full single item sync was executed a JSONsummary file of the sync operation is also included in this directory.
I hope this script allows administrators to purge objects from connector spaces for troubleshooting or issue resolution easily.
When a distribution list is migrated the cloud only list has attributes that are fully managed in Exchange Online. This allows all attributes including the primary SMTP address associated with the group to be changed in Exchange Online.
If the distribution list has been migrated with the -enableHybridMailFlow switch or had enable-hybridMailFlowPostMigration run this results in mail flow objects existing in both Active Directory and Exchange Online. It would be possible for the primary SMTP address to be updated in Exchange Online and hybrid mail flow being broken as a result.
When hybrid mail flow is enabled a dynamic distribution list holds the same primary SMTP address as the migrated distribution list. In order for relay or other Exchange on-premises functions to continue to work the address would need to be updated in both directories.
Version 2.9.8.26 now enables a command update-HybridMailAddress. This command allows an administrator to specify a new primary SMTP address and alias for a migrated distribution group. The command searches Active Directory to locate the dynamic distribution list created and if found the Exchange Online primary SMTP address is updated. If the primary SMTP address can successfully be updated in Exchange Online the primary SMTP address and mail address of the dynamic distribution list is updated in Active Directory. Changing the alias is optional, and if specified when changing the primary SMTP address the alias is updated in both Exchange Online and Active Directory.
Having a single command ensures that hybrid mail flow works when processing a primary SMTP proxy change.
Distribution lists offer administrators the opportunity to nest within each other. As a part of distribution list migrations all child groups must be migrated prior to the parent group being migrated.
In the case of a single migration, if the parent is selected for migration and contains children, the migration will fail and the logs will indicate that a child group was found and must be migrated first.
In the case of multiple migrations, if the parent is attempted first before a child for migration, the parent will be scheduled for retry. After a migration pass has been attempted against each group, the parent distribution lists are retried if the child was included in the migration batch.
I recently had a customer that presented an interesting scenario. They have a parent distribution list that contains multiple children. The children lists membership is managed by another product that only has on-premises integration. In this customer instance they desired to migrate the parent distribution list but retain the children on premises. The child distribution lists would continue to be managed through their third party system. Both the parent and child distribution lists were synchronized to Office 365 and available in Exchange Online.
They proposed a solution where they would remove the children distribution lists and then migrate the parent. Post migration, in Exchange Online, they would add the children distribution lists back as members. This is not blocked, synchronized distribution lists can be added as members of a cloud only distribution group.
This obviously is a manual process and could lead to things being missed. Plus, what fun is a manual process when we could easily code a solution to support it 🙂
In version 2.9.8.24 a new switch has been introduced to SINGLE distribution list migrations. The switch is not available in multiple or multiple machine migrations. The switch is “-skipNestedGroupCheck”. When this switch is specified as a part of a migration if a mail enabled child group is found as a member of the distribution list to be migrated the migration is allowed to proceed. Instead of logging an error the mail enabled child distribution list is added as a valid recipient and as long as the recipient can be located in Office 365 the migration will proceed. At the end of the migration the synchronized child distribution lists are added as members of the migrated cloud distribution lists.
At the conclusion of the migration the mail disabled group remains on premises. The membership of the mail disabled group remains the same. If at a later time a child distribution list is migrated the module already supports reviewing all cloud only distribution groups for membership. This group will be found as a member of the previously migrated group and the group membership should be retained.
Are there any mail flow considerations when doing this? The answer is yes! If you are not utilizing the -enableHybridMailFlow switch on premises Exchange Servers will continue to receive email at all child distribution lists. The parent distribution lists address will no longer be available on premises, therefore any email that relied on the expansion of the parent distribution list would fail.
If -enableHybridMailFlow is utilized the following mail flow route ensures that all group, including the non-migrated child distribution lists, receive the message.
I hope this new switch adds some additional flexibility and opens new scenarios for migration!
As customers stop deploying Exchange on premises installations recipients are being provisioned without enabling a remote mailbox. A common scenario that I see is where administrators create users but only stamp the windows mail property on the object.
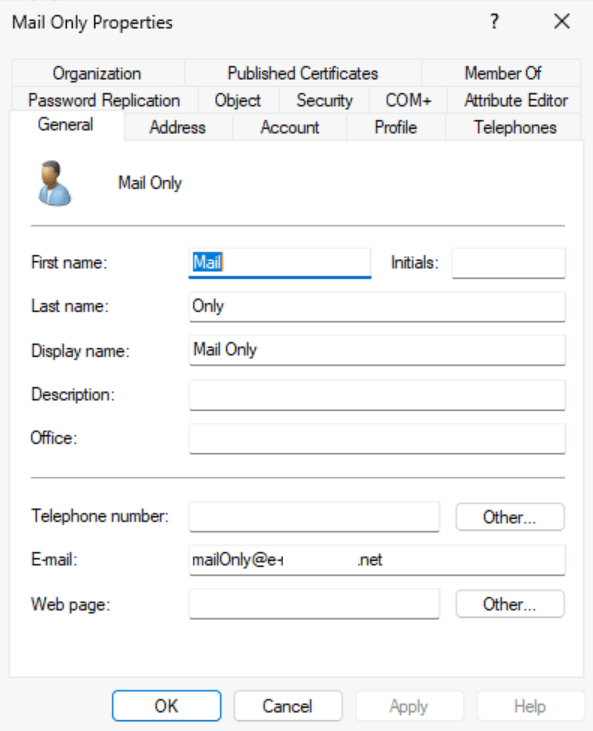
When an initial synchronization of this user occurs to Entra Active Directory and then Exchange Online the user is not mail enabled. As with all user object synchronized it is represented in Exchange Online as a user.
PS C:\> Get-User mailonly@e-domain.net


Name                                 RecipientType

----                                 -------------

eed81dfa-2492-4a9d-a757-d06f4e1d92d7 User
PS C:\> Get-Recipient mailonly@e-domain.net
Write-ErrorMessage : Ex6F9304|Microsoft.Exchange.Configuration.Tasks.ManagementObjectNotFoundException|The operation
couldn't be performed because object 'mailonly@e-domain.net' couldn't be found on
'CY4PR04A10DC003.NAMPR04A010.PROD.OUTLOOK.COM'.
At C:\Users\timmcmic\AppData\Local\Temp\tmpEXO_py0m5z5k.qxt\tmpEXO_py0m5z5k.qxt.psm1:1192 char:13
+ Write-ErrorMessage $ErrorObject
+ ~~~~~~~~~~~~~~~~~~~~~~~~~~~~~~~
+ CategoryInfo : NotSpecified: (:) [Get-Recipient], ManagementObjectNotFoundException
+ FullyQualifiedErrorId : [Server=SJ0PR04MB8325,RequestId=0bf40c30-2584-9980-e501-7659b045e73a,TimeStamp=Tue, 30 J
an 2024 20:36:37 GMT],Write-ErrorMessageTo mail enable the object a license is required that contains an Exchange Online plan. When the license is assigned, the object will be converted from USER to USERMAILBOX. This is confirmed when get-recipient returns a valid user mailbox.
PS C:\> Get-Recipient mailonly@e-domain.net


Name                                 RecipientType

----                                 -------------

eed81dfa-2492-4a9d-a757-d06f4e1d92d7 UserMailbox
The primary smtp address on the object reflects the mail attribute set in Active Directory.
PS C:\> Get-Recipient mailonly@e-mcmichael.net | fl primarySMTPAddress,emailAddresses


PrimarySmtpAddress : mailOnly@e-domain.net

EmailAddresses     : {SMTP:mailOnly@e-domain.net, smtp:mailOnly@timmcmic.domain.com,

                     SIP:mailonly@e-domain.net}
To change the primary SMTP address of the user the mail attribute may be adjusted in Active Directory. In this case the domain is changed from .net to .com.
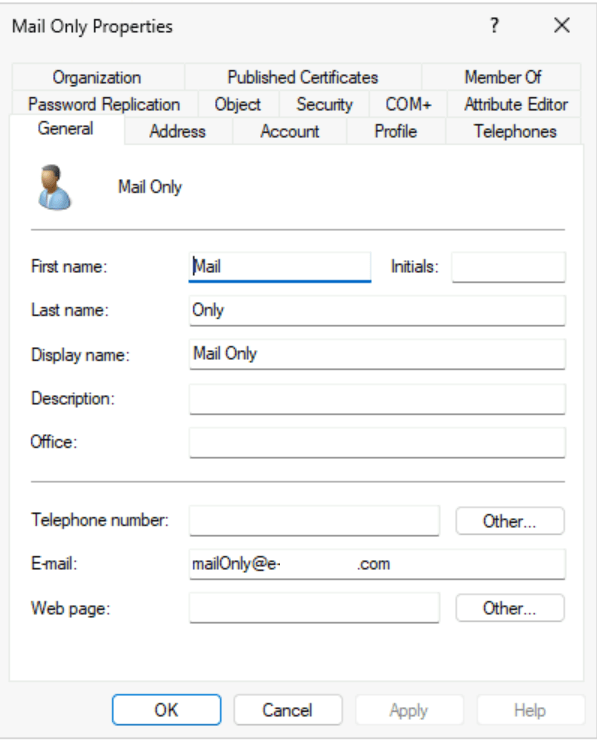
When the change successfully replicates to Entra Active Directory and then Exchange Online the primary smtp address of the user will be updated to reflect this change.
PS C:\> Get-Recipient mailonly@e-domain.net | fl primarySMTPAddress,emailAddresses


PrimarySmtpAddress : mailOnly@e-domain.com

EmailAddresses     : {SMTP:mailOnly@e-domain.com, smtp:MailOnly@e-domain.net,

                     smtp:mailOnly@domain.onmicrosoft.com, SIP:mailonly@e-domain.net}
In recent weeks I have spoken with some customers that have opened support cases where updates to the mail attribute is not resulting in a change in Exchange Online. In this example the mail attribute was updated to a completely different address.
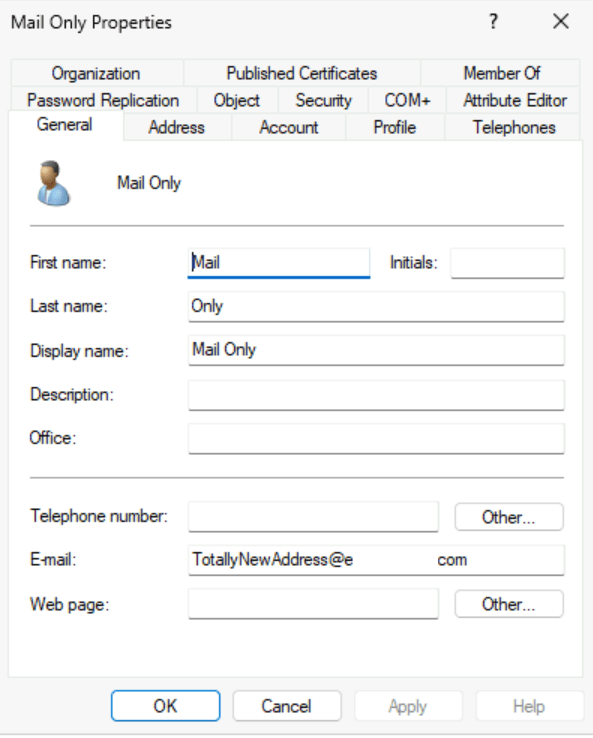
We were able to confirm that the mail address was successfully replicated to Entra Active Directory by Entra Connect. When waiting several hours, it was observed the address did not change in Exchange Online.
PS C:\> Get-Recipient mailonly@e-domain.net | fl primarySMTPAddress,emailAddresses


PrimarySmtpAddress : MailOnly@e-domain.net

EmailAddresses     : {SMTP:MailOnly@e-domain.net, smtp:mailOnly@domain.onmicrosoft.com,

                     SIP:mailonly@e-domain.net}
Why did the address not change? When reviewing the properties of the object in Active Directory it was noted that these users had the proxyAddresses attribute stamped.
Get-ADObject "CN=Mail Only,OU=Users,OU=Objects,DC=home,DC=e-domain,DC=com" -Properties Mail,ProxyAddresses


DistinguishedName : CN=Mail Only,OU=Users,OU=Objects,DC=home,DC=e-domain,DC=com

Mail              : TotallyNewAddress@e-domain.com

Name              : Mail Only

ObjectClass       : user

ObjectGUID        : f0bc7fcd-a31e-4f7a-9c71-be9d948c3f6d

ProxyAddresses    : {x500:/o=ExchangeLabs/ou=Exchange Administrative Group

                    (FYDIBOHF23SPDLT)/cn=Recipients/cn=233c7693141f41d2b6ad1a2e24a5bf63-eed81dfa-24}
If the objects in Active Directory are not fully mail enabled, then why is the proxyAddresses populated? When a license is assigned to an object that had only a mail address set an X500 address is generated in Exchange Online. In this installation the Entra Connect configuration had Exchange Hybrid enabled. With this feature enabled the X500 address from Exchange Online is written to Active Directory. Once the proxyAddresses attribute is present on the object this is the attribute that controls the addresses that will be utilized for proxy calc in Entra Active Directory and then subsequently synchronized into Exchange Online.
For users that had a proxyAddress field stamped this attribute will need to be adjusted in Active Directory in order for the address change to occur in Exchange Online.
Get-ADObject "CN=Mail Only,OU=Users,OU=Objects,DC=home,DC=e-domain,DC=com" -Properties Mail,ProxyAddresses


DistinguishedName : CN=Mail Only,OU=Users,OU=Objects,DC=home,DC=e-domain,DC=com

Mail              : TotallyNewAddress@e-mcmichael.com

Name              : Mail Only

ObjectClass       : user

ObjectGUID        : f0bc7fcd-a31e-4f7a-9c71-be9d948c3f6d

ProxyAddresses    : {SMTP:totallyDifferentAddress@e-domain.com, x500:/o=ExchangeLabs/ou=Exchange Administrative

                    Group (FYDIBOHF23SPDLT)/cn=Recipients/cn=233c7693141f41d2b6ad1a2e24a5bf63-eed81dfa-24}
The get-recipient command verifies that the attribute updated successfully.
PS C:\> Get-Recipient mailonly@e-domain.net | fl primarySMTPAddress,emailAddresses


PrimarySmtpAddress : totallyDifferentAddress@e-domain.com

EmailAddresses     : {SMTP:totallyDifferentAddress@e-domain.com, smtp:MailOnly@e-mcmichael.net,

                     smtp:mailOnly@domain.onmicrosoft.com, SIP:mailonly@e-domain.net}
If the Exchange Hybrid feature remains enabled in Entra Connect you can expect to have to continue to modify the proxyAddresses attribute if address changes are necessary. If your provisioning model does not include fully mail enabled objects, you might consider disabling the Exchange Hybrid feature in Entra Connect. Disabling this feature will not impact users that already have the proxyAddresses attribute set but it will impact new objects where Exchange Online licenses are assigned.
Last week I had the privilege of speaking with Steve Goodman and Paul Robichaux hosts of the Practical 365 Podcast. We discussed identity management and techniques for migrating distribution lists to Office 365. You can find the podcast here.
I want to extend my thanks to both for their time and having me as a guest!
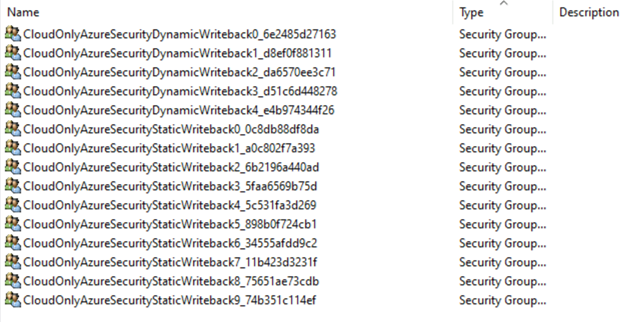
In EntraID Connect group write back may be enabled for your organization. Group writeback allows administrators to create Active Directory entries for cloud only group objects. Group writeback comes in two versions. For the purposes of this post group write V2 is enabled and only a subset of groups is enabled for synchronization.
When group write back is enabled groups are written to Active Directory in the format Group_GroupObjectID. This format is not necessarily intuitive to matching the Active Directory object to the EntraID object.
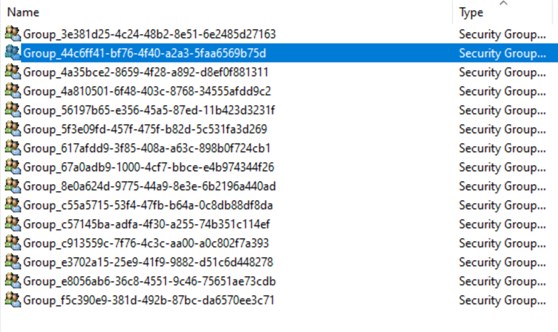
PS C:\Users\timmcmic> Get-MgGroup -GroupId 44c6ff41-bf76-4f40-a2a3-5faa6569b75d
DisplayName Id MailNickname Description GroupTypes
———– — ———— ———– ———-
CloudOnlyAzureSecurityStaticWriteback3 44c6ff41-bf76-4f40-a2a3-5faa6569b75d 731916f2-1 {}
In EntraID Connect administrators now have the option to enable a preview feature “Writeback Group Distinguished Name with cloud Display Name). When enabled this feature will replace the Group_ with the cloud display name of the group. This allows for more intuitive management of groups written back from EntraID.
To enable the feature the Azure AD Connect setup wizard (commonly located on the desktop) is utilized. The checkbox to enable the feature is located on the Group Writeback configuration page.
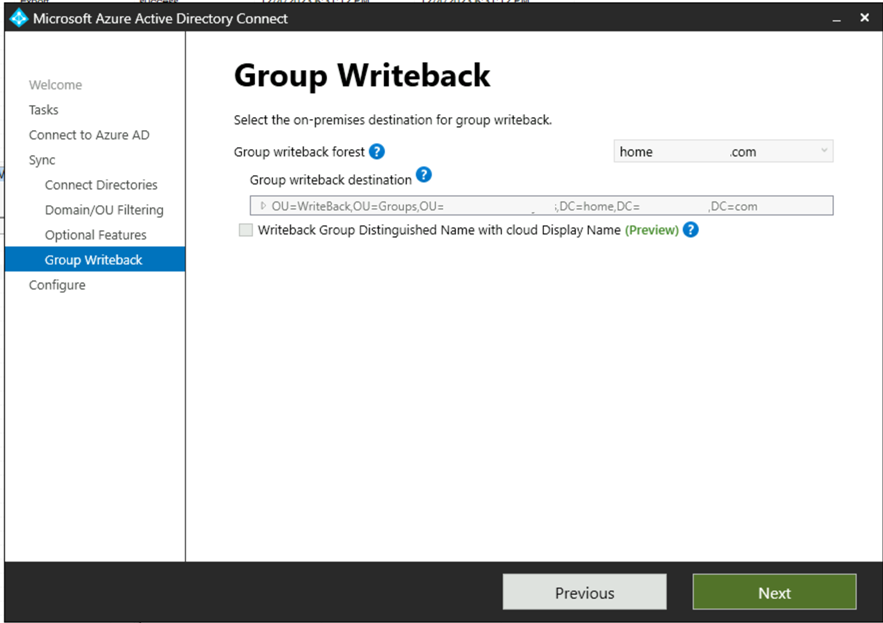
In this case the feature is currently greyed out and cannot be enabled. This is due to Group Writeback already being enabled. The feature must be enabled at the time that group writeback is enabled. If you disable and re-enable group writeback this can result in any of the groups already written to Active Directory being removed. This could cause potential issues if those groups are nested or utilized to permission on-premises resources or utilized for mail flow. There is a way to perform this conversion without deleting and recreating the groups.
The first step in the process is to enable staging mode on the EntraID Connect Server. Enabling staging mode prevents any changes from being written to either Active Directory for EntraID until have had an opportunity to review the changes. When staging mode is enabled in this step we will also be disabling the synchronization cycle. This will prevent any synchronization operations from occurring while we are in the process of conversion. To enable staging mode:
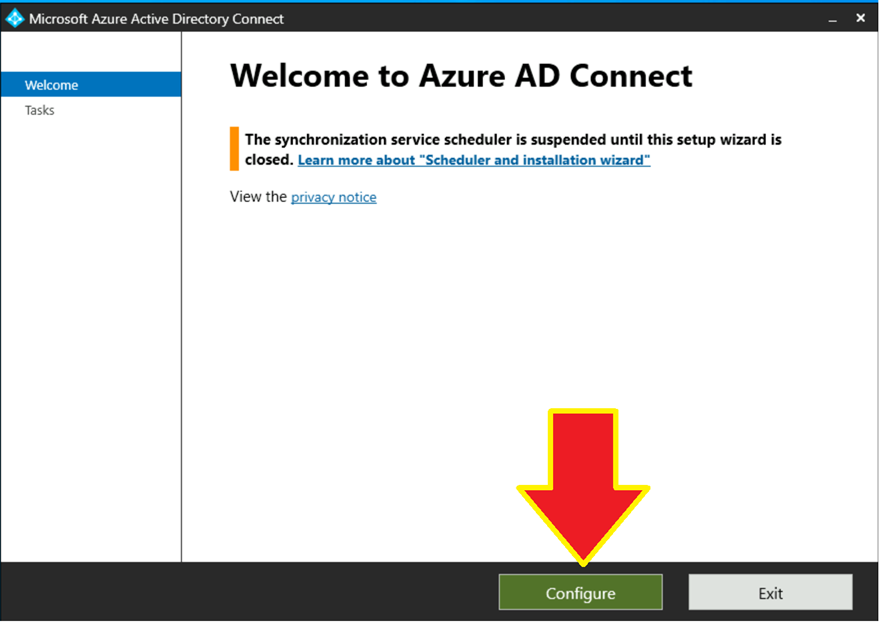
Run the EntraID Connect setup wizard on the desktop of the synchronization server and select configure.
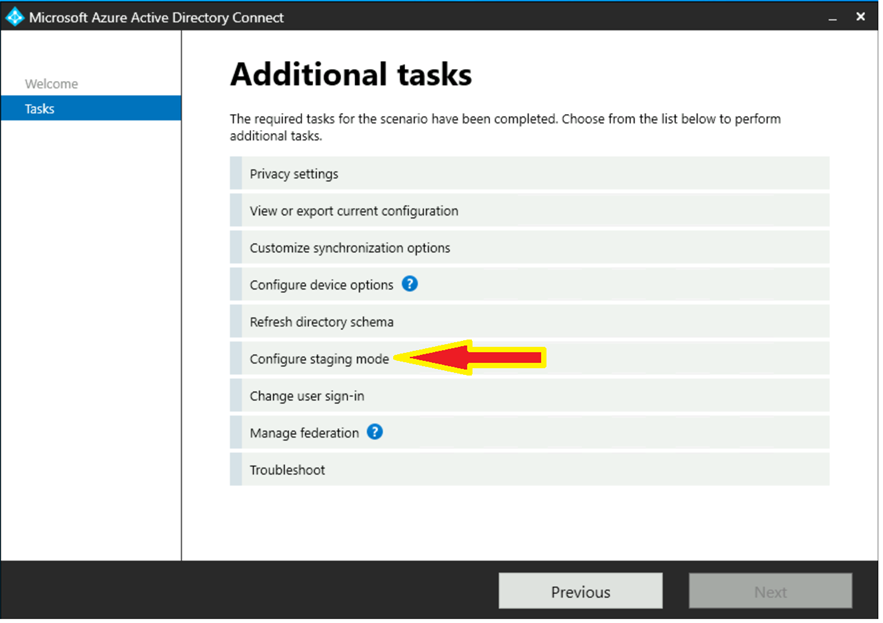
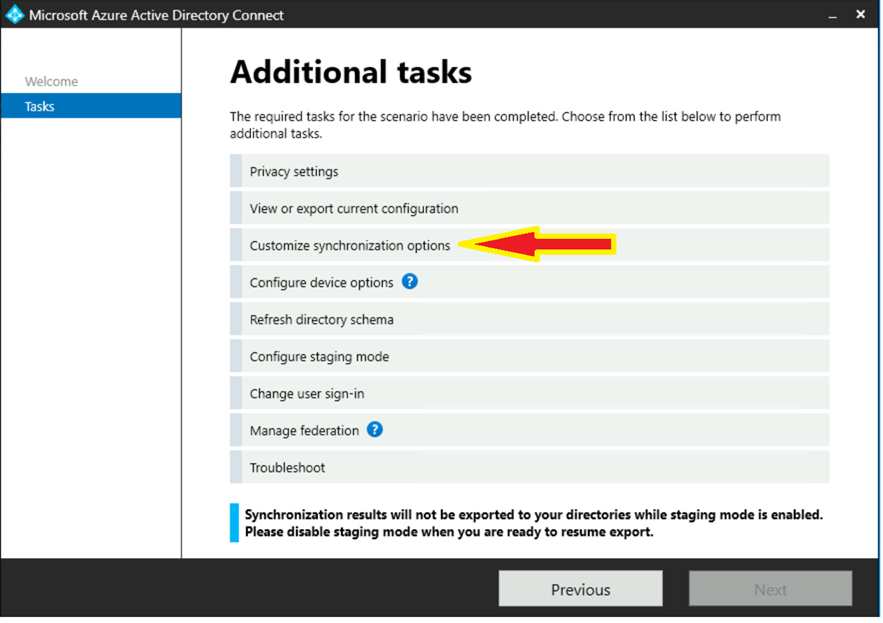
In the configuration options screen select “configure staging mode”.
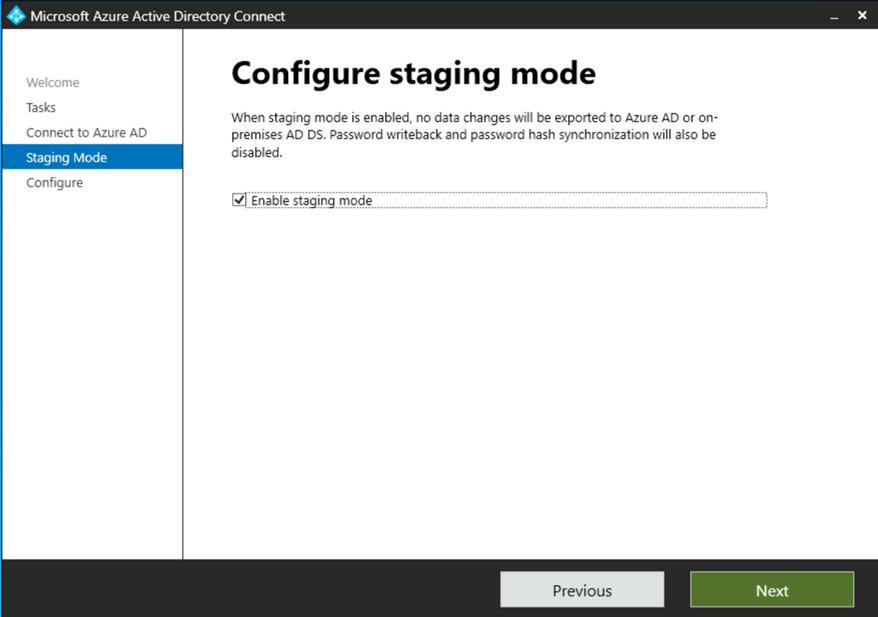
Follow the in screen prompts to perform authentication. When authentication is complete select “enable staging mode” on the appropriate screen.
Continue through the wizard until you reach the final step. Prior to click the configure button un-select “start the synchronization process when configure completes”.
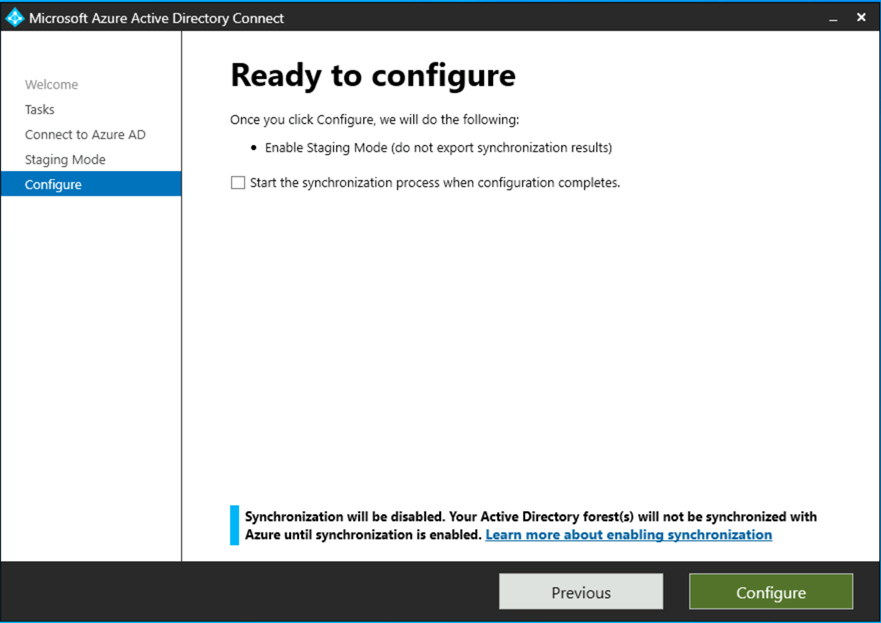
At the conclusion of these steps the server has now been placed in staging mode and the synchronization process has been suspended.
At this time group write can be disabled. With the machine in staging mode and the synchronization cycle suspended groups will not be removed from Active Directory. To disable group writeback run the EntraID Connect setup wizard on the desktop of the synchronization server and select configure.
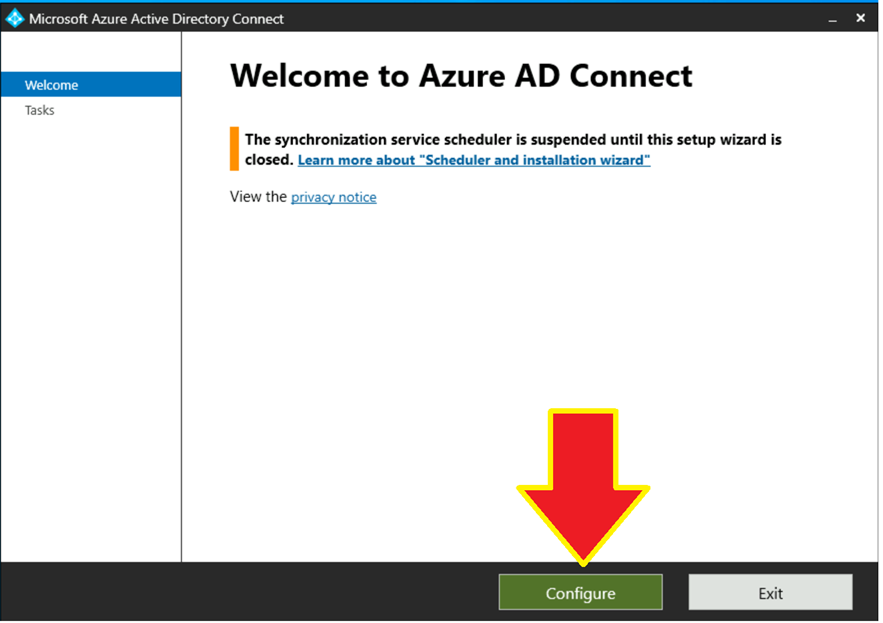
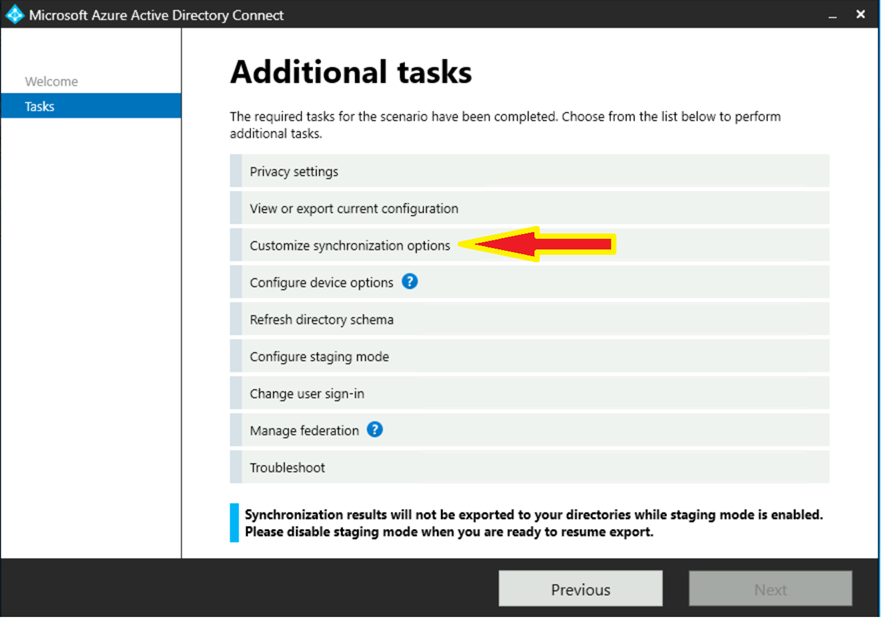
Select the option to “customize synchronization options”.
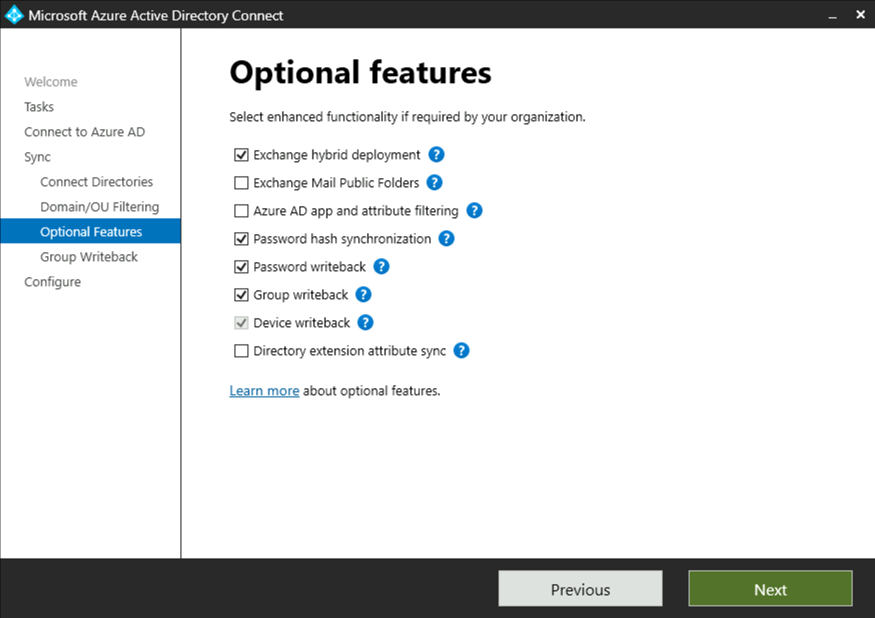
Proceed through the configuration wizard until the optional features page is displayed. On the optional features page de-select Group Writeback. There will be a warning presented indicating that groups already written to Active Directory will be deleted. This will not occur with the machine in staging mode and the synchronization cycle disabled.
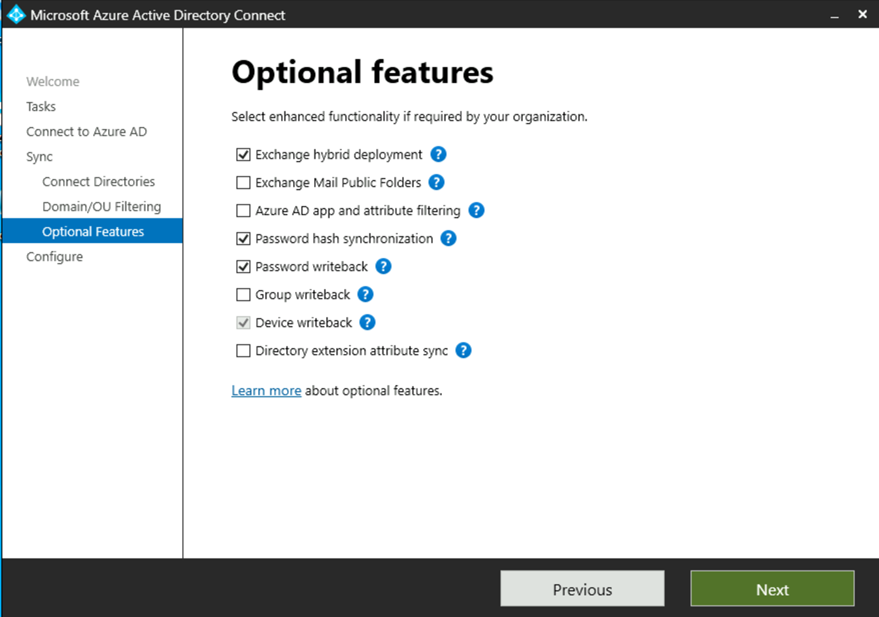
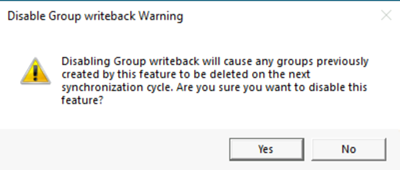
Complete the wizard making no further changes. Currently group writeback is disabled, the synchronization cycle remains disabled, and staging mode remains disabled.
At this time group writeback may be re-enabled. To enable group writeback run the EntraID Connect setup wizard on the desktop of the synchronization server and select configure.
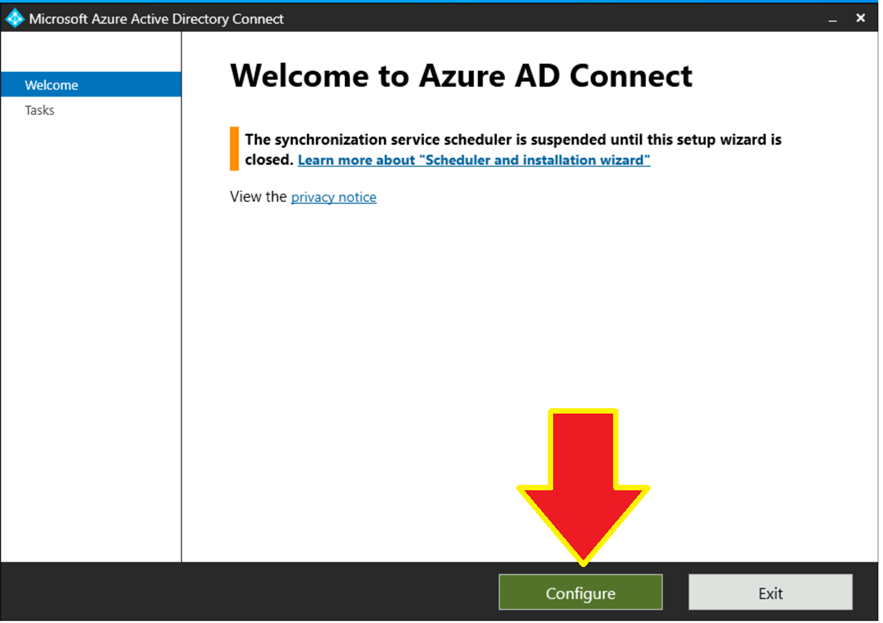
Select the option to “customize synchronization options”.
Proceed through the configuration wizard until the optional features page is displayed. On the optional features page select Group Writeback.
Select next to proceed to the group writeback configuration page. On the configuration page select the same organizational unit that the groups were previously written back to. (This is VERY important – the organizational unit must remain the same). Enable the feature “Writeback Group Distinguished Name with cloud Display Name” to utilize friendly names on the existing groups.
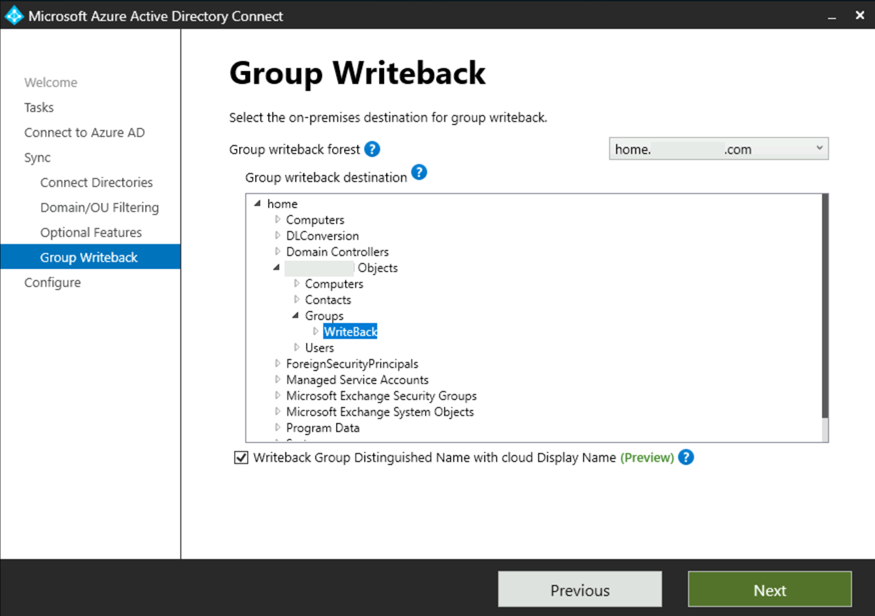
Continue through the wizard. On the group writeback permissions page you may select the option to configure with Powershell. The permissions are already configured from being previously enabled. Prior to selecting the configure button and completing the wizard ensure the checkbox to start the synchronization cycle is checked.
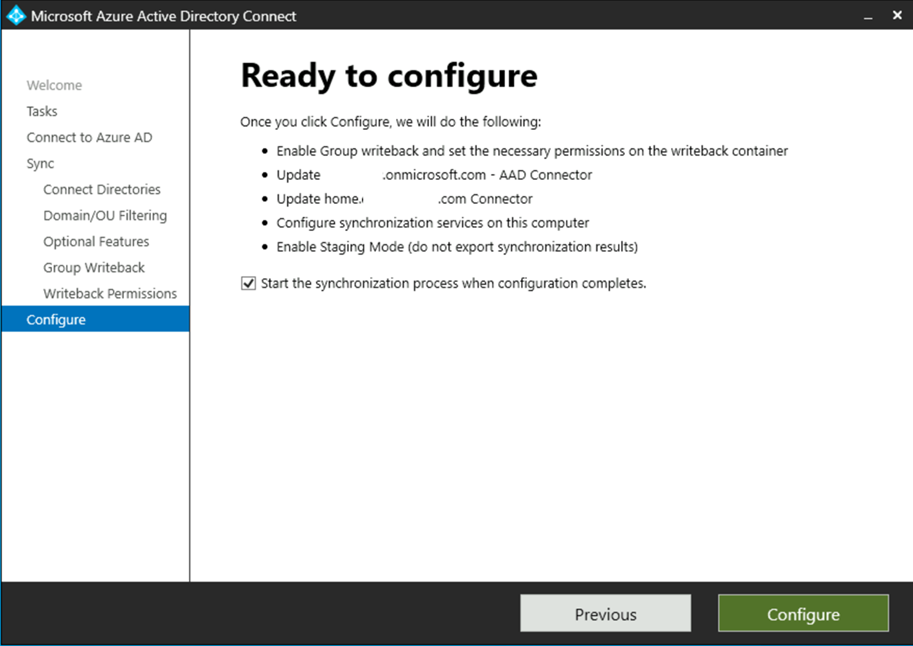
When the wizard has completed a synchronization cycle will begin. Please note that this change will cause a full import operation from Entra ID and a full synchronization operation to occur both in Active Directory and Entra ID. Depending on the size of the environment this could take several hours so please plan accordingly.
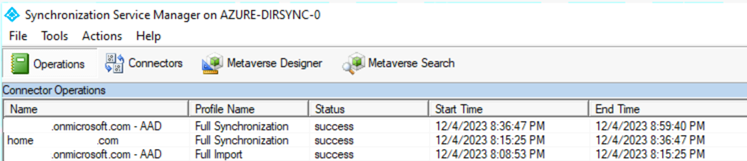
At this time we can validate the success of the change prior to taking the machine out of staging mode. To do so using the synchronization manager on the EntraID Connect server select the connectors button. Right click on the Active Directory Domain Services connector and select “search connector space”.
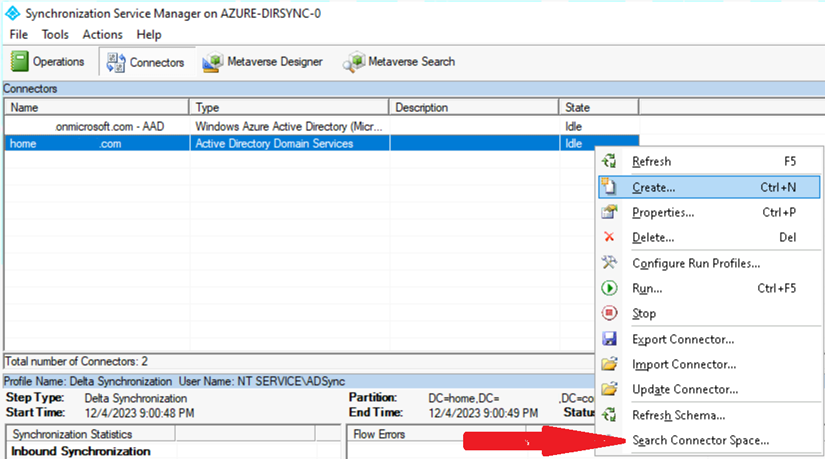
In the search connector space dialog, under the scope drop down, select pending exports. This will enable three options. Select the modify option and select search. This dialog will show all operations that are pending export had the machine not been in staging mode. We should see an entry for each group that was previously written back.
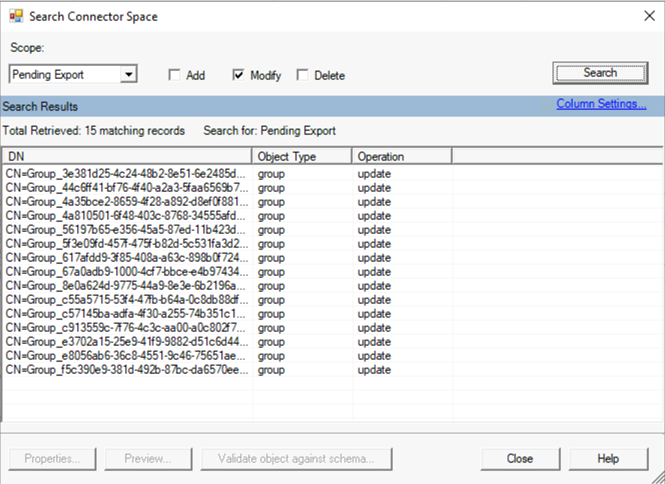
To validate a specific change double click on any of the groups displayed in the search. In the attribute dialog select the preview button. This will enable the attribute preview window. Select the generate preview button. This generates a preview of all calculated attributes. In the left hand pane, under connector updates, expand the connector for Active Directory and select export attribute flow.
Locate the entry where the data source is EscapeDNComponent. The initial value field will be NULL and the final value will display a CN value containing the name of the group. The presence of the name demonstrates that the change was successful.

The final operation is to remove the server from staging mode.
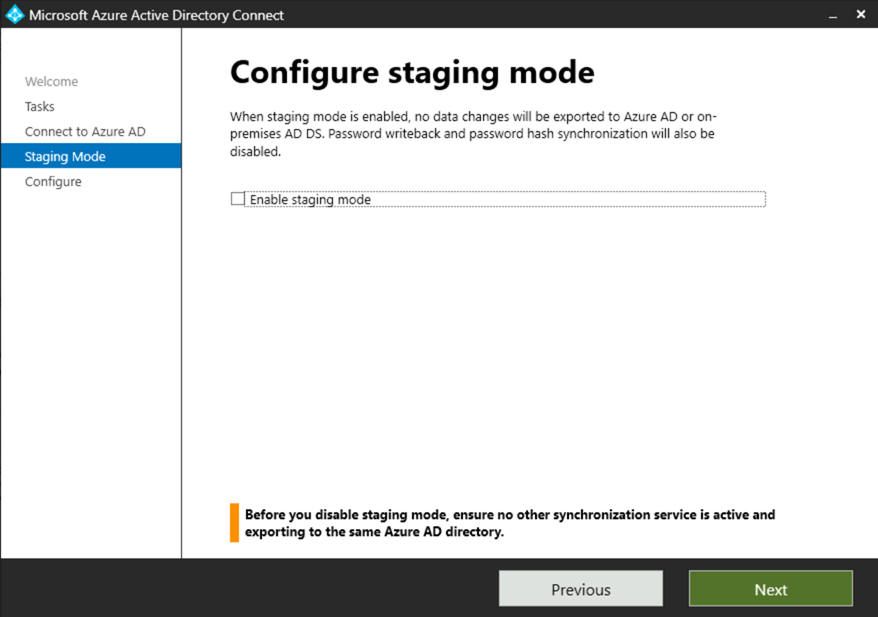
When staging mode is disabled the next delta synchronization cycle will result in the exports writing the updates to Active Directory.
If your environment is configured with both an active server exporting to EntraID and a staging server already you may consider making these changes on the staging server first. This allows the full import and synchronization operations to run without impacting the primary sync server. When the staging server has successfully completed these operations the server roles may be swapped. The process can then be repeated on the new staging server.
In the Microsoft 365 Admin Center administrators may provision new user accounts. The password for the account created may be auto generated during the account creation.
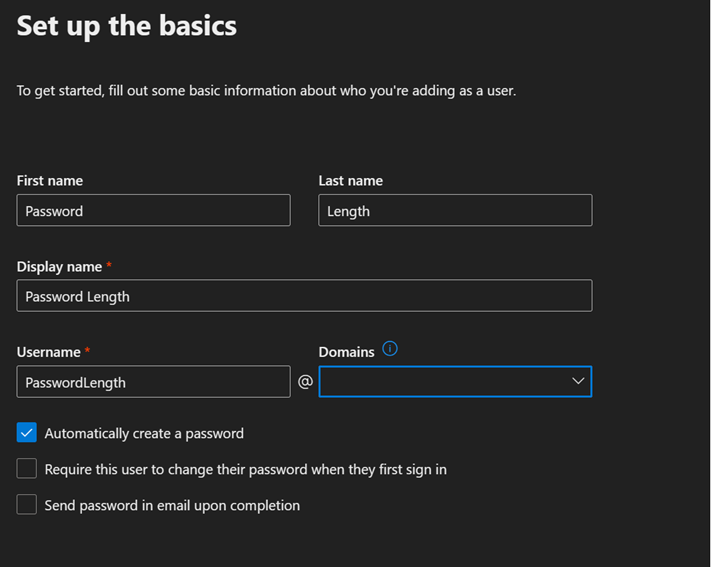
At the conclusion of creating the account the password is displayed along with the relevant account information.
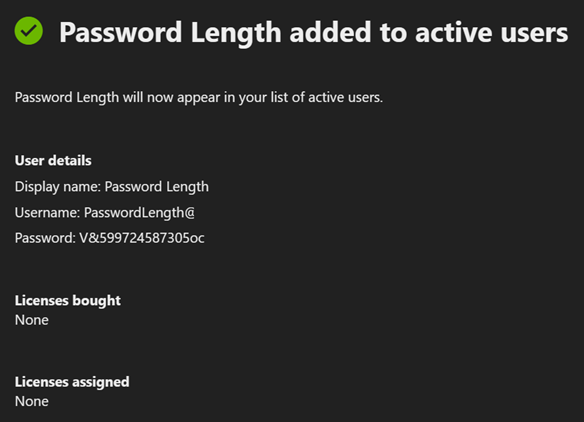
The password generated in this instance is 16-character complex password. In the previous version of the M365 Admin Center the password created was only an 8-character complex password.
The change in password length is due to a migration of the method that users are provisioned within the M365 Admin Center. New versions of the M365 Admin Center utilize graph interfaces to provision user identities. The new graph interfaces utilize a default 16-character complex password. The password length cannot be specified or changed.
As of the time of publishing this post the reset password option on the user account still provides an 8-character complex password. It is expected that as all features are migrated to the new graph interfaces this will also change. When creating account or resetting password if a shorter password length is desired the administrator may specify the option to provide the password rather than letting the password be automatically managed.
When EntraID Connect exports user attributes to Entra ID validations occur on the data submitted. If the validations fail for any reason a DataValidationFailed error message will be present in EntraID Connect Synchronization Manager. Here is a sample of a DataValidationFailure:
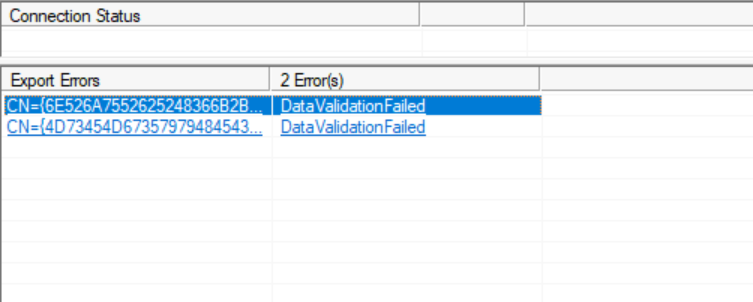
When selecting one of the objects in a DataValidationFailed state and reviewing the export errors tab details regarding the number and timing of failures is present.
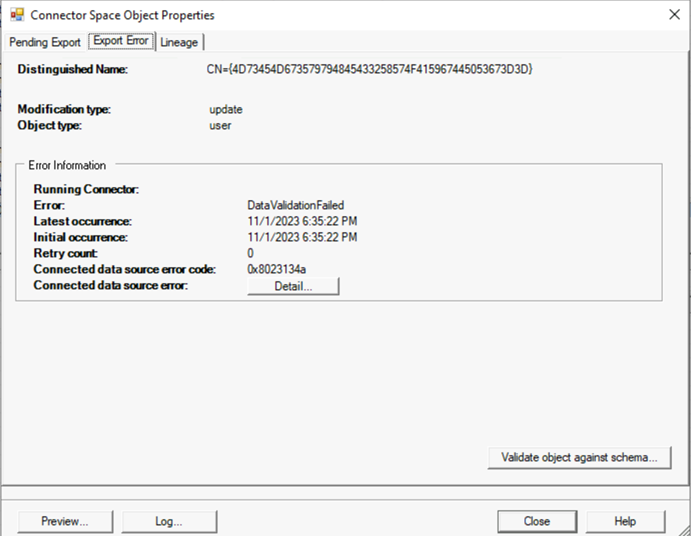
When selecting the Details button further information regarding the error is provided.
Unable to update this object in Azure Active Directory, because the attribute [None], is not valid. Update the value in your local directory services.
Tracking Id: 8f0b1067-a691-4832-b9fe-9e18f35d835a
ExtraErrorDetails:
[{“Key”:”ObjectId”,”Value”:[“504bd7a2-78bc-4dd8-a795-be93a7d67bf4”]},{“Key”:”InvalidAttributeName”,”Value”:[“None”]}]
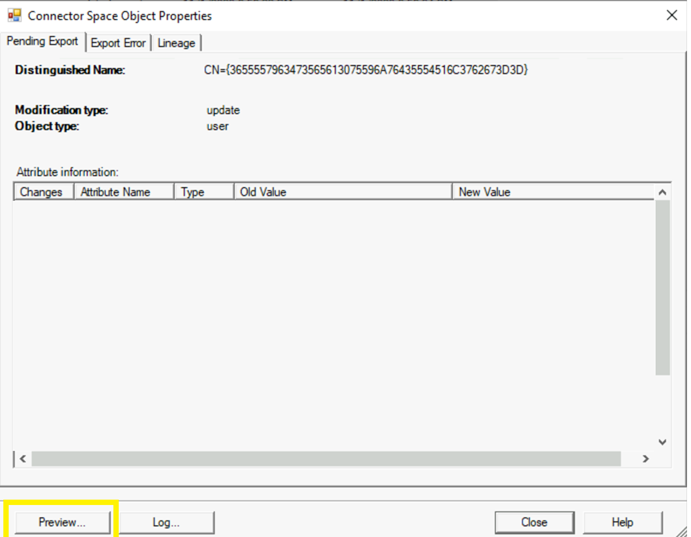
In this instance the details are not extremely helpful. They do not point to a specific attribute that is invalid nor to the data contained within an attribute would have violated the validation rules. How do we isolate where the potential problem lies? On the pending export tab the attributes that are being added or modified may be reviewed. In the case of this user there were three attributes that were being added to Entra ID.
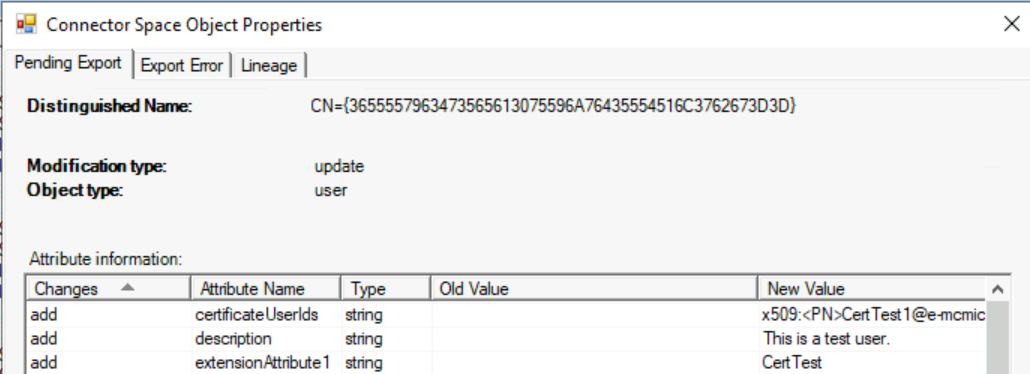
Two of the attributes, description and extensinoAttribute1, are standard attributes synchronized on a user object. The third, certificateUserIds, is not a standard attribute and would be calculated by a custom rule.
In order to determine how this attribute is being calculated the preview button in the lower left hand corner will allow us to manually execute a synchronization on an object.
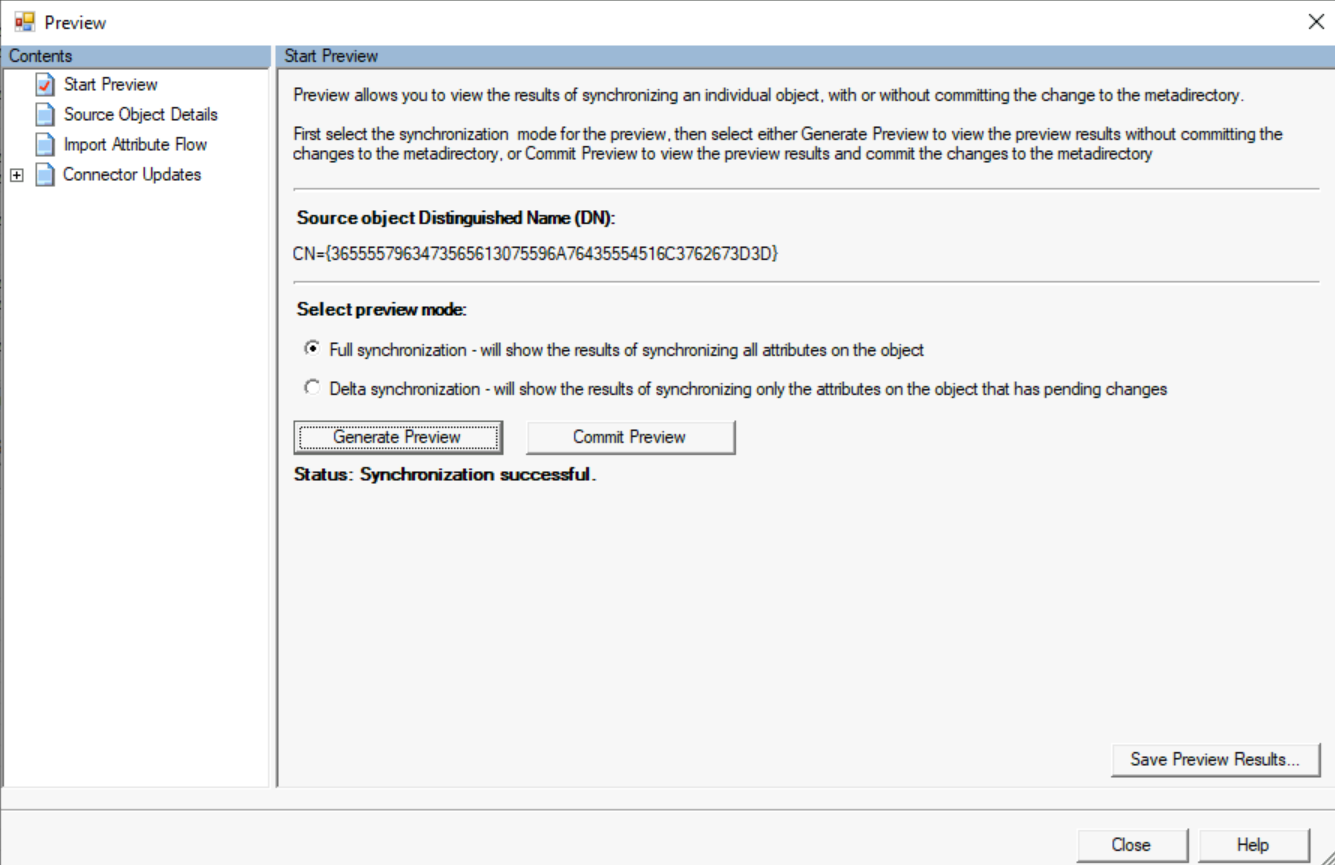
When the preview window opens selecting generate preview will run the synchronization operation. In the left hand column, under connector updates will be the attribute representation for the Active Directory connector and the Entra ID connector.
Expanding connector updates will show the Entra ID object (specified by CN=) and the Active Directory object (specified by the distinguished name). Expanding the Entra ID connector and selecting export attribute flow shows the attribute values calculated and the rule responsible for the value.
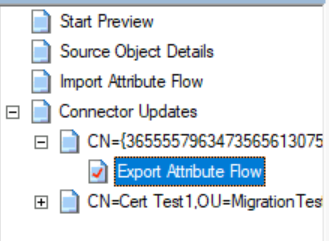
The rule name is in the left column.

The certificateUserIDs value was calculated by the rule Out to AAD – certificateUserTypes. Selecting the … button allows the review of the initial value and final value. Here are the final calculated values that are being submitted to Entra ID:
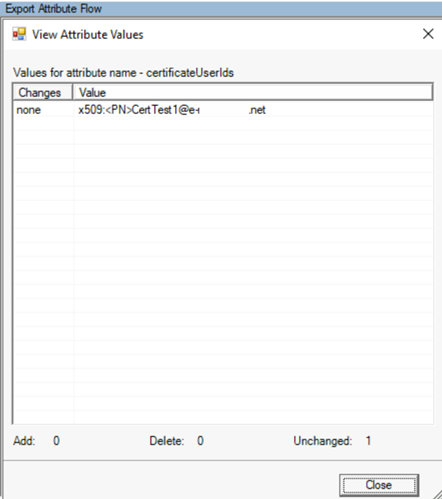
When reviewing the properties of the rule this is the syntax that stamps the value.
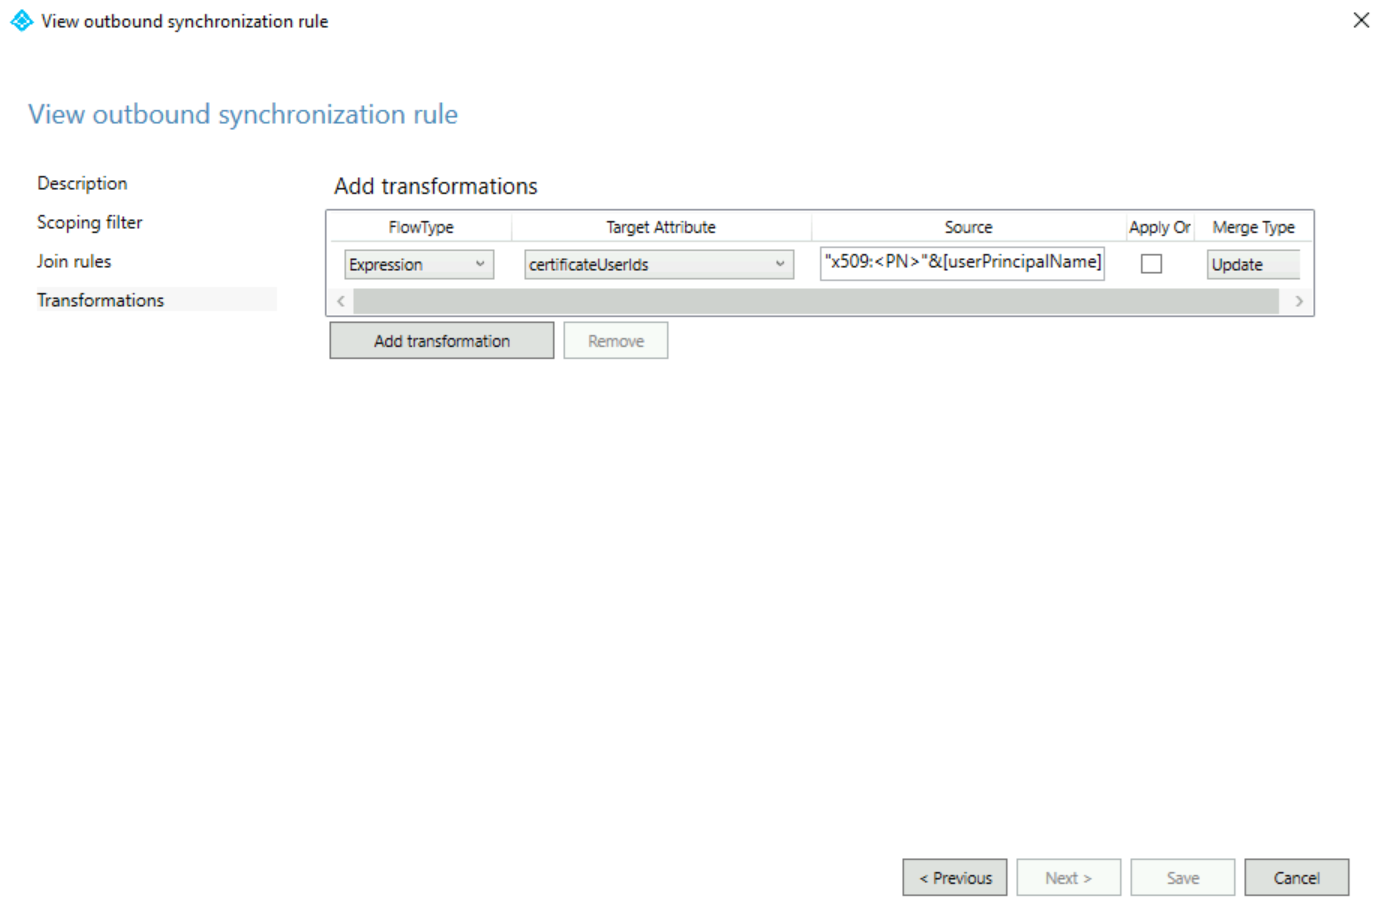
“x509:<PN>”&[userPrincipalName] is the source expression syntax.
When comparing the value being exported to the rule expression the calculated values match the rule expression. The following article contains the acceptable values for certificateUserIDs:
Certificate user IDs for Microsoft Entra certificate-based authentication | Microsoft Learn
|
Certificate mapping Field |
Examples of values in CertificateUserIds |
|
PrincipalName |
“X509:<PN>bob@woodgrove.com” |
|
PrincipalName |
“X509:<PN>bob@woodgrove” |
|
RFC822Name |
“X509:<RFC822>user@woodgrove.com” |
|
X509SKI |
“X509:<SKI>123456789abcdef” |
|
X509SHA1PublicKey |
“X509:<SHA1-PUKEY>123456789abcdef” |
In this case the desired value is using the PrincipalName formatting. Briefly looking at the two values they look the same and look formatted correctly. There is one very minor difference between the two values – the table details an upper case X in the X509 syntax where the rule is utilizing a lower case x in the x509 syntax. Using the rules editor the expression syntax is updated:
“X509:<PN>”&[userPrincipalName]
Updating the rule will cause full synchronization to be performed on the Entra ID connector. At the conclusion of the synchronization operation the exports are now successful.
In this case the DataValidationFailed was due to the attribute being case sensitive and the expression not including the correct case.
When a recipient is synchronized to Azure Active Directory the proxy addresses that are assigned to the recipient are determined by a process called ProxyCalc. The synchronization process stores the on-premises Active Directory values in shadow values within Azure Active Directory. The ProxyCalc process reads the shadow values and calculates the actual proxy address values visible in Azure Active Directory. At the conclusion of this calculation the values are synchronized into the recipient in Exchange Online. The rules for ProxyCalc may be found in the following article: How the proxyAddresses attribute is populated in Azure AD – Active Directory | Microsoft Learn.
I recently worked on an escalation with a customer that presented an interesting scenario involving ProxyCalc. All users who’s user principal name differed from their primary SMTP address also had a secondary SMTP address in Azure Active Directory of the user principal name. Unlike examples contained within the previously cited document the users were fully provisioned with mail, mailNickName, and proxyAddresses submitted through the synchronization process. In addition, the secondary address appeared regardless of the license status of the user. This seems inconsistent with the scenarios outlined in the cited documentation where adding the UPN as a secondary proxy address appears to occur during licensing scenarios.
The remote mailbox is provisioned in the on-premises Active Directory. The user principal name is different from the primary SMTP address and does not appear in the proxy addresses attribute of the recipient.
[PS] C:\>Get-RemoteMailbox UPNTest | fl userPrincipalName,primarySMTPAddress,emailAddresses
UserPrincipalName : UPNTest@domain.net
PrimarySmtpAddress : UPNTest@domain.com
EmailAddresses : {x500:/o=ExchangeLabs/ou=Exchange Administrative Group
(FYDIBOHF23SPDLT)/cn=Recipients/cn=a0b7e9472d3b4f678b47d62d2908575e-f80c3258-a7,
SMTP:UPNTest@domain.com}
When reviewing the properties of the user in Azure Active Directory the proxy addresses show that the user principal name was added as a secondary address.
PS C:\> Get-MsolUser -UserPrincipalName upntest@domain.net | fl userPrincipalName,ProxyAddresses
UserPrincipalName : UPNTest@domain.net
ProxyAddresses : {smtp:UPNTest@domain.net, smtp:UPNTest@domain.onmicrosoft.com, SMTP:UPNTest@domain.com}
This did confirm that the user principal name was added as a secondary proxy regardless of the licensed status of the user <or> the attributes submitted through the directory synchronization process.
This is by design. The user principal name will always appear as a proxy address on mail recipient. The user principal name cannot be removed from the recipient unless the user principal name is changed on-premises. This essentially reserves this from use on any other mail enabled object.
 TIMMCMIC