Look out – Office 365 URL and IP Address changes…

It is a common implementation for customers to control the resources that employees can access. To that end, Office 365 publishes the IP addresses and URLs that are necessary for a successful Office 365 deployment. In addition to publishing the list, a JSON file is made available for services that can automatically digest this information for automatic rules creation. Rules are generally split into two categories: (1) endpoints accessible via an IP address and (2) endpoints accessible via a URL. There was occasionally some overlap where certain URL-based endpoints had IP address ranges published. For URL-based endpoints, the ports required for access are also published and it is expected that any IP address for that URL is accessible. The documentation on this is at Office 365 URLs and IP address ranges – Microsoft 365 Enterprise | Microsoft Docs.

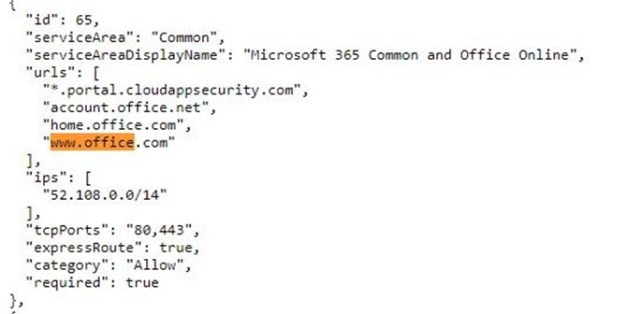
Recently I worked a customer escalation where the customer was being denied access to http://www.office.com. When reviewing the documentation http://www.office.com was published to use an IP address space of 52.108.0.0/14.

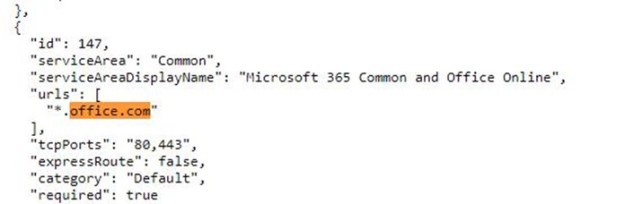
We observed that http://www.office.com would routinely be redirected to IP addresses in the 13.X.X.X subnets, and when reviewing the documentation, we noticed the following:

In this case, there is an explicit IP range published and then an open URL-based exception. For this customer, the more specific scenario was applied, resulting in users being unable to access http://www.office.com. In consultation with our engineering group, we determined that URL-based IP publishing is being phased out in favor of simple URL publishing. Therefore, in this instance, the new scheme is expected and any access to anything *.office.com should be allowed to any endpoint. The ultimate resolution was to remove the URL and IP address combination associated with http://www.office.com.

If you are ingesting the JSON file, you may want to start ensuring your environment is ready. The network devices that you use will require interpretation of URL-based filtering and will not be able to rely solely on IP / URL-based filtering to ensure a successful Office 365 deployment.

Azure Active Directory and Country Codes

In Azure Active Directory the default country for user objects that are provisioned from on-premises is the region where the tenant was created. For many companies that are multi-national they expect the region in Azure Active Directory to reflect the region that the user resides in.


Account attributes are determined by the attribute set replicated through Azure Active Directory Connect. The country attribute is no exception – in order for a directory synchronized object to reflect the correct country it must be accurately set in the on-premises Active Directory.


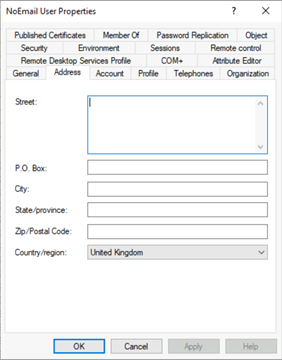
In Active Directory Users and Computers, on the address tab, the administrator may specify the country of the user.


The result of completing this operation is setting three attributes in Active Directory. These attributes are C, CO, and Country Code.


PS C:\> Get-ADUser NoEmailUser -Properties “c”,”co”,”countrycode”


c : GB

co : United Kingdom

countrycode : 826

DistinguishedName : CN=NoEmail User,OU=User,OU=DLMembers,OU=DLConversion,DC=home,DC=domain,DC=com

Enabled : True

GivenName : NoEmail

Name : NoEmail User

ObjectClass : user

ObjectGUID : 4ab27bae-d02c-48cd-88eb-4ba6fd430ce6

SamAccountName : NoEmailUser

SID : S-1-5-21-278042269-1514808692-1118015945-42988

Surname : User

UserPrincipalName : NoEmailUser@e-domain.com


Many organizations do not utilize native tools to provision users in AD. In these environments users are provisioned through connections to human resource systems or other third party directories. In many instances these third party systems flow the country into the attribute C.


PS C:\> Get-ADUser NoEmailUser1 -Properties “c”,”co”,”countrycode”


c : GB

countrycode : 0

DistinguishedName : CN=NoEmailUser1,OU=User,OU=DLMembers,OU=DLConversion,DC=home,DC=domain,DC=com

Enabled : True

GivenName :

Name : NoEmailUser1

ObjectClass : user

ObjectGUID : 1ce0caf2-1982-45d3-9db7-a49878953d22

SamAccountName : NoEmailUser1

SID : S-1-5-21-278042269-1514808692-1118015945-43637

Surname :

UserPrincipalName : NoEmailUser1@domain.com


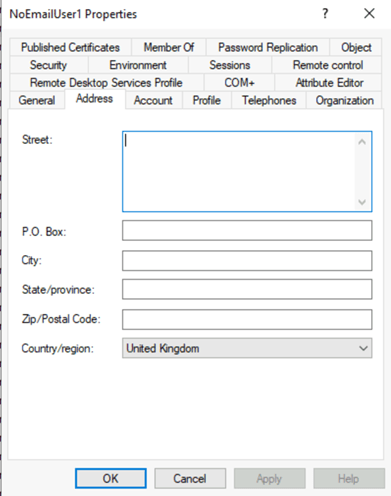
When reviewing the user in AD Users and Computers the country does appear to be set.


This can lead to some confusion – for the country to be complete set the C, CN, and Country Code should be set.


Many customers who utilize third party provisioning systems will discover that the country code does not reflect in Azure AD whereas when adjusting the country code via ADUC or resetting it on a provisioned account in ADUC it successfully reflects.


Azure AD Connect is responsible for evaluating the attribute set on premises and replicating the changes to Azure Active Directory. The attributes replicated are based on a set of rules. The population of county occurs through the rule “In from AD – User Common”.


In the “In from AD – User Common” rule the attributes C and CO are imported into the metaverse.


Once in the metaverse – the attributes need to be mapped as to what is exported to Azure AD. In this case country is exported through “Out to AAD – User ExchangeOnline”. The metaverse attribute CO is mapped to the country field in Azure AD.


This demonstrates the issues associated with third party directories and only setting the C values. If the CO value is not also set – even though the C value is set (and the GUI shows a country) there will be no country replicated to Azure AD.


To fully provision the country for a user the C, CO, and CountryCode values should be set. Standards for the country codes utilized and background information maybe found here.

Office 365 – Distribution List Migrations Version 2.0 – Part 7

Enabling hybrid mail flow for migrated distribution lists.

There may be circumstances where mail flow continues through the Exchange on-premises environment. Customers may choose to continue to have their MX records route through Exchange, mailboxes may not have been migrated, or the Exchange solution may be retained as an SMTP relay for internal applications. All of these circumstances may require that mail flow continue to the distribution list even though the group has been migrated to Office 365. Customers may also have chosen to enable centralized mail flow which routes email to the on-premises environment for routing decisions.

Creating a solution that allows for cross-premises mail flow was quite a challenge. First you have to have a method to allow the same SMTP address to exist in the on-premises directory and in the Office 365 directory but on different objects. There has to be a mail object that exists in both directories so that DL membership and other dependencies can be tracked (See Office 365 – Distribution List Migrations Version 2.0 – Part 6). In addition, a method is needed to maintain the nickname cache and allow the recipient to appear in the groups within address book views. Messages that are transferred between on-premises Exchange and Office 365 should be secure and viewed as internal (and not anonymous).

In the distribution list migration module, administrators have the ability to enable hybrid mail flow. Using the -enableHybridMailFlow:$TRUE switch requires the use of an on-premises Exchange server. This is due to the remote PowerShell dependencies with creating objects.

The first step in enabling hybrid mail flow is to mail enable the contact object created through ADSI. This is facilitated by calling the update-recipient cmdlet. In addition to calling update recipient, the external address of the mail contact is set to the unique onmicrosoft.com address assigned to the new distribution list when created in Office 365. This serves as the routing link between on-premises and Office 365. The mail contact cannot share the same email addresses as the migrated group. If it did, when Azure AD Connect replicates the object to Office 365, a proxy address collision would occur. This necessitates using another object to hold the proxy addresses of the migrated distribution list.


[PS] C:\>Get-MailContact TestNewParameter-MigratedByScript | fl name,alias,externalEmailAddress,emailaddresses,customAttribute1,CustomAttribute2


Name         : TestNewParameter-MigratedByScript

Alias         : TestNewParameter-MigratedByScript

ExternalEmailAddress : SMTP:TESTNEWPARAMETER@domain.MAIL.ONMICROSOFT.COM

EmailAddresses : {x500:/o=ExchangeLabs/ou=Exchange Administrative Group (FYDIBOHF23SPDLT)/cn=Recipients/cn=6a14b390befd42e59d155cfdc9a45651-TestNewPara, smtp:TestNewParameter-MigratedByScript@domain.mail.onmicrosoft.com, SMTP:TestNewParameter-MigratedByScript@domain.com}

CustomAttribute1 : MigratedByScript

CustomAttribute2 : TestNewParameter@domain.com


The second step is to create a dynamic distribution group. Why would a dynamic distribution group be created in order to assist with mail flow? First, the dynamic distribution group can never be replicated by Azure AD Connect. This ensures that the object that will hold the SMTP addresses of the migrated distribution list will never collide with the object already created in Office 365 and will never soft match to the existing group. Second, it’s a distribution group by definition. This means that customers who use address book views heavily and look for group filters will still see distribution groups in the view they expect to see them, versus looking for a mail enabled contact that would not be in the same view. The dynamic distribution group is created with the same attributes as the distribution list that was migrated. Name, display name, alias, proxy addresses, and mail attributes all match. Additionally, the legacyExchangeDN of the original group is added as an X500 address of the dynamic distribution list preserving nickname cache. A dynamic distribution list must have a set of filtered criteria for recipients to include. In this case, the criteria are custom attribute 1 “MigratedByScript” and custom attribute 2 “Proxy Address of Migrated Group.” This ensures that the dynamic distribution list has one member: the mail contact that was created in place of the migrated distribution group.


[PS] C:\>Get-DynamicDistributionGroup TestNewParameter | fl name,alias,emailaddresses,*filter*


Name : TestNewParameter

Alias : TestNewParameter

EmailAddresses : {x500:/o=Home/ou=Exchange Administrative Group

(FYDIBOHF23SPDLT)/cn=Recipients/cn=b13dd7a5e1df487f8b250f4c4138986f-TestNew,

smtp:TestNewParameter0@domain.com, smtp:TestNewParameter1@domain.com,

smtp:TestNewParameter2@domain.com, smtp:TestNewParameter3@domain.com,

smtp:TestNewParameter4@domain.com, smtp:TestNewParameter5@domain.com,

smtp:TestNewParameter6@domain.com, smtp:TestNewParameter7@domain.com,

smtp:TestNewParameter8@domain.com, smtp:TestNewParameter9@domain.com,

smtp:TestNewParameter10@domain.com, smtp:TestNewParameter11@domain.com,

smtp:TestNewParameter12@domain.com, smtp:TestNewParameter13@domain.com,

smtp:TestNewParameter14@domain.com…}

RecipientFilter : ((((CustomAttribute1 -eq ‘MigratedByScript’) -and (CustomAttribute2 -eq

‘TestNewParameter@domain.com’) -and (Alias -ne $null))) -and (-not(Name -like

‘SystemMailbox{*’)) -and (-not(Name -like ‘CAS_{*’)) -and (-not(RecipientTypeDetailsValue -eq

‘MailboxPlan’)) -and (-not(RecipientTypeDetailsValue -eq ‘DiscoveryMailbox’)) -and

(-not(RecipientTypeDetailsValue -eq ‘PublicFolderMailbox’)) -and (-not(RecipientTypeDetailsValue

-eq ‘ArbitrationMailbox’)) -and (-not(RecipientTypeDetailsValue -eq ‘AuditLogMailbox’)) -and

(-not(RecipientTypeDetailsValue -eq ‘AuxAuditLogMailbox’)) -and (-not(RecipientTypeDetailsValue

-eq ‘SupervisoryReviewPolicyMailbox’)))

LdapRecipientFilter : (&(extensionAttribute1=MigratedByScript)(extensionAttribute2=TestNewParameter@domain.com)(ma

ilNickname=*)(!(name=SystemMailbox{*))(!(name=CAS_{*))(!(msExchRecipientTypeDetails=16777216))(!(

msExchRecipientTypeDetails=536870912))(!(msExchRecipientTypeDetails=68719476736))(!(msExchRecipie

ntTypeDetails=8388608))(!(msExchRecipientTypeDetails=4398046511104))(!(msExchRecipientTypeDetails

=70368744177664))(!(msExchRecipientTypeDetails=140737488355328)))

RecipientFilterType : Precanned


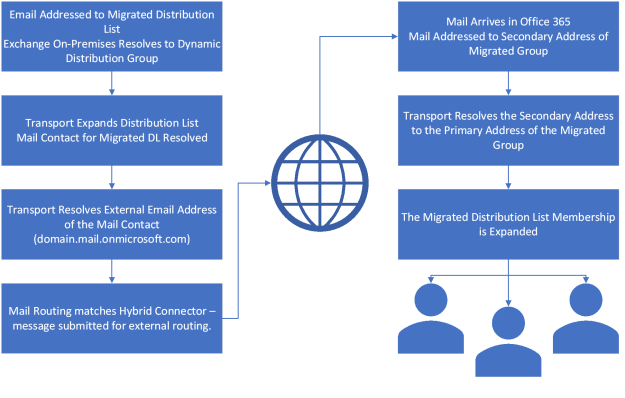
How does this setup facilitate mail flow? Assuming we have an application on-premises that relays through Exchange and sends email to MigratedDL@contoso.com. Originally this was an on-premises distribution list and the membership would have been directly expanded and the message delivered to the recipients based on this expansion. For a migrated distribution list, the message is routed to the dynamic distribution group. When the dynamic group is expanded, there is a single recipient found: the mail contact created. Transport then re-routes the email to the mail contact, which has an external email using the onmicrosoft.com address of the migrated DL. In a hybrid environment, secure connectors are created for the mail.onmicrosoft.com namespace to ensure authentication occurs on cross-premises mail flow. Transport re-routes the message to migratedDL@contoso.mail.onmicrosoft.com. This namespace matches the hybrid connector and is routed to Office 365. Upon arrival in Office 365, the message is evaluated and migratedDL@contoso.mail.onmicrosoft.com is found as a secondary proxy on the group MigratedDL@contoso.com. The address is changed to MigratedDL@contoso.com at which point the group is expanded. The message is then delivered to the expanded group.

Here are sample message tracking events to follow the mail flow.

  • Drop message for on-premises distribution list expansion.

RunspaceId : da80b36e-c62c-41d9-8244-991a146b7075

Timestamp : 4/1/2021 4:19:35 PM

ClientIp :

ClientHostname : server-Mail-0

ServerIp :

ServerHostname :

SourceContext :

ConnectorId :

Source : ROUTING

EventId : DROP

InternalMessageId : 87617332838410

MessageId : 5b55a8f65beb4062b9c7b4376972ba86@domain.com

NetworkMessageId : 8f58f417-29d7-43d4-1a4e-08d8f529f062

Recipients : {MemberTest@domain.com}

RecipientStatus : {[{LED=250 2.1.5 RESOLVER.GRP.Expanded; distribution list

expanded};{MSG=};{FQDN=};{IP=};{LRT=}]}

TotalBytes : 8759

RecipientCount : 1

RelatedRecipientAddress :

Reference :

MessageSubject : Test Routing 2

Sender : TIM@domain.com

ReturnPath : TIM@domain.com

Directionality : Originating

TenantId :

OriginalClientIp :

MessageInfo :

MessageLatency :

MessageLatencyType : None

EventData : {[DeliveryPriority, Normal], [AccountForest, home.domain.com]}

TransportTrafficType : Email

SchemaVersion : 15.02.0792.010

  • Expansion event resolving to the mail enabled migration contact.


RunspaceId : da80b36e-c62c-41d9-8244-991a146b7075

Timestamp : 4/1/2021 4:19:35 PM

ClientIp :

ClientHostname :

ServerIp :

ServerHostname : server-Mail-0

SourceContext : server-DC-0.home.domain.com

ConnectorId :

Source : ROUTING

EventId : EXPAND

InternalMessageId : 87617332838410

MessageId : 5b55a8f65beb4062b9c7b4376972ba86@domain.com

NetworkMessageId : 8f58f417-29d7-43d4-1a4e-08d8f529f062

Recipients : {MemberTest-MigratedByScript@domain.com}

RecipientStatus : {250 2.1.5 RESOLVER.GRP.Expanded; distribution list expanded}

TotalBytes : 7896

RecipientCount : 1

RelatedRecipientAddress : MemberTest@domain.com

Reference :

MessageSubject : Test Routing 2

Sender : TIM@domain.com

ReturnPath : TIM@domain.com

Directionality : Originating

TenantId :

OriginalClientIp :

MessageInfo :

MessageLatency :

MessageLatencyType : None

EventData : {[DeliveryPriority, Normal], [AccountForest, home.domain.com]}

TransportTrafficType : Email

SchemaVersion : 15.02.0792.010


  • Mail enabled contact resolved to target address (which is a secondary address of the migrated distribution list)


RunspaceId : da80b36e-c62c-41d9-8244-991a146b7075

Timestamp : 4/1/2021 4:19:35 PM

ClientIp :

ClientHostname :

ServerIp :

ServerHostname : server-Mail-0

SourceContext :

ConnectorId :

Source : ROUTING

EventId : RESOLVE

InternalMessageId : 87617332838410

MessageId : 5b55a8f65beb4062b9c7b4376972ba86@domain.com

NetworkMessageId : 8f58f417-29d7-43d4-1a4e-08d8f529f062

Recipients : {MEMBERTEST@domain.MAIL.ONMICROSOFT.COM}

RecipientStatus : {}

TotalBytes : 7896

RecipientCount : 1

RelatedRecipientAddress : MemberTest-MigratedByScript@domain.com

Reference :

MessageSubject : Test Routing 2

Sender : TIM@domain.com

ReturnPath : TIM@domain.com

Directionality : Originating

TenantId :

OriginalClientIp :

MessageInfo :

MessageLatency :

MessageLatencyType : None

EventData : {[DeliveryPriority, Normal], [AccountForest, home.domain.com]}

TransportTrafficType : Email

SchemaVersion : 15.02.0792.010


  • Message transferred via the hybrid connector using certificate-based security.


RunspaceId : da80b36e-c62c-41d9-8244-991a146b7075

Timestamp : 4/1/2021 4:19:37 PM

ClientIp : 10.0.0.20

ClientHostname : server-Mail-0

ServerIp :

ServerHostname : domain-mail-onmicrosoft-com.mail.protection.outlook.com

SourceContext : ;250 2.6.0 5b55a8f65beb4062b9c7b4376972ba86@domain.com [InternalId=21801253998737,

Hostname=DM5PR04MB0619.namprd04.prod.outlook.com] 10314 bytes in 0.141, 71.363 KB/sec Queued

mail for delivery;ClientSubmitTime:

ConnectorId : Outbound to Office 365

Source : SMTP

EventId : SENDEXTERNAL

InternalMessageId : 87617332838413

MessageId : 5b55a8f65beb4062b9c7b4376972ba86@domain.com

NetworkMessageId : 8f58f417-29d7-43d4-1a4e-08d8f529f062

Recipients : {MEMBERTEST@domain.MAIL.ONMICROSOFT.COM}

RecipientStatus : {250 2.1.5 Recipient OK}

TotalBytes : 6935

RecipientCount : 1

RelatedRecipientAddress :

Reference :

MessageSubject : Test Routing 2

Sender : TIM@domain.com

ReturnPath : TIM@domain.com

Directionality : Originating

TenantId :

OriginalClientIp :

MessageInfo : 2021-04-01T16:19:34.691Z;SRV=server-Mail-0.home.domain.com:TOTAL-SUB=0.163|SA=0.125|MTSS-

PEN=0.039(MTSSD-PEN=0.038(MTSSDA=0.002|MTSSDC=0.005|SDSSO-PEN=0.019 (SMSC=0.014|MTSSDM-PEN=0.

004)));SRV=server-Mail-0.home.domain.com:TOTAL-HUB=2.232|SMR=0.133(SMRDI=0.005|SMRC=0.127

(SMRCL=0.102|X-SMRCR=0.127))|CAT=0.196(CATOS=0.036(CATSM=0.036(CATSM-Malware

Agent=0.035))|CATRESL=0.020(X-CATRESLX=0.008)|CATORES=0.008(CATRS=0.007(CATRS-Index Routing

Agent=0.006))|CATORT=0.111(CATRT=0.111(CATRT-RMS Encryption Agent=0.002|CATRT-Journal

Agent=0.109))|CATCC=0.008|CATBIF=0.001)|QDE=0.153|SMSC=0.647(X-SMSDR=0.152)|SMS=1.100

MessageLatency : 00:00:02.3930000

MessageLatencyType : EndToEnd

EventData : {[E2ELatency, 2.393], [ExternalSendLatency, 0.492], [ToEntity, Internet], [FromEntity,

Hosted], [MsgRecipCount, 1], [IncludeInSla, True],

[Microsoft.Exchange.Transport.MailRecipient.RequiredTlsAuthLevel, DomainValidation],

[Microsoft.Exchange.Transport.MailRecipient.EffectiveTlsAuthLevel, DomainValidation],

[IsSmtpResponseFromExternalServer, True], [DeliveryPriority, Normal], [AccountForest,

home.domain.com]}

TransportTrafficType : Email

SchemaVersion : 15.02.0792.010

  • The message is received in Office 365 and the distribution group is expanded.


Message Trace ID : 2b83eb1b-af9d-4806-78aa-08d8f529f12b

Message ID : <5b55a8f65beb4062b9c7b4376972ba86@domain.com>

Date : 4/1/2021 4:19:37 PM

Event : Receive

Action :

Detail : Message received by: DM5PR04MB0619.namprd04.prod.outlook.com using TLS1.2 with AES256

Data : <root><MEP Name=”ConnectorId” String=”DM5PR04MB0619\Default DM5PR04MB0619″/><MEP Name=”ClientIP”

String=”2603:10b6:300:116::19″/><MEP Name=”ServerHostName”

String=”DM5PR04MB0619.namprd04.prod.outlook.com”/><MEP name=”FirstForestHop”

String=”DM5PR04MB0619.namprd04.prod.outlook.com”/><MEP Name=”DeliveryPriority”

String=”Normal”/><MEP Name=”ReturnPath” String=”TIM@domain.com”/><MEP Name=”CustomData” Blob=”S

:ProxyHop1=CO1NAM04FT009.mail.protection.outlook.com(10.152.90.137);S:ProxyHop2=MWHPR07CA0009.outloo

k.office365.com(2603:10b6:300:116::19);’S:InboundConnectorData=Name=Inbound from 19df6a88-b887-4e90-

8b47-31d6cfb90aca;ConnectorType=OnPremises;TenantId=f7d9d2a4-dded-4f6f-90a9-5011281137b9′;S:tlsversi

on=SP_PROT_TLS1_2_SERVER;S:tlscipher=CALG_AES_256;S:Oorg=domain.com”/><MEP

Name=”SequenceNumber” Long=”0″/><MEP Name=”RecipientReference” String=””/></root>


Message Trace ID : 2b83eb1b-af9d-4806-78aa-08d8f529f12b

Message ID : <5b55a8f65beb4062b9c7b4376972ba86@domain.com>

Date : 4/1/2021 4:19:37 PM

Event : Resolve

Action :

Detail : The message was resolved to membertest@domain.com.

Data : <root><MEP Name=”ServerHostName” String=”DM5PR04MB0619″/><MEP Name=”SourceContext” String=”Rewrite

to Primary”/><MEP Name=”ReturnPath” String=”TIM@domain.com”/><MEP Name=”SequenceNumber”

Long=”0″/><MEP Name=”RecipientReference” String=””/><MEP Name=”RelatedRecipient”

         String=”membertest@domain.com”/></root>


Message Trace ID : 2b83eb1b-af9d-4806-78aa-08d8f529f12b

Message ID : <5b55a8f65beb4062b9c7b4376972ba86@domain.com>

Date : 4/1/2021 4:19:37 PM

Event : Expand DL

Action :

Detail : The message was sent to a distribution list (DL) that was expanded to the recipients of the DL.

Data : <root><MEP Name=”RcptCount” Integer=”1″/><MEP Name=”ServerHostName” String=”DM5PR04MB0619″/><MEP

Name=”SourceContext” String=”BY5PR04A04DC006.NAMPR04A004.prod.outlook.com”/><MEP Name=”ReturnPath”

String=”TIM@domain.com”/><MEP Name=”ClientName” String=””/><MEP Name=”SequenceNumber”

Long=”0″/><MEP Name=”RecipientStatus” String=”250 2.1.5 RESOLVER.GRP.Expanded; distribution list

         expanded”/><MEP Name=”RecipientReference” String=””/></root>


Message Trace ID : 2b83eb1b-af9d-4806-78aa-08d8f529f12b

Message ID : <5b55a8f65beb4062b9c7b4376972ba86@domain.com>

Date : 4/1/2021 4:19:39 PM

Event : Drop

Action :

Detail : Reason: [{LED=250 2.1.5 RESOLVER.GRP.Expanded; distribution list

expanded};{MSG=};{FQDN=};{IP=};{LRT=}]

Data : <root><MEP Name=”SourceContext” String=””/><MEP Name=”ReturnPath”

String=”TIM@domain.com”/><MEP Name=”ClientName”

String=”DM5PR04MB0619.namprd04.prod.outlook.com”/><MEP Name=”SequenceNumber” Long=”0″/><MEP

Name=”RecipientStatus” String=”[{LED=250 2.1.5 RESOLVER.GRP.Expanded; distribution list


expanded};{MSG=};{FQDN=};{IP=};{LRT=}]”/><MEP Name=”RecipientReference” String=””/></root>


Here is an example of the original group retained, the hybrid mail contact created, and the dynamic distribution group.



Sample Flow:


Office 365 – Distribution List Migrations Version 2.0 – Part 6

How does the module track distribution lists that have been migrated?

Objects in Active Directory may have dependencies on the distribution list (DL) being migrated to Office 365. For example, the DL maybe a member of other groups, it may accept messages from other groups, or may be a manager of other groups. When the DL is migrated, the mail attributes of the group are removed, or the group is deleted. This requires a method to exist to create an object that could replace the mail enabled distribution list. The assumption is also made that other groups will continue to be migrated to Office 365.

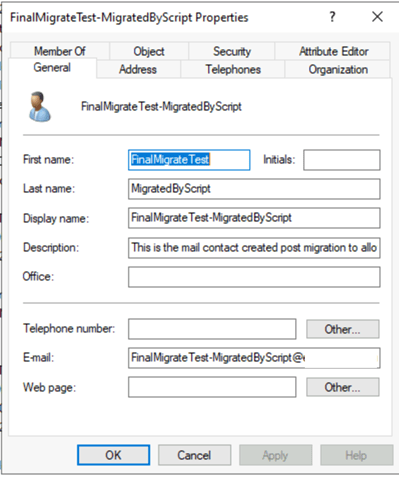
To facilitate tracking of a migrated distribution list a mail contact is created in place of the distribution list. The mail contact is an intentional choice because it allows us to specify an external address for mail routing purposes, because it will not soft match to a migrated distribution group, and because it is not a security principal that could allow for an authentication object within the directory. A mail contact will also replicate to Office 365 and not compete with any of the existing objects. This allows non-migrated distribution groups to still contain migrated lists and maintain accurate mail flow.

The mail contact is created with the name of the distribution list that was migrated plus the test MigratedByScript. There are two custom attributes that are specified. Custom attribute 1 is the text “MigratedByScript” and custom attribute 2 is the original SMTP address of the migrated distribution list. This is what allows the mail contact to act in place of the distribution list. The contact is also hidden from the address list.

Take the following example. The distribution list Parent has a member distribution list Child. Child is migrated to Office 365. The child group is replaced with the mail contact Child-MigratedByScript and added as a member of the Parent distribution group. The administrator runs a migration of the Parent list. When the mail contact Child is encountered, the script recognizes the custom attributes and determines that this was a group that was migrated. Instead of importing the email addresses associated with the mail contact, the script automatically substitutes the email address stored within Custom Attribute 2. When Parent is created in Office 365, the email address for Child is added as a member. The final outcome is that Parent is created with Child as a member.

In the case of a distribution list migration that does not use Exchange on-premises, the contact object created is not a fully mail enabled object. The custom attribute logic does not change. The contact in this case is created through ADSI.

If Exchange is used and hybrid mail flow is enabled, the mail contact is instrumental in enabling this. Hybrid mail flow will be covered in a future post.


Sample Mail Contact


Office 365 – Distribution List Migrations Version 2.0 – Part 5

Gathering advanced dependencies for a group to be migrated…

Distribution lists can have numerous uses throughout an environment, both on-premises and in Office 365. To migrate a distribution list with full fidelity it is necessary to account for some dependencies. Locating these dependencies often goes beyond looking at the attributes of the group itself and requires evaluation of mailboxes and recipients. The ability to do this in a timely fashion can often be challenging, especially when performed in the scope of a single distribution list migration.

The advanced properties that the module attempts to capture are SendAs, Full Mailbox Access, and individual folder permissions. The distribution list migration module v2 offers administrators the ability to scan for some of these dependencies during migration (for small environments) or pre-screen the recipients to capture this information beforehand. Capturing the information beforehand allows for more efficient scanning of point in time files to locate these dependencies.

In the migration planning process, administrators may choose to pre-gather these dependencies. To accomplish this the module contains several functions to trigger data gathering. When used with defaults the gather commands operate on the set of recipients required. Administrators may find that they are only interested in scanning a group of mailboxes. For example, you may only be interested in pre-gathering a set of VIP users or if migrating groups by department only gather data for mailboxes in that department. If that is the case each of the staging functions support the BringYourOwnMailboxes switch <or> BringYourOwnRecipients switch to narrow the evaluation down to a group of mailboxes.

Here are the cmdlets that can be used to pre-gather dependencies.

Start-CollectOnPremSendAs

This cmdlet requires an on-premises Exchange Server in order to gather all recipients of all classes. SendAs rights may apply to any recipient object. Once gathered the recipients are evaluated for AD permissions – extended rights send as. If any extended rights send as are located the user is added to an XML file that will be used for offline scanning. This cmdlet does not filter its queries to a specific group rather it finds all send as rights. The data returned in this file is used to make decisions on overriding the decision to keep the distribution list. If the administrator has decided to retain the distribution group as part of migration you may consider skipping this as the permissions are automatically retained.

Here is a sample of the function performance for 10,100 recipients.


Days : 0

Hours : 10

Minutes : 9

Seconds : 41

Milliseconds : 798

Ticks : 365817987291

TotalDays : 0.423400448253472

TotalHours : 10.1616107580833

TotalMinutes : 609.696645485

TotalSeconds : 36581.7987291

TotalMilliseconds : 36581798.729


The scan took approximately 10 hours to complete. Times could be longer depending on the Active Directory complexity and the location of domain controllers for all domains relative to the workstation where the collection function is run.


Start-CollectOnPremFullMailboxAccess

This cmdlet requires an on-premises Exchange Server in order to gather all mailboxes. Once gathered the mailboxes are evaluated for any permissions of full mailbox access. If any full mailbox access rights are discovered the mailbox Is added to an XML file that will be used for offline scanning. This cmdlet does not filter its queries to a specific group rather it finds all full mailbox rights. The data returned in this file is used to make decisions on overriding the decision to keep the distribution list. If the administrator has decided to retain the distribution group as part of migration you may consider skipping this as the permissions are automatically retained.

Here is a sample of the function performance for 10,080 mailboxes.


Days : 0

Hours : 0

Minutes : 43

Seconds : 56

Milliseconds : 495

Ticks : 26364957391

TotalDays : 0.0305149969803241

TotalHours : 0.732359927527778

TotalMinutes : 43.9415956516667

TotalSeconds : 2636.4957391

TotalMilliseconds : 2636495.7391


The scan took approximately 43 minutes to complete.


Start-CollectOnPremMailboxFolders

This function requires an on-premises Exchange Server to collect all mailbox objects and the folders contained within them. The folders are scoped to default folders and any folder that is user created. When the mailboxes are collected, and the mailbox folders are collected the names of the folders are normalized to use their folder IDs. This is required as folders may contain special characters that prevent accurate analysis via name. With the folders normalized permissions are gathered off the folders. If the permission is not default or anonymous the permission and folder ID are recorded into the XML file for later interpretation. The data returned in this file is used to make decisions on overriding the decision to keep the distribution list. If the administrator has decided to retain the distribution group as part of migration you may consider skipping this as the permissions are automatically retained.

Here is a sample of the function performance for 10,080 mailboxes.


Days : 0

Hours : 10

Minutes : 9

Seconds : 58

Milliseconds : 697

Ticks : 365986971295

TotalDays : 0.423596031591435

TotalHours : 10.1663047581944

TotalMinutes : 609.978285491667

TotalSeconds : 36598.6971295

TotalMilliseconds : 36598697.1295


To complete the folder scan and permissions evaluation took approximately 10 hours. It is important to note that this test was performed in a lab where the majority of mailboxes contained only the default folder set. In addition, all mailboxes were located in the same location where the collection script was executed and all in the same mailbox database. This cmdlet requires that the mailbox be directly accessed which means performance can be highly dependent on the location of where the script is executed verses the mailbox database that contain the mailbox. In addition, performance can also be greatly impacted by the number of folders contained within the mailbox. An archive mailbox is not evaluated.


Start-CollectOffice365FullMailboxAccess

This function iterates through all mailboxes in Office 365 to determine if the full mailbox access right has been set on the mailbox. If a full mailbox access right is found an XML file is updated with the information regarding the access right. The XML file is used as a part of the transition and if the distribution list being migrated was found as having the right the right is reset to the new distribution group created. Use of this function is necessary if full mailbox access rights retention is desired as any full mailbox access rights would be lost when the distribution list is deleted and recreated.


To record full mailbox access permissions on 13,050 mailboxes in Office 365.


Days : 0

Hours : 1

Minutes : 21

Seconds : 14

Milliseconds : 975

Ticks : 48749754067

TotalDays : 0.0564233264664352

TotalHours : 1.35415983519444

TotalMinutes : 81.2495901116667

TotalSeconds : 4874.9754067

TotalMilliseconds : 4874975.4067


The total time was approximate 1 ½ hours.


Start-CollectOffice365MailboxFolders

This function collects all mailbox objects and the folders contained within them. The folders are scoped to default folders and any folder that is user created. When the mailboxes are collected, and the mailbox folders are collected the names of the folders are normalized to use their folder IDs. This is required as folders may contain special characters that prevent accurate analysis via name. With the folders normalized permissions are gathered off the folders. If the permission is not default or anonymous the permission and folder ID are recorded into the XML file for later interpretation. The data returned in this file is used to make decisions on overriding the decision to keep the distribution list. If the administrator has decided to retain the distribution group as part of migration you may consider skipping this as the permissions are automatically retained. An archive mailbox is not evaluated.

To record mailbox folder permissions on 13,050 mailboxes.


Days : 4

Hours : 23

Minutes : 33

Seconds : 48

Milliseconds : 996

Ticks : 4304289967003

TotalDays : 4.98181709143866

TotalHours : 119.563610194528

TotalMinutes : 7173.81661167167

TotalSeconds : 430428.9967003

TotalMilliseconds : 430428996.7003


In total it took approximately 5 days to gather the folders and associated permissions. Using the REST-based commands the estimate is approximately 32 seconds per mailbox (default folder set). The performance of the data capture is largely dependent on the number of mailboxes and the number of folders contained within the mailbox.

Why is there no pre-gather function for Office 365 Send As Rights? The Exchange Online PowerShell commands support filtering on the send as rights. When specifying to retain Office 365 Send As permissions this filter is used as a part of the migration.

As demonstrated by the performance analysis each of these cmdlets could take a long time to complete. Due to the fact that Exchange PowerShell cmdlets are used there could be any number of potential failures that maybe encountered in the data gathering process. Each cmdlet supports a retry switch. The recipients processed are tracked and should the cmdlet fail the retry function determines the last recipient processed and resumes processing from that point forward until completion or the next failure. It is important to note that each function uses the same retry files – please do not mix retries across function as you may miss a set of users.

IMPORTANT: The data gathered is a point in time snapshot. During the migration this point in time snapshot is evaluated. Any permissions that may have changed after the point in time snapshot would be lost.

EXAMPLES:


  • Start-CollectOffice365FullMailboxAccess -logFolderPath c:\temp -exchangeOnlineCredential $cred
    • Collects all full mailbox access permissions from Exchange Online
    • Creates the audit data folder in the path c:\temp
  • Start-CollectOffice365MailboxFolders -logFolderPath c:\temp -retryCollection:$TRUE
    • Collects all mailbox folder permissions from Exchange Online
    • Retry is specified – previously exported permissions are imported, and log files are used to determine where collection should restart from.
  • Sample: Bring your own mailboxes / filter based on attributes.
    • $mailboxes = get-ExoMailbox -resultsize unlimited | where {$_.customAttribute1 -like “*HumanResources*”}
    • $mailboxes | export-csv c:\mailboxesIWant.csv
    • Start-CollectOffice365MailboxFolders -logFolderPath c:\temp -exchangeOnlineCredential $cred -bringYourOwnMailboxes (import-csv -path c:\mailboxesIWant.csv)
    • Command imports the mailbox objects from the CSV file and then uses those as the selection criteria to pull folders from Exchange Online.


Office 365 – Distribution List Migrations Version 2.0 – Part 4

Retaining the original distribution group post migration…

In the Distribution List Migration Module v2, administrators now have the option to retain the original group in the on-premises Active Directory. In v1 of the distribution list migration script, the distribution list post migration was deleted from the Active Directory. This was a self-protection mechanism. The script originally allowed the option to retain the group. This caused several issues:

  • The group was typically stored in an organizational unit that did not synchronize to Azure Active Directory. The groups retained their mail enabled settings. Azure AD Connect soft matches groups in Azure AD through the mail and proxy addresses field. Customers quickly discovered that if you accidentally enabled this organizational unit for synchronization, soft matching would occur, and the distribution list migration would be undone. This would, in worse case, reset the group to a state that could be old and unwanted.
  • The group retained was mail enabled. If an on-premises Exchange solution is used for mail relay, the messages would be expanded to the group on-premises and not to the updated membership and properties of the migrated distribution group.

Deleting the distribution group also had unintended consequences. Many customers have combined security enabled groups with distribution groups. The security groups could have any number of dependencies in the environment, from permissions to on-premises applications, folder shares, or other general security items. A security group is also replicated to Azure Active Directory as a security enabled group. These groups in Office 365 could also be used for the security of applications or the assignment of licenses. In essence there is a catch-22 to keeping the group or removing it.

In this version of the distribution list migration module, I sought to keep a balance between the two options. During the migration, the distribution group is moved to an organizational unit that is not synchronized. This allows Azure AD Connect to trigger the group deletion in Office 365. Upon successful completion of the re-creation of the group – the administrator may choose to delete the original group or retain it.

If the administrator decides to retain the group – the following workflow is followed.

  • The group is moved back to the original organizational unit where it previously resided.
  • All mail enabled attributes of the group are purged through Active Directory PowerShell.
  • The group display name and Windows SAM account name are appended with a !. This randomizes the name from the migrated distribution group without actually changing its ability to be found in the directory.
  • The SID of the group does not change – therefore any permissions applied in either on-premises or Office 365 are retained.
  • The object GUID of the group does not change – therefore the source anchor link to the group in Azure AD is preserved. A duplicate group is not created.

If the administrator chooses to audit for more complex DL dependencies such as SendAS, Full Mailbox Access, or folder permissions and the group is found to have these dependencies, the distribution group retention option is automatically configured. A security group may continue to function for these permissions even if mail disabled – but may not be able to be modified with the Exchange cmdlets.

If the administrator chooses to delete the group, the group is deleted upon confirmation of successful creation in Office 365. If the Active Directory Recycle Bin is enabled, the group may be eligible for recovery for the Recycle Bin duration.

The choice is now yours!

Office 365 – Distribution List Migrations Version 2.0 – Part 3

Using the distribution list migration module v2 for simple migrations

With the Distribution List Migration Module V2 installed and all of the pre-requisites ready you are now ready to try a distribution list migration.

In order to accomplish a migration, you must identify the following resources and have the necessary permissions to perform the migration.

    • (Mandatory) Global catalog server in the domain where the distribution list resides.
      • If all resources for this distribution list are in the same domain as the group, domain administrator rights for the credential specified are required.
      • If the distribution list to be migrated has dependencies in other domains within the forest (for example, the group is a member of groups in other domains), then enterprise administrator rights are required.
      • Remote PowerShell available and configured on the global catalog server referenced. A remote PowerShell session is required for Active Directory PowerShell commands that do not support specifying a server endpoint.
    • (Optional) Identify the Azure Active Directory Connect server that is responsible for synchronizing objects to Office 365.
      • ADSyncAdmin credentials are required in order to perform delta synchronization.
      • The specified account must also have rights to open a remote PowerShell session to the Azure AD Connect server.
      • Typically, the same account used for the global catalog server is used for the Azure AD Connect server.
    • (Optional) Exchange on-premises server in the organization containing the distribution list.
      • Exchange Organization Management rights are required.
      • If Active Directory split permissions are enabled, the account must also have rights to any organizational units where mailbox objects reside that will be included in pre-requisite scans or where hybrid mail flow objects will be created.
      • If the Exchange Server URL specified is part of a load balancer it may be required to enable basic authentication on the PowerShell virtual directory.
      • If the Exchange Server URL specified is a backend server using the installed self-signed certificate Kerberos authentication may be used.
    • (Mandatory) Access to Exchange Online through the Exchange Online Management Module v2.
      • Authentication may be performed either in the context of a user account or through certificate-based authentication.
      • The specified administrator account must have the Exchange Online Management role. (This may be different from using a Global Administrator within Azure, although this is the most common configuration).
      • If certificate authentication will be used, ensure that all pre-requisites are met at the following link: App-only authentication | Microsoft Docs
  • (Mandatory) Access to Azure Active Directory through the Azure Active Directory PowerShell Module.
    • Authentication may be performed either in the context of a user account or through certificate-based authentication.
    • The specified administrator account must have the Global Administrator right.
  • Unrestricted access to domain controllers and global catalog servers in other domains.
    • If the group to be migrated has dependencies in other domains within the Active Directory forest, the workstation or server where the migration is performed may need access to these resources to complete the migration.
    • Administrators do not have control over where changes happen in this domain. The script leverages the ability of the Active Directory PowerShell command to locate the “best” domain controller or global catalog server for the operation.

When the servers are identified, and the required credentials available you can proceed with a distribution list migration. To begin the migration, processing the SMTP address of the group is required. The administrator has the flexibility to decide how to store credentials; for example, in a secure XML file or by specifying them as a part of another command.

Here is an example prompting the administrator for credentials:

$gcCred = get-credential

$adConnectCred = get-credential

$cloudCred = get-credential

$exchangeCred = get-credential

Here is an example of credential reuse:

$gcCred = get-credential

$adConnectCred = $gcCred

$cloudCred = get-credential

$exchangeCred = $gcCred

Here is an example of credentials stored in XML files:

Prepare the credentials:

$cred=get-credential

$cred | export-CLIXML -path c:\credentials\onPrem.xml

$cred=get-credential

$cred | export-CLIXML -path c:\credentials\cloud.xml

Use the credentials:

$gcCred = import-cliXml -path c:\credentials\onPrem.xml

$adConnectCred = $gcCred

$exchangeCred = $gcCred

$cloudCred = import-cliXML -path c:\credentials\cloud.xml

There is a great deal of flexibility in how credentials are specified. If you are not using the script to trigger Azure AD Connect, enable hybrid mail flow, or to use other Exchange-only features (including full mailbox access and send as only) the global catalog credential, Azure Active Directory, and Exchange Online credential are necessary.

The script has several parameters – we will explore what each of them does as part of the migration process.

  • (Required)GroupSMTPAddress
    • This is the primary SMTP address of the group to be migrated.
    • It must match the mail field in Active Directory.
  • (Required)GlobalCatalogServer
    • This is the global catalog server specified in the same domain as the distribution list to be migrated specified as a fully qualified domain name.
  • (Required)ActiveDirectoryCredential
    • This is the credential for connections to the global catalog server <or> other Active Directory resources in the forest.
  • (Optional)ActiveDirectoryAuthenticationMethod
    • This specifies if Kerberos or another authentication method should be utilized when connecting to Active Directory.
    • Default = Kerberos
  • (Optional)AADConnectServer
    • This is the fully qualified domain name of the Azure AD Connect server.
    • If this is specified along with a credential, delta synchronization will be triggered to decrease the time to remove the distribution group from Office 365.
    • If the server is not specified the script will wait for the default sync cycle interval to trigger and for group removal to occur.
  • (Optional)AADConnectCredential
    • Credential used to connect to the Azure AD Connect server to perform delta synchronization.
    • This is required if AADConnectServer is specified.
  • (Optional)AADConnectAuthenticationMethod
    • This specifies if Kerberos or another authentication method should be utilized when connecting to Azure Active Directory Connect.
    • Default = Kerberos
  • (Optional)ExchangeServer
    • This is the fully qualified domain name to the on-premises Exchange Server remote PowerShell directory.
    • This is required if hybrid mail flow objects for the migrated distribution lists are enabled.
  • (Optional)ExchangeCredential
    • This is the credential specified for the Exchange remote PowerShell connection.
    • This is required if an Exchange server is specified.
  • (Optional)ExchangeAuthenticationMethod
    • This is the authentication method to the on-premises Exchange server.
    • Values are Kerberos or Basic, with Basic being the default.
    • This may require enabling Basic Authentication on the Exchange server’s PowerShell virtual directory.
    • Default = Kerberos
  • (Optional)ExchangeOnlineCredential
    • This is the credential that will be used for Exchange Online connectivity.
    • This credential is mandatory if certificate-based authentication is not being used.
  • (Optional)ExchangeOnlineCertificateThumbprint
    • This is the thumbprint of the locally installed certificate that will be used with certificate-based authentication.
    • This is mandatory if an Exchange Online credential is not specified.
  • (Optional)ExchangeOnlineEnvironmentName
    • This is the environment for the Exchange Online remote PowerShell connection.
    • This automatically defaults to the Office 365 commercial environment.
    • This may change for other environments like GCC.
    • This is required if you specify an ExchangeOnlineCertificateThumbprint.
  • (Optional)ExchangeOnlineAppID
    • This is the application ID associated with the application created in Azure for certificate-based authentication.
    • This is required if you specify an ExchangeOnlineCertificateThumbprint.
  • (Optional)AzureADCredential
    • This is the credential that will be used for Azure Active Directory connectivity.
    • This credential is mandatory if certificate-based authentication is not being used.
  • (Optional)AzureEnvironmentName
    • This is the environment for the Azure Active Directory PowerShell connection.
    • This automatically defaults to the Office 365 commercial environment.
    • This may not change for other environments like GCC.
    • This is required if you specify AzureCertificateThumbprint.
  • (Optional)AzureTenantID
    • This is the tenant GUID associated with the Azure Active Directory instance.
    • This is required if you specify AzureCertificateThumbprint.
  • (Optional)AzureAplicationID
    • This is the application ID associated with the application created in Azure for certificate-based authentication.
    • This is required if you specify AzureCertificateThumbprint.
  • (Optional)AzureCertificateThumbprint
    • This is the thumbprint of the locally installed certificate that will be used with certificate-based authentication.
    • This is mandatory if an Azure Active Directory credential is not specified.
  • (Required)LogFolderPath
    • This is the root path where the script will look for audit data (pre-collected dependencies) and store all log / export files associated with the migration.
    • Upon completion this folder is a date/time rename and appended with either success or failure.
  • (Mandatory)DoNotSyncOU
    • This is the organizational unit in Active Directory in the same domain as the distribution list to be migrated that is set to not synchronize through Azure AD Connect.
    • This is mandatory and used to trigger distribution list removal in Office 365.

Above are the basic parameters that can be used as part of a simple distribution list migration. The parameters below offer administrators more advanced options, including tracking additional dependencies in both the on-premises and Office 365 environments.

  • (Optional)RetainOriginalGroup
    • This allows the administrator to retain the group after migration.
    • The default is TRUE.
    • In a future post, the workflow will be outlined as to how the group is retained.
    • If the group is a security group type on premises and retainOriginalGroup is set to false the option is ignored and the group is retained.
  • (Optional)GroupTypeOverride
    • This option allows the administrator to create the migrated distribution group in Office 365 as a type that differs from on-premises.
    • For example, a security enabled group can be changed to a distribution only group in Office 365 by specifying the override value “Distribution.”
    • Values are “Distribution” or “Security.
    • Default is “None.”
  • (Optional)TriggerUpgradeToOffice365Group
    • This option allows administrators to request that the migrated distribution group be automatically converted to a Microsoft 365 Group.
    • This option only triggers the upgrade request; it does not guarantee that the upgrade will occur or be successful as this is an asynchronous process that occurs in the background.
  • (Optional)UseCollectedFullMailboxAccessOnPrem
    • This switch indicates that the administrator has run the pre-collection command to gather all full mailbox access permissions prior to migration.
    • This uses point in time data to increase the efficiency of maintaining additional rights.
    • See documentation on start-collectOnPremFullMailboxAccess.
  • (Optional)useCollectedFullMailboxAccessOffice365
    • This switch indicates that the administrator has run the pre-collection command to gather all full mailbox access permissions prior to migration.
    • This uses point in time data to increase the efficiency of maintaining additional rights.
    • See documentation on start-collectOffice365FullMailboxAccess.
  • (Optional)UseCollectedSendAsOnPrem
    • This switch indicates that the administrator has run the pre-collection command to gather all send as permissions to recipients.
    • This uses point in time data to increase the efficiency of maintaining additional rights.
    • See documentation on start-collectOnPremSendAs.
  • (Optional)UseCollectedFolderPermissionOnPrem
    • This switch indicates that the administrator has run the pre-collection command to gather all mailbox rights on folders.
    • This uses point in time data to increase the efficiency of maintaining additional rights.
    • See documentation on start-collectOnPremMailboxFolders.
  • (Optional)useCollectedFolderPermissionsOffice365
    • This switch indicates that the administrator has run the pre-collection command to gather all mailbox rights on folders.
    • This uses point in time data to increase the efficiency of maintaining additional rights.
    • See documentation on start-collectOffice365MailboxFolders.

With the parameters defined here are some sample migration commands:

  • Simple distribution list migration with delta sync trigger.
    • Start-distributionListMigration -globalCatalogServer server.domain.com -activeDirectoryCredential $cred -groupSMTPAddress group@contoso.com -AADConnectServer aadconnect.domain.consoto.local -aadConnectCredential $cred -azureADCredential $cred -logFolderPath c:\temp -doNotSyncOU “ou=nosync,dc=domain,dc=contoso,dc=local” -exchangeOnlineCredential $cloudCred
  • Simple distribution group migration with no other dependencies.
    • Start-distributionListMigration -globalCatalogServer server.domain.com -activeDirectoryCredential $cred -groupSMTPAddress group@contoso.com -AADConnectServer aadconnect.domain.consoto.local -aadConnectCredential $cred -logFolderPath c:\temp -doNotSyncOU “ou=nosync,dc=domain,dc=contoso,dc=local” -exchangeOnlineCredential $cloudCred -azureADCredential $cloudCred
  • Simple distribution group migration where hybrid mail flow should be maintained.
    • Start-distributionListMigration -globalCatalogServer server.domain.com -activeDirectoryCredential $cred -groupSMTPAddress group@contoso.com -AADConnectServer aadconnect.domain.consoto.local -aadConnectCredential $cred -azureADCredential $cloudCred -logFolderPath c:\temp -doNotSyncOU “ou=nosync,dc=domain,dc=contoso,dc=local” -exchangeOnlineCredential $cloudCred -exchangeServer webmail.contoso.com -exchangeCredential $cred -enableHybridMailFlow:$TRUE
  • Simple distribution group migration where the group will be deleted post migration – delta sync triggered.
    • Start-distributionListMigration -globalCatalogServer server.domain.com -activeDirectoryCredential $cred -groupSMTPAddress group@contoso.com -AADConnectServer aadconnect.domain.consoto.local -aadConnectCredential $cred -logFolderPath c:\temp -dnNotSyncOU “ou=nosync,dc=domain,dc=contoso,dc=local” -exchangeOnlineCredential $cloudCred -azureADCredential $cloudCred -retainOriginalGroup:$FALSE
  • Migrate everything using all data gathered from pre-recorded commands.
    • Start-distributionListMigration -globalCatalogServer server.domain.com -activeDirectoryCredential $cred -groupSMTPAddress group@contoso.com -AADConnectServer aadconnect.domain.consoto.local -aadConnectCredential $cred -logFolderPath c:\temp -dnNotSyncOU “ou=nosync,dc=domain,dc=contoso,dc=local” -exchangeOnlineCredential $cloudCred -azureADCredential $cloudCred -retainOriginalGroup:$FALSE -useCollectedSendAsOnPrem:$TRUE -useCollectedFullMailboxAccessOnPrem:$TRUE -useCollectedFolderPermissionsOnPrem:$TRUE -useCollectedFullMailboxAccessOffice365:$TRUE -useCollectedFolderPermissionsOffice365:$TRUE -retainSendAsOffice365:$TRUE
  • Simple distribution group migration with delta sync and upgrade to Office 365 group.
    • Start-distributionListMigration -globalCatalogServer server.domain.com -activeDirectoryCredential $cred -groupSMTPAddress group@contoso.com -AADConnectServer aadconnect.domain.consoto.local -aadConnectCredential $cred -logFolderPath c:\temp -dnNotSyncOU “ou=nosync,dc=domain,dc=contoso,dc=local” -exchangeOnlineCredential $cloudCred -azureADCredential $cloudCred -triggerUpgradeToOffice365Group:$true
  • Simple distribution list migration with delta sync trigger and exchange certificate authentication.
    • Start-distributionListMigration -globalCatalogServer server.domain.com -activeDirectoryCredential $cred -groupSMTPAddress group@contoso.com -AADConnectServer aadconnect.domain.consoto.local -aadConnectCredential $cred -logFolderPath c:\temp -dnNotSyncOU “ou=nosync,dc=domain,dc=contoso,dc=local” -exchangeOnlineCertificateThumbPrint 7972D7272C95F8D7C7CE26DF2ECE286EE853BDD7 -exchangeOnlineOrganizationName domain.onmicrosoft.com -exchangeOnlineAppID 42726348-e106-4b55-8304-228159d80ddd -azureADCredential $cloudCred

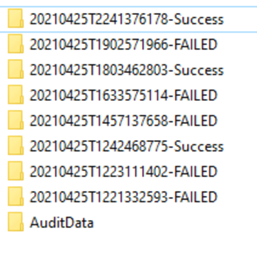
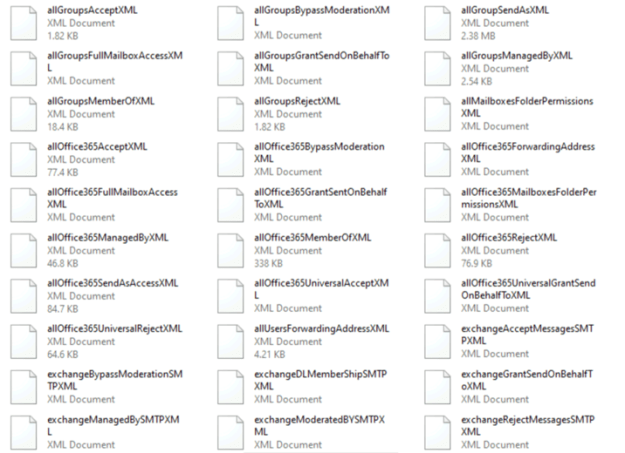
The actions of the script are logged into a log file with the name of the distribution group. Upon success, the folder is renamed with a date/time stamp and appended with success. If a failure is encountered, the folder is renamed with a date/time stamp and appended with failure. Included with the log directory are XML dumps of all dependencies in case the distribution list requires manual recreation. In addition, this could be used to debug failed migration attempts.

  • Sample of log files and folders in the log folder path.


  • Sample of data contained in the success / failure folder.


Happy migrating!


Office 365 – Distribution List Migrations Version 2.0 – Part 1

Introduction to the Distribution List Migration Module version 2.0

In September 2018, I began the process of outlining and implementing a method for administrators to migrate distribution lists to Office 365. The goal was to provide a scripted method that not only dealt with the group and the group’s members – but all the dependencies that may exist on the group. This culminated in the release of the Distribution List Migration script v1.0.

Version 1.0 achieved many of the results that I had sought. Lists were migratable, the source of authority moved to the cloud, and the majority of the dependencies that may have existed on the group were retained in both the on-premises and Office 365 organizations. The script was dependent on an Exchange server existing in the environment – and leveraged many of the list management cmdlets that were available.

Today, I am publishing a PowerShell module for Distribution List migrations. This is the v2 iteration of the ideas first developed in v1. I have taken a great deal of time to address many of the customer concerns and feature requests. Here are some of the highlights:

  • Remove the requirement to have Exchange on-premises in order to perform the migrations.

In v1, it was a requirement to have a basic authenticated remote PowerShell session to an on-premises Exchange server in order to do migrations. This presented a unique challenge for some customers who had completed their migrations and uninstalled their last Exchange server. In v2, I moved all core functions to use LDAP and Active Directory PowerShell cmdlets. This eliminates the requirement to have Exchange on-premises and also increased the speed and performance of the overall migration. To accomplish this task, the script must be run from a machine that has the Active Directory Remote Server Administration Tools installed. This can be a Windows 10 client or a Windows Server 2012 R2 or later server. The script tests for the presence of the appropriate commands and will error if the module’s commands are not found.

  • Uses Exchange Online Management v2 PowerShell to perform Exchange Online operations.

In v1, the script used a basic authentication remote PowerShell session to Exchange Online. Using the legacy connection method relied on basic authentication – which is being replaced by modern authentication. Exchange Online Management v2 allows administrators to use either credentials or a certificate for authentication and it leverages modern authentication. The legacy connection was also prone to underlying disconnects of the HTTPS session, which would often result in the script failing during long duration operations. To compensate, v1 of the script routinely disconnected and reconnected the session after so many operations – resulting in a time delay in the overall migration process. Exchange Online Management v2 will automatically re-establish the session (if the underlying session is closed) when a command is called. The script is now available to GCC customers using modern authentication. Lastly, we can leverage the new Graph-based cmdlets to test for recipients, which provides further performance enhancements.

  • More flexibility with how credentials are provided to the script.

In v1, credentials were recycled across applications (Active Directory / Azure AD Connect / Exchange Online) and were stored in local files. This often highlighted the support boundaries within customer organizations. For example, one group might manage Active Directory but not have rights to the Azure AD Connect server to perform a sync. The script now ingests a set of credentials for each external connection that is made. As of publishing, there are four sets of credentials – Active Directory, Azure AD Connect, Exchange on-premises, and Exchange Online. The administrator can choose to recycle credentials,but it is no longer necessary to do so. The admin also has the flexibility to provide credentials in a manner that suits them, making it no longer required to read them from an XML file.

  • Module has support for multiple Office 365 environments.

The PowerShell module has been extended with options for use in multiple Office 365 environments including commercial, 21vianet, and GCC.

  • Forcing Azure AD Connect sync is no longer required.

In v1, a remote PowerShell session to the Azure AD Connect server was required in order to trigger a delta sync. In customer escalations, there were times where the desire to migrate a distribution list existed but the inability to establish remote PowerShell sessions or possess the necessary permissions to interact with Azure AD Connect were available. It is still HIGHLY RECOMMENDED that you provide an Azure AD Connect server and credentials. If this information is not provided – the script will loop until the standard synchronization cycle runs and the group is naturally removed from Office 365. This can add at maximum 30 minutes to the migration cycle of the distribution group.

  • Modified recipient verification from primary SMTP address to external directory object ID for user object types.

When a user object is synchronized via Azure AD Connect (modern / supported versions) the Azure Active Directory object ID is written back to the user. This flows into Exchange Online as the externalDirectoryObjectID of the recipient. In v1, safety checks to see if a recipient existed were done based on primary SMTP address. This could be somewhat ambiguous and did not necessarily ensure that the intended recipient existed in Office 365. The safety check of a user is now performed against the external directory object ID. This allows us to ensure that the user found in the on-premises directory matches the user found in Office 365.

  • Administrators now have the option to retain the original group.

In v1, the original group was always deleted post migration. This was done on purpose as a safety precaution against un-doing the distribution list migration. In Azure AD Connect, soft matching of groups occurs anytime the email address of the group on-premises matches the email address of the group in Azure Active Directory. In some cases, admins accidentally moved groups back into the sync scope thereby soft matching the original group to the migrated group. (This could be bad, as it rolls back the migration to the previous group state). In some environments, distribution lists were made as security groups – and several on-premises dependencies were introduced because these groups had permissions on any number of objects. This made deleting the group very challenging, and if the group was retained, the same soft match issue still existed. In v2, we allow the admin to retain the group on-premises. In a future post, I’ll highlight the logic that is used to accomplish this workflow.

  • Administrators can now choose the authentication method to Exchange on-premises remote PowerShell.

In v1, Basic Authentication via Exchange Remote PowerShell was required in order for the script to function. In v2, the admin has the option to specify Kerberos as the type of authentication desired. For Kerberos to function, only a single server should be specified in the Exchange server name. If you are using load-balanced Exchange servers, Basic Authentication should still be configured on the remote PowerShell directories and Basic Authentication should be used.

  • Provide administration interfaces to record dependencies on the distribution group including SendAs rights, full mailbox access, and individual folder permissions.

In v1, logic was provided to track distribution list dependencies, including SendAs and full mailbox access. Individual folder permissions were not retained if they were tied to a group. When used in large environments the total migration time of a distribution group was greatly increased due to the lack of filterable properties to track these items. In v2, we provide administrative interfaces to pre-collect this information into point in time copies. This allows admins to plan their migrations and collect this data. Performance is greatly improved by evaluating this data offline and further supports our no-loss migration strategy. In future posts, I’ll outline the usage of the commands.

You can find more information on the module in upcoming blog posts and at the links below.

PowerShell Gallery | DLConversionV2 2.1.3

GitHub – timmcmic/DLConversionV2


Azure Active Directory Connect, inetOrgPersons, and ms-ds-ConsistencyGuid

When installing or upgrading Azure Active Directory Connect administrators are encouraged to upgrade the source anchor attribute from objectGUID to ms-DS-ConsistencyGuid.  For new installations this occurs when the administrator selects allow azure ad connect to manage the source anchor.   If an installation is upgraded or existing the administrator has the option to run the Azure AD Connect setup wizard and change the source anchor to ms-DS-ConsistencyGuid.

For information on source anchor please see the following –> Azure AD Connect: Design concepts | Microsoft Docs

The use of ms-DS-ConsistencyGuid offers administrators the flexibility to adjust the on premise source anchor value should it become necessary.  This is particularly helpful in scenarios where you need to hard match a new on-premises AD object to an existing Azure AD object.  When enabled – the rule sets within Azure AD Connect are adjusted to flow the objectGUID of the object directly to the ms-DS-ConsistencyGUID attribute within the directory.  Other rules dealing with source anchor are updated to either read objectGUID (if ms-DS-ConsistencyGUID is not present) or utilize the populated ms-DS-ConsistencyGUID to establish the immutableID of the object in Azure Active Directory.

In a default installation the rules extension for ms-DS-ConsistencyGuid have been created for objects of USER and GROUP type.  I recently encountered a customer that was a heavy user of inetOrgObjects within their on-premises Active Directory.   What the customer observed was that these object classes did not receive ms-DS-ConsistencyGuid although they were successfully replicated to Azure Active Directory. 

Let’s take a look at why.

When ms-DS-ConsistencyGUID is configured as the source anchor an outbound rule to the local active directory is created.  This rule is responsible for flowing the ms-DS-ConsistencyGUID attribute back to the on premises directory. 

Rules Wizard

The transformations within this rule map the ms-DS-ConsistencyGUID based on the calculated source anchor when the object was imported.  The connector object type of this rule is USER – indicating that it will only flow to objects of the user class.

IIF(IsPresent([cloudSourceAnchor]),IIF(IsPresent([sourceAnchorBinary]),[sourceAnchorBinary],IgnoreThisFlow),IgnoreThisFlow)

The rule indicates that if the cloudSourceAnchor is present (TRUE) then check if sourceAnchorBinary is present (TRUE) if so populate ms-DS-ConsistencyGUID with the value of sourceAnchorBinary.  If either condition is false the flow should be ignored.

In order for this rules to function the following flow happens:

  1. The user is provisioned in active directory.
  2. The ms-DS-ConstencyGUID, if present, is utilized as the source anchor and flowed into the sourceAnchorBinary attribute of the metaverse object.  If ms-DS-ConsistencyGUID is not present the objectGUID is flowed into the sourceAnchorBinary.
    1. This is accomplished through the rule In From AD – User Join
    2. The rule implements the following syntax for sourceAnchorBinary –> IIF(IsPresent([mS-DS-ConsistencyGuid]),[mS-DS-ConsistencyGuid],[objectGUID])
    3. If present ms-DS-ConsistencyGuid (TRUE) use ms-DS-ConsistencyGuid otherwise (FALSE) use objectGUID.
  3. The object is exported to Azure Active Directory.
  4. During the next delta sync cycle the delta import from Azure AD flows the cloudSourceAnchor for the object into the metaverse object.
    1. This is accomplished through the rule In From AAD – User Join.
    2. The rule implements the following syntax for cloudSourceAnchor –> ImportedValue(“sourceAnchor”)
    3. Use the imported value for source anchor as the cloudSourceAnchor.
  5. During the same sync cycle the criteria to stamp ms-DS-ConsistencyGUID is met and the GUID is now written to the attribute in the on premises Active Directory.
  6. During the next delta sync cycle now that the attribute ms-DS-ConsistencyGUID is populated this will serve as the source anchor moving forward.

As you can see the use of ms-DS-ConsistencyGUID requires both the implementation of inbound and outbound rules. 

How does this pertain to an inetOrgPerson?  The use of ms-DS-ConsistencyGUID starts by having a rule that populates it in the on premises active directory.  In this particular instance there is not Out to AD – *ImmutableID rule that operates on the inetOrgPerson.  This means that any rules that read in the inetOrgPerson objects will utilize objectGUID rather than ms-DS-ConsistencyGuid.  Under most circumstances there is no need to alter or change this behavior.  If you are in a situation though where you desire consistency and / or have a need to hard match an inetOrgPerson object, utilizing ms-DS-ConsistencyGUID can be helpful.

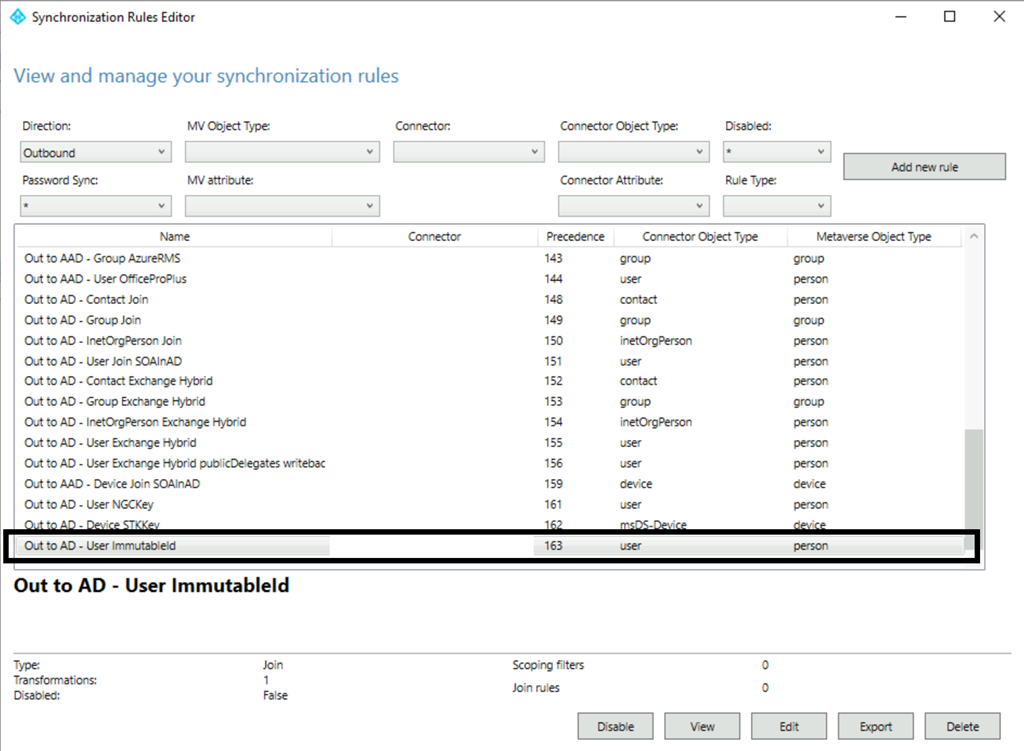
To utilize ms-DS-ConsistencyGUID we must first create a outbound rule to the local active directory that populates the GUID.  From a local active directory standpoint – the attribute set for USER and iNETORGPERSON are almost identical.  With this in mind the easiest solution is to duplicate the rule Out to AD – User ImmutableID. 

To start:

  1. Launch the Azure Active Directory configuration wizard to temporarily suspend all synchronization cycles.
  2. Launch the Azure Active Directory Rules Wizard
  3. In the direction box – select outbound.
  4. Scroll and locate the rule Out to AD – User ImmutableID
  5. Select the edit button
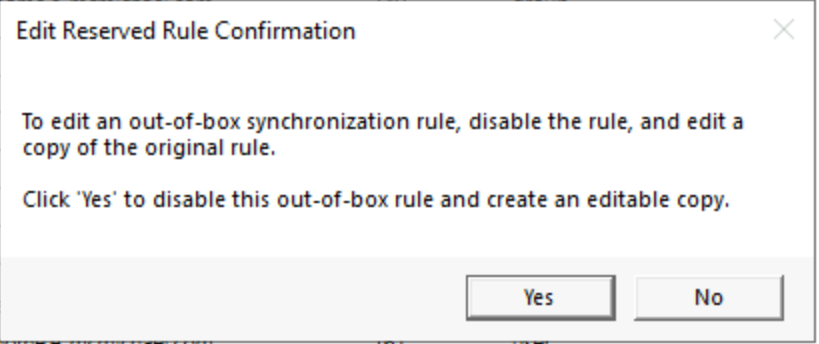
  6. You will be prompted to duplicate the rule and disable the current inbox rule.  For the purposes of this activity say yes.
    1. image
  7. This will clone the rule and bring the new rules wizard up.
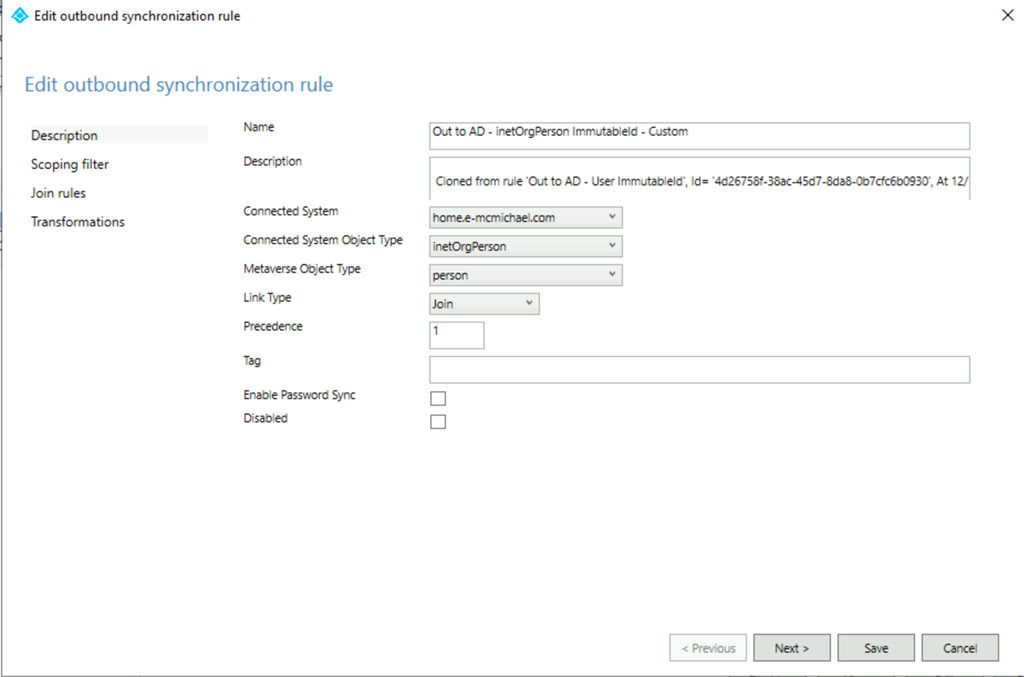
  8. To provision the rule for iNetOrgPersons – make the following adjustments.
    1. Edit the name to Out to AD – inetOrgPerson immutableID Custom.  I recommend you add custom or something additionally identifiable to the rule name to help easily identify the rule.
    2. Change the connected system object type drop down to iNetOrgPerson.
    3. Change the rule precedence to a value of < 99 but > 0.
    4. image
    5. Complete the rules wizard making no further changes.
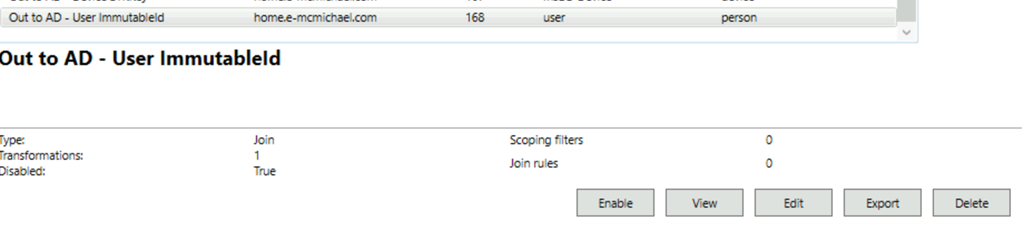
  9. In the rules wizard locate the original rule.  This rule is now DISABLED.  Select the rule and press the enable button to re-enable the rule.
    1. image
    2. image
  10. Exit the Azure AD Connect setup wizard to allow sync cycles to resume.

Following the rules change full imports and syncs will be performed as scheduled by the tool.  Monitor the synchronization cycle to ensure it completes successfully.

Why do we not need any inbound rules customization?  The In from AD – iNetOrgPerson join already implements the same logic as the In From AD – User Join as it pertains to object GUID and ms-DS-ConsistencyGUID.  Therefore it is only necessary to ensure that the ms-DS-ConsistencyGUID is being exported.

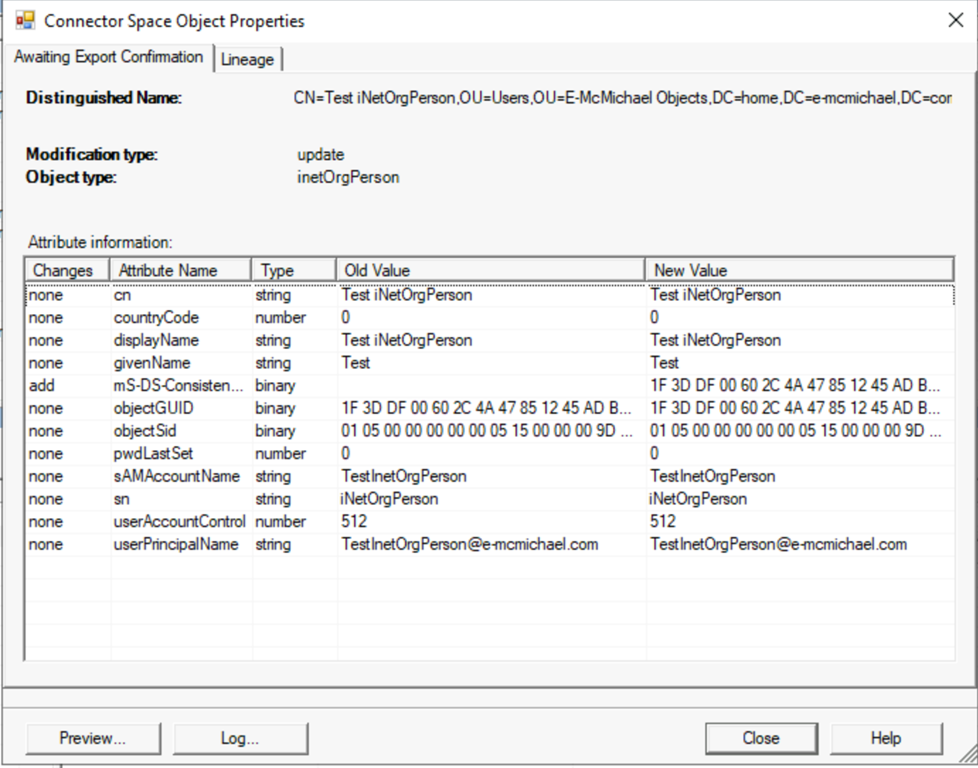
With the new rules in place , when reviewing exports to the local active directory, we should observe ms-DS-ConsistencyGUID being written to the local Active Directory.

image

In addition when reviewing the attribute of the user in Active Directory you should observe that the ms-DS-ConsistencyGUID is now populated.

image

It is important that you document this customization to your environments and ensure that all build documents are updated.  You may consider exporting the new rule you created and keeping the file with your build document. 

Please also note that Microsoft Product Support Services does not assist in the direct customization of rules with Azure AD Connect and there is no guarantee that future versions of AD Connect may cause issues with rule customizations.  Please ensure that you appropriate test all rules changes in environments to ensure appropriate understanding of how they work and what impacts may occur from there use.

Swapping licenses with dynamic groups and group based licensing…

In Azure Active Directory tenants that have purchased Azure AD Premium have access to dynamic azure groups and group based licensing.  When combined, the two technologies offer administrators a great deal of flexibility in managing license assignments without having to manage group membership.  

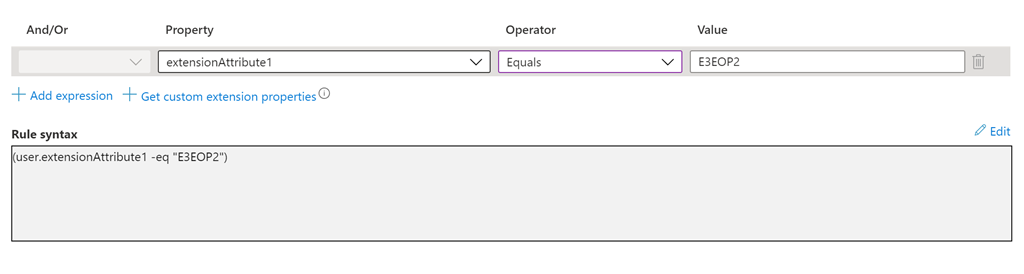
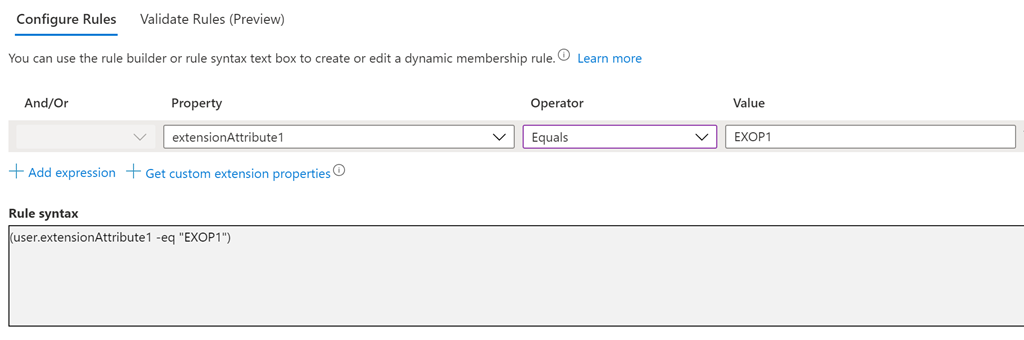
Azure dynamic groups allow administrators to create groups directly in Azure Active Directory where the membership is calculated off attribute values present in Azure AD.  Unlike Exchange Online dynamic distribution groups which do not have any actual membership, their members are are calculated only at the time that the group is utilized through an LDAP query, Azure dynamic groups have true members.  When an Azure dynamic group is provisioned, the query is utilized to add members to the group.  The groups are represented in other Office 365 applications as groups with static membership, even though the membership may dynamically change in Azure AD as user properties change.  Within Azure AD there is an asynchronous process that runs in the background as users are provisioned or changed which reprocesses the dynamic group membership.

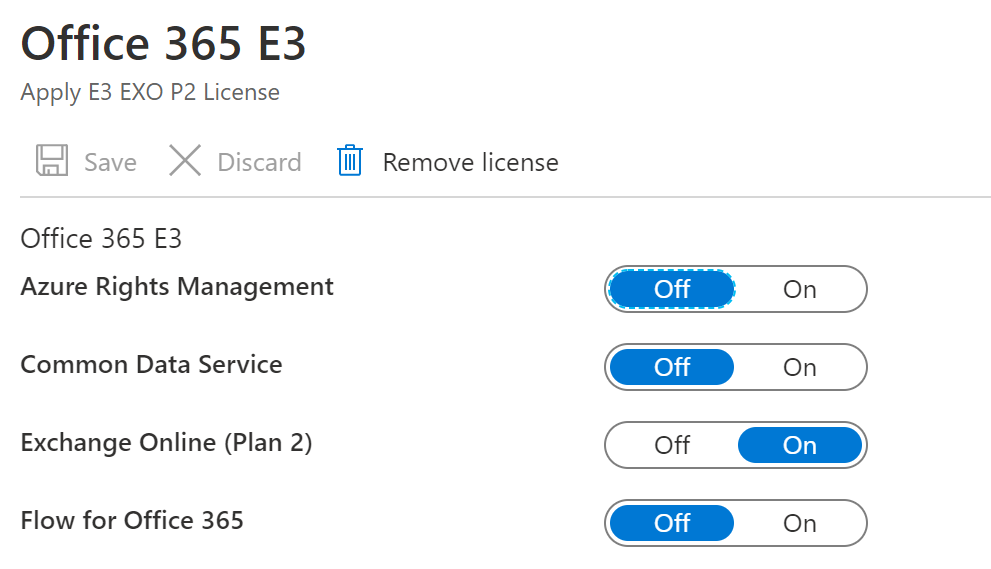
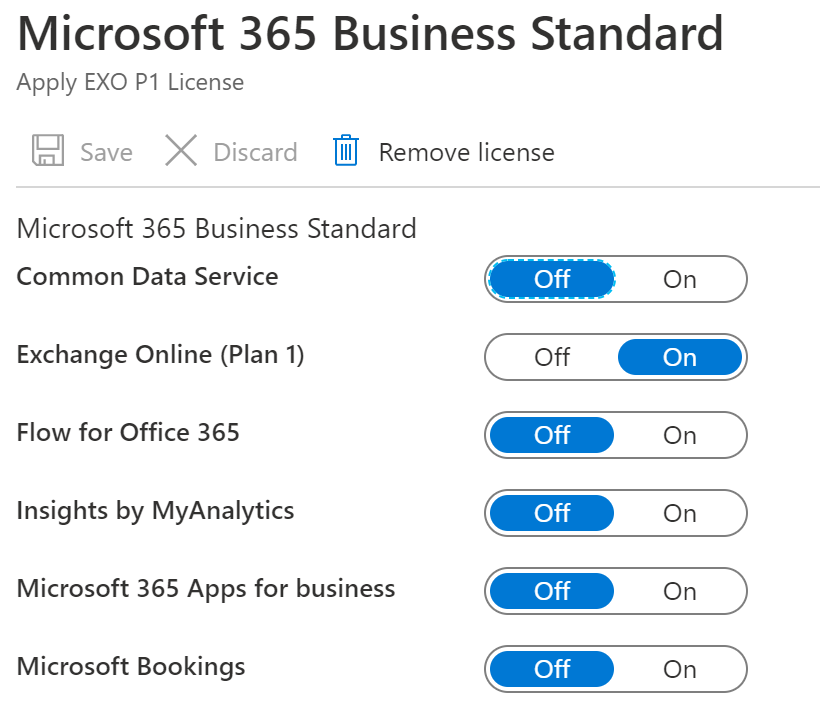
Group based licensing allows administrators to then add licensing templates to each of the groups they provision.  An administrator may add a Office 365 E3 license with a subset of plans to a particular group.  As members are added or removed from the groups – the licenses are subsequently added and removed from the users.  Within Azure AD there is an asynchronous process that runs that is responsible for the initial application of licenses as well as the reprocessing of any failures that may occur.  It is important with group based licensing you do not overlap common plans with different SKUs.  For example, if a user is assigned an Exchange Online Plan 2 through an Office 365 E3 an error will occur if you attempt to assign an Exchange Plan 1 through an Office 365 F3 –> this would cause a collision.  A collision does not occur if multiple groups apply the same items, for example one group may apply an Office 365 E3 with Exchange Online Plan 2 and Team while another group applies an Office 365 E3 with Exchange Online Plan 2 and One Drive for Business.  In this case – the common plan Exchange Online Plan 2 – comes from the same sku Office 365 E3 so there is no collision, and all license would be accumulated and applied. 

When combined – dynamic groups with group based licensing allow administrators great flexibility in applying licenses and plans based off user attributes.  For example, everyone in the main office may get a full E3 license – so creating a dynamic group based off the office attribute would allow this application to occur automatically without managing group membership.  Additionally those members that work in the office and in engineering may have additional licenses applied – a dynamic group based off office and department would allow for a different template to be applied to the groups of users.  As the users attribute change – someone moves from engineering to marketing – their licenses would dynamically change with their attributes relieving the administrators of the responsibility for managing static group membership or directly assigning licenses.

In recent weeks I’ve worked with customers that wanted to use the combination of these two technologies to migrate users licenses either due to renewal or the desire to change the SKUs applied to the users.  For some users – the transition was seamless – for other users the change resulted in a loss of licensing and access to Office 365.  Let’s take a look at how this could happen when the two technologies are combined – and what can be done about it.

In this example we have two dynamic groups.  The first group “Apply E3 EXO P2” is a dynamic groups where members are based off extensionAttribute1 equaling the value “E3EOP2”.  This group has group based licensing configured and applies the Office 365 E3 with Exchange Online Plan 2 automatically to all members of the group. 

image

image

The second group “Apply EXO P1” is a dynamic group where members are based off extensionAttirbute1 equaling the value “EXOP1”.  This group has group based licensing configured and applies the Office 365 E5 with Exchange Online Plan 1 automatically to all members of the group.

image

image

In this customers scenario all of the members started with an Office 365 E3 and Exchange Online Plan 2.  This was accomplished by setting extensionAttribute1 on the users to E3EOP2.  Here is an example:

[PS] C:\>Get-RemoteMailbox -Identity 1 | fl customAttribute1                                                           


CustomAttribute1 : E3EOP2

In Azure AD the dynamic group membership is automatically updated.

PS C:\> Get-AzureADGroupMember -ObjectId 0e9a5089-df1d-42ff-98e7-d1abf44002c5 | Select-Object objectID,userType


ObjectId                             UserType
——–                             ——–
c83a1498-4d48-4bda-a9e3-228b87fd8bdf Member
c2e09366-2b8c-4ac3-92a6-5eb6f4e0fe6b Member
597c1869-3319-4575-9d85-27ba0708b401 Member
0bf733c0-eaea-4486-b4c1-09f753c8a1cf Member
7551cea4-dcf1-4709-99f7-4ef62ae79057 Member
0cc2637d-e391-4f27-8581-963e807971a1 Member
c3d456bb-a8a7-4a5b-848d-197e7743a88d Member
8741d05c-d11d-4769-af01-3da61114073c Member
e50696ed-12fc-4648-a779-7312bf233d9b Member
fbde5d23-6d02-4f3d-9391-02d11d1109e3 Member
184622f1-b7ee-4b22-9929-0cffb5efa10e Member
e9e813b9-455c-473e-a3ab-e563cdf555e9 Member
1c01114c-5502-4659-9617-0f57b4e5cb3e Member
6d5db76d-69a0-4b58-b3d0-51c4e68f18e1 Member
f79bedaf-4a42-49e4-ae03-97323d8b6ff8 Member

This results in 15 users that were dynamically added to the group having the Office 365 E3 license applied.

image

In this particular scenario the customer determined that a subset of users – not the entire list of users – needed to move to Exchange Online Plan 1.  To a accomplish this task the administrator took the subset of users and updated the customAttribute1 to EXOP1.  This is where the issue started.  Remembering that dynamic group membership calculation is asynchronous, and this means that members could be added and removed from the dynamic group in any order.

The desired outcome in this configuration:

  • User configured with E3 through customAttribute1.
  • Customattribute1 is changed to apply Exchange Online Plan 1.
  • Change synchronizes to Azure AD.
  • User is removes from the E3 group and the E3 license is removed.
  • User is added to the Exchange Online Plan 1 group and the Exchange Online Plan 1 license is applied.
  • The user retains access to the services under the new plan guidelines.

For the majority of users that were moved – this was the exact scenario that occured.  The users plans were adjusted without any issue.  There were though several users that experienced a complete loss of their license and subsequently a loss of access to Office 365 resources.

Upon investigation when looking at the Exchange Plan 1 group we noted the following error for a user on the license assignment tab:

image

Why does this user have a conflicting service plan error?  Here is what happened…

  • User configured with E3 through customAttribute1.
  • Customattribute1 is changed to apply Exchange Online Plan 1.
  • Change synchronizes into Azure AD.
  • User is added to the Exchange Online Plan 1 group and an attempt to assign the Exchange Online Plan 1 license was made.
    • The license assignment fails.  Exchange Online Plan 1 conflicts with Exchange Online Plan 2 already assigned.
  • User is removed from the E3 dynamic group and the E3 license is removed.
  • The user has lost access to Office 365.

This is an example of async group processing.  In this particular case the user was added to the Exchange Online Plan 1 group BEFORE being removed from the E3 group.  This caused a conflicting license plan issue.  When a conflict occurs – the user is not immediately re-evaluated again.  The administrator must reprocess the group <or> the user will eventually be re-evaluated – but it could take several hours for the re-evaluation to occur.  It is NOT immediate.  For users that were successful their timing fell in line with expectations – for users that were not successful their processing fell outside of expectations.

With dynamic groups there is no guaranteed control on processing therefore there is no specific way to handle this using them.  Is there a viable workaround?  Yes – with some work license plan changes can occur with group basic licensing that provides consistent results and eliminates the potential loss of licenses.  Let’s outline the plan.

  • In Azure AD we create a new group –> License Transitions.
    • The group type is STATIC membership.
  • On the License Transitions group we apply group based licensing that mirrors the configuration of the E3 group.
    • In this instance it would be the Office 365 E3 and Exchange Online Plan 2.
  • For all users that will be transitioned add them statically to the group.
    • In this case the group will apply the same licenses as the dynamic group.
    • There is no collision since the plans match –> Office 365 E3 with Exchange Online Plan 2.
  • NULL customattribute1 on premises.
    • This will sync into Azure AD and remove the user from the dynamic group for Office 365 E3.
  • On the License Transition group remove the Office 365 E3 license and add the Exchange Online Plan 1 license.
    • This reassigns the users to Exchange Online Plan 1.
  • Change customAttribute1 on premises to the attribute for Exchange Online Plan 1.
    • This will sync into Azure AD and add the user to the Exchange Online Plan 1 dynamic group.
  • When license processing has been validated remove the static group.
    • The user retains the Exchange Online Plan 1 license through the dynamic group.

Let us examine an example of this process.  To start the users are in the expected group with the E3 license applied.

PS C:\> Get-AzureADGroupMember -ObjectId 0e9a5089-df1d-42ff-98e7-d1abf44002c5 | Select-Object objectID,userType


ObjectId                             UserType
——–                             ——–
c83a1498-4d48-4bda-a9e3-228b87fd8bdf Member
c2e09366-2b8c-4ac3-92a6-5eb6f4e0fe6b Member
597c1869-3319-4575-9d85-27ba0708b401 Member
0bf733c0-eaea-4486-b4c1-09f753c8a1cf Member
7551cea4-dcf1-4709-99f7-4ef62ae79057 Member
0cc2637d-e391-4f27-8581-963e807971a1 Member
c3d456bb-a8a7-4a5b-848d-197e7743a88d Member
8741d05c-d11d-4769-af01-3da61114073c Member
e50696ed-12fc-4648-a779-7312bf233d9b Member
fbde5d23-6d02-4f3d-9391-02d11d1109e3 Member
184622f1-b7ee-4b22-9929-0cffb5efa10e Member
e9e813b9-455c-473e-a3ab-e563cdf555e9 Member
1c01114c-5502-4659-9617-0f57b4e5cb3e Member
6d5db76d-69a0-4b58-b3d0-51c4e68f18e1 Member
f79bedaf-4a42-49e4-ae03-97323d8b6ff8 Member

The license processing through the current E3 group is completed with no errors.

image

The static group will be created and the members assigned to the group.

image

image

With the license transition group created the custom attribute will be removed on premises.  The dynamic group membership can be validated to ensure the users in the transition group were removed.

Members of the license transition group:

PS C:\> Get-AzureADGroupMember -ObjectId 3e9c8f36-45b5-4aaa-80c2-467b1a6cc158 | Select-Object objectID


ObjectId
——–
e50696ed-12fc-4648-a779-7312bf233d9b
fbde5d23-6d02-4f3d-9391-02d11d1109e3
184622f1-b7ee-4b22-9929-0cffb5efa10e
e9e813b9-455c-473e-a3ab-e563cdf555e9
1c01114c-5502-4659-9617-0f57b4e5cb3e
6d5db76d-69a0-4b58-b3d0-51c4e68f18e1
f79bedaf-4a42-49e4-ae03-97323d8b6ff8

Members of the E3 dynamic group:

PS C:\> Get-AzureADGroupMember -ObjectId 0e9a5089-df1d-42ff-98e7-d1abf44002c5 | Select-Object objectID


ObjectId
——–
c83a1498-4d48-4bda-a9e3-228b87fd8bdf
c2e09366-2b8c-4ac3-92a6-5eb6f4e0fe6b
597c1869-3319-4575-9d85-27ba0708b401
0bf733c0-eaea-4486-b4c1-09f753c8a1cf
7551cea4-dcf1-4709-99f7-4ef62ae79057
0cc2637d-e391-4f27-8581-963e807971a1
c3d456bb-a8a7-4a5b-848d-197e7743a88d
8741d05c-d11d-4769-af01-3da61114073c

This validates that the users were removed successfully and that there is no overlap.  A quick validation of an individual user shows that licenses are still assigned as expected and the licenses are inherited from the license transition group.

image

With these changes in place the licenses on the license transition group can now be updated.  In this case we will remove the E3 and assign the Business Standard / Exchange Online Plan 1.  When we make the license transition we will select the ASSIGNMENTS button and remove the Office 365 E3 and add the Business Standard in a SINGLE STEP.  If you remove the Office 365 E3 and apply and then subsquently add the Business Standard / Exchange Online Plan 1 and apply this case be interpreted by the system as a de-provision and re-provision rather than a license SWAP.

Changing the licenses puts the group into a pending application state.

image

This is followed by a notification that license assignment is complete if no assignment issues occurred.

image

A quick verification of a user shows that the user is inheriting the business standard license from the license transition group.

image

In this example the dynamic group for Exchange Online Plan 1 shows no membership.  

PS C:\> Get-AzureADGroupMember -ObjectId c505a6d2-8ca3-4408-90f1-d69682cd784a | Select-Object objectID
PS C:\>

The customAttribute1 on premises can now be updated to move the users into the Exchange Online Plan 1 dynamic group.  Using powershell we can validate that the members match the license transition group.

PS C:\> Get-AzureADGroupMember -ObjectId c505a6d2-8ca3-4408-90f1-d69682cd784a | Select-Object objectID


ObjectId
——–
e50696ed-12fc-4648-a779-7312bf233d9b
fbde5d23-6d02-4f3d-9391-02d11d1109e3
184622f1-b7ee-4b22-9929-0cffb5efa10e
e9e813b9-455c-473e-a3ab-e563cdf555e9
1c01114c-5502-4659-9617-0f57b4e5cb3e
6d5db76d-69a0-4b58-b3d0-51c4e68f18e1
f79bedaf-4a42-49e4-ae03-97323d8b6ff8

A quick review of the user shows licenses inherited from both groups a this time.

image

A review of the dynamic group shows that licensing application completed successfully for the Exchange Online Plan 1.

image

To complete the process the licenses can be removed from the license transition group.

image

When the license transition group shows that processing is complete the group should be safe to delete.

image

The final review of the user shows that the licenses are not transition to and applying from the dynamic group only.

image

Although more steps are required – this method allows for a graceful transition to a different plan for the same product while utilizing dynamic groups as the main assignment method pre and post transition.