Category Archives: Uncategorized

Office 365 – Distribution List Migration Version 2.0 – Part 39

Implementing improved error handling and error cleanup.

In version 2.9.8.19 new error handling was implemented to improve the clean up experience during migration failures and increase the reliability of migrations.


The first improvement involves implementing error handling in the function that moves on-premises groups between organizational units. The move command is called up to three times in the module. The first call moves the group from the OU that it is currently into the non-sync OU specified in the migration command. It was possible in the original code that if an exception occurred on moving the group to the non-sync OU this would not cause the migration to fail. This in turn created an endless loop in the migration process scanning for the distribution list deletion in Office 365. The migration would neither succeed nor fail. The current code now attempts the move to the non-sync OU and if an exception occurs will retry the operation up to 5 times waiting 5 seconds between each attempt. If the move is not successful in 5 tries the migration is halted. The second call involves moving the group from the non-sync OU back to the sync OU. The code now attempts this operation 1 time and if the move fails a post create error is created alerting the administrator that manual movement is required. Failing this move was an optional task. The last potential call for a move occurs when the migration fails. If the migration fails after moving the group to a non-sync OU the group will remain there until the administrator move the group back to the sync OU. If the migration fails a single attempt at moving the group back to the original OU is performed. If an error is encountered the migration will end as a result of the previous failure.


The second improvement provides some clean up capabilities in response to failure. There are two scenarios that potentially require cleanup after a failed migration. The first scenario is the temporary distribution group created in Office 365. In order to speed operations and limit downtime that the group is unavailable in the cloud operations that potentially take a significant amount of time are performed on a temporary distribution list created in Office 365 as a part of the migration. In previous versions if a failure was encountered after this temporary distribution list was created but before it was renamed as part of migration the group would often be orphaned if a failure occurs. New logic is now implemented that tracks the migration status and if the migration fails between the creation of the temporary distribution list and the renaming / finalizing operation of the migration the temporary distribution list is automatically cleaned up. The second scenario is that failed migrations prior to disabling the distribution list on premises often resulted in the distribution list remaining in the non-sync OU. New is now implemented that tracks the migration status and if a failure occurs prior to disabling the on-premises distribution list an attempt is made to move the list back to the original OU. This should allow the synchronization process to detect the original distribution list and provision the recipient again in the cloud limiting the likelihood of an extended outage pending administrator intervention. It is important to note that the module does not trigger a synchronization in response to this event but rather waits for the current sync cycle to run. If your sync cycles are not default the outage in the cloud may be longer than anticipated.


These changes should hopefully improve the reliability of the migrations and prevent manual cleanup.


Are my users registered for Azure MFA?

Implementing multi-factor authentication as a part of securing your environment is a wise decision. For implementing multi-factor authentication in Azure, I would recommend reviewing the following resources:


Providing a default level of security in Azure Active Directory – Microsoft Entra | Microsoft Learn

Turn on MFA with security defaults or Conditional Access – Microsoft 365 Business Premium | Microsoft Learn

Enable Azure AD Multi-Factor Authentication – Microsoft Entra | Microsoft Learn


I recently worked with a customer that was implementing an organization wide multi-factor authentication conditional access policy. As a part of this implementation, users were advised to register strong authentication methods using Microsoft Authenticator prior to the enablement of the conditional access policy. The goal was to have all end users prepared for policy enablement and not have interactive authentication interrupted by multi-factor registration.


Users were provided instructions that directed to them to access https://myaccount.microsoft.com. Once authentication was successful to my account portal selecting security info directs the users to the location where they can self service register a strong authentication method. At this point users were instructed to add an authentication method utilizing Microsoft Authenticator as the default application for multi-factor authentication. In this example I have two users MFATest1 and MFATest2 that both followed the directions.


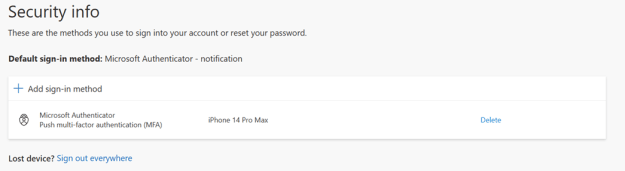
MFATest1
 

MFATest2
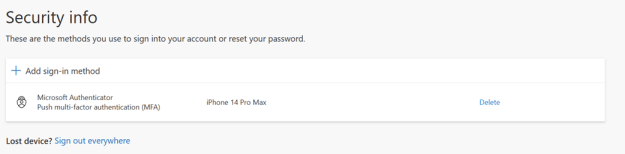
 

In the case of user MFATest1 and MFATest2 each user was showing a Microsoft Authenticator registration with push multi-factor authentication.


In addition to providing end users with instructions on enabling strong authentication methods administrators were creating reports using the Microsoft Graph API. The reports detailed the strong authentication methods enabled for the users. When administratively determining who is enabled for multi-factor authentication capturing the strong authentication methods of the users is often utilized for this purpose.


Here is an example for MFATest1.

Capture the authentication methods for the user.

$mfaTest1=Get-MgBetaUserAuthenticationMethod -UserId mfatest1@domain.com

List the authentication methods for the user.

$mfaTest1

Id


28c10230-6103-485e-b985-444c60001490

a5c2ef35-1db2-49c3-8631-e12a5025859e

List the details of the authentication methods for the user.

PS C:\> $mfatest1 | Select-Object id,additionalProperties -ExpandProperty additionalProperties


Key Value

— —–

@odata.type #microsoft.graph.passwordAuthenticationMethod

createdDateTime 2023-08-08T12:23:33Z

@odata.type #microsoft.graph.microsoftAuthenticatorAuthenticationMethod

displayName iPhone 14 Pro Max

deviceTag SoftwareTokenActivated

phoneAppVersion 6.7.12

clientAppName microsoftAuthenticator


Here is an example for MFATest2

Capture the authentication methods for the user.

$mfaTest2=Get-MgBetaUserAuthenticationMethod -UserId mfatest2@domain.com

List the authentication methods for the user.

$mfaTest2

Id


28c10230-6103-485e-b985-444c60001490

6ce10fca-fb88-4109-95e4-66d27c3e9f6d

List the details of the authentication methods for the user.

PS C:\> $mfatest2 | Select-Object id,additionalProperties -ExpandProperty additionalProperties


Key Value

— —–

@odata.type #microsoft.graph.passwordAuthenticationMethod

createdDateTime 2023-08-08T12:23:33Z

@odata.type #microsoft.graph.microsoftAuthenticatorAuthenticationMethod

displayName iPhone 14 Pro Max

deviceTag SoftwareTokenActivated

phoneAppVersion 6.7.12

clientAppName microsoftAuthenticator


When reviewing a user that has not registered a strong authentication method the additional identifier is missing when listing the authentication method details.


PS C:\> Get-MgBetaUserAuthenticationMethod -UserId 9ee2446b-f4c9-41cb-a73b-66a1937b45bb


Id


28c10230-6103-485e-b985-444c60001490


The identifier 28c10230-6103-485e-b985-444c60001490 is present on all users as all users have a password authentication method.


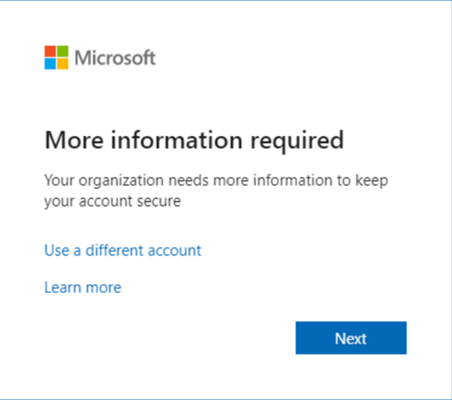
With the end users showing an MFA capable device and administrative reports indicating users had registered strong authentication methods the conditional access policy requiring multi-factor authentication was enabled. When the policy was enabled some users were experiencing the following dialog when signing in.
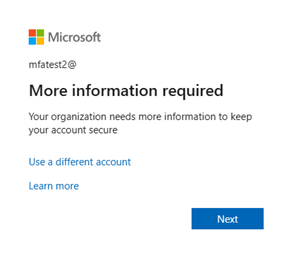


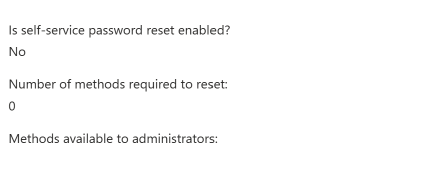
Typically, this dialog is presented to user when MFA registration, self service password reset registration, or combined registration is enabled or required. In this case self service password reset was disabled and the registration was to enroll a device for multi-factor authentication. The user MFATest2 already has a strong authentication method stamped on their account and should not be required to register for multi-factor authentication.


In the Azure Portal we reviewed the authentication methods assigned to the account MFATest2.
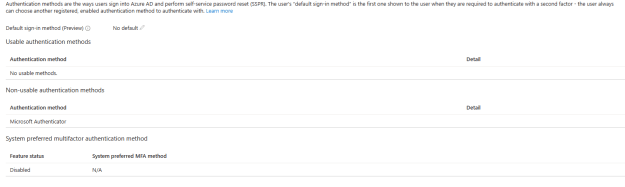


Why is Microsoft Authenticator listed under non-usable authentication methods? Is this the same for other accounts that are working? In this instance account MFATest1 is not showing the same issue. When reviewing the authentication methods assigned to MFATest1 the following is found:
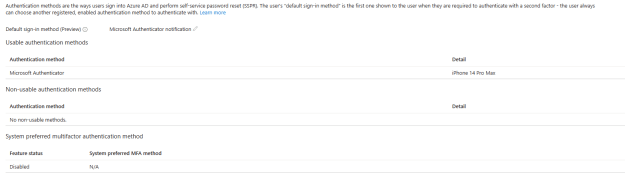
 

In the case of user MFATest1 Microsoft Authenticator is showing as a usable authentication method.


The work to enable multi-factor authentication and register strong authentication methods was performed within the last 30 days. This allows us to query the audit logs in Azure and determine the flow of steps taken. For account MFATest2 this is the audit log flow associated with the addition of a strong authentication method and multi-factor authentication enablement. There are entries for “Azure MFA StringAuthenticationService” with an activity of “Update User”.


8/8/2023, 12:38:54 PM

Core Directory

UserManagement

Update user

Success


MFATest2@domain.com.com

Azure MFA StrongAuthenticationService


When reviewing the properties of the audit log entry the following information is present:


Activity

Date (UTC)

8/8/2023, 12:38 PM

Activity Type

Update user

Correlation ID

c653c0e4-91d1-454d-ade9-dd076c6a975f

Category

UserManagement

Status

success

Status reason

User Agent

Initiated by (actor)

Type

Application

Display Name

Azure MFA StrongAuthenticationService

App ID

Service principal ID

797b413b-1b35-45ad-a30a-11c0eb96fa8f

Service principal name

Additional Details

UserType

Member


Target

Type

User

Id

d1bec8bc-cfcd-4b1a-9038-205b9435a5ae

Display Name

User Principal Name

MFATest2@domain.com


MFATest2@e-mcmichael.com

StrongAuthenticationPhoneAppDetail

[]

[{“DeviceName”:”iPhone 14 Pro Max”,”DeviceToken”:”apns2-41a5642b6047a6ceb39c327a26c9147b4c8b58f7d7f824f879b04e9c23677f19″,”DeviceTag”:”SoftwareTokenActivated”,”PhoneAppVersion”:”6.7.12″,”OathTokenTimeDrift”:0,”DeviceId”:”00000000-0000-0000-0000-000000000000″,”Id”:”6ce10fca-fb88-4109-95e4-66d27c3e9f6d”,”TimeInterval”:0,”AuthenticationType”:3,”NotificationType”:2,”LastAuthenticatedTimestamp”:”2023-08-08T12:38:24.2254241Z”,”AuthenticatorFlavor”:null,”HashFunction”:null,”TenantDeviceId”:null,”SecuredPartitionId”:0,”SecuredKeyId”:0}]

MFATest2@e-mcmichael.com

Included Updated Properties

“StrongAuthenticationPhoneAppDetail”

MFATest2@e-mcmichael.com

TargetId.UserType

“Member”


The information highlighted in red reflects the old value of NULL for strong authentication methods and the new value of the Microsoft Authenticator registration.


For account MFATest1 this is the audit log flow associated with the addition of a strong authentication method and multi-factor authentication enablement. There are entries for “Azure MFA StringAuthenticationService” with an activity of “Update User”. We also see events indicating User started security info registration and user registered security info.


Date (UTC)

Service

Category

Activity

Status

Status reason

Target(s)

Initiated by (actor)

8/8/2023, 12:35:46 PM

Authentication Methods

UserManagement

User registered security info

Success

User registered Authenticator App with Notification and Code

MFA Test1

MFATest1@domain.com

8/8/2023, 12:35:46 PM

Core Directory

UserManagement

Update user

Success


MFATest1@domain.com

MFATest1@domain.com

8/8/2023, 12:35:40 PM

Authentication Methods

UserManagement

User started security info registration

Success

User started the registration for Authenticator App with Notification and Code

MFA Test1

MFATest1@domain.com

8/8/2023, 12:35:33 PM

Core Directory

UserManagement

Update user

Success


MFATest1@domain.com

Azure MFA StrongAuthenticationService


This sequence of events lists extremely important details about the registration of a strong authentication method and then it’s subsequent use for MFA. What we observe in the case of the users that are working:

  1. The strong authentication method is set on the user account. (Account is added in https://myaccount.microsoft.com)


    StrongAuthenticationPhoneAppDetail

    []

    [{“DeviceName”:”iPhone 14 Pro Max”,”DeviceToken”:”apns2-41a5642b6047a6ceb39c327a26c9147b4c8b58f7d7f824f879b04e9c23677f19″,”DeviceTag”:”SoftwareTokenActivated”,”PhoneAppVersion”:”6.7.12″,”OathTokenTimeDrift”:0,”DeviceId”:”00000000-0000-0000-0000-000000000000″,”Id”:”a5c2ef35-1db2-49c3-8631-e12a5025859e”,”TimeInterval”:0,”AuthenticationType”:3,”NotificationType”:2,”LastAuthenticatedTimestamp”:”2023-08-08T12:35:33.183712Z”,”AuthenticatorFlavor”:null,”HashFunction”:null,”TenantDeviceId”:null,”SecuredPartitionId”:0,”SecuredKeyId”:0}]


  1. The user starts security info registration. (The user scans the QR code for adding the account and selects next to begin validation)

    Date (UTC)

    8/8/2023, 12:35 PM

    Activity Type

    User started security info registration

    Correlation ID

    730563f2-3031-4a65-aa00-13fbc17910eb

    Category

    UserManagement

    Status

    success

    Status reason

    User started the registration for Authenticator App with Notification and Code

    User Agent

    Initiated by (actor)

    Type

    User

    Display Name

    Object ID

    d4bf89ba-ef39-4858-99c5-d0a44acfe8d2

    IP address

    N/A

    User Principal Name

    MFATest1@domain.com


  1. The default type is changed to Microsoft Authenticator (The user responds to the MFA prompt on the phone providing the correct number matching code)


MFATest1@e-mcmichael.com

StrongAuthenticationMethod

[]

[{“MethodType”:6,”Default”:true},{“MethodType”:7,”Default”:false}]

MFATest1@e-mcmichael.com

Included Updated Properties

“StrongAuthenticationMethod”

MFATest1@e-mcmichael.com

TargetId.UserType

“Member”


  1. The user finishes registration of security information. (Authenticator is now a usable method for multi-factor authentication)


Activity

Date (UTC)

8/8/2023, 12:35 PM

Activity Type

User registered security info

Correlation ID

faf9110a-7088-49b2-9efe-75cec7aea6af

Category

UserManagement

Status

success

Status reason

User registered Authenticator App with Notification and Code

User Agent

Initiated by (actor)

Type

User

Display Name

Object ID

d4bf89ba-ef39-4858-99c5-d0a44acfe8d2

IP address

N/A

User Principal Name

MFATest1@domain.com


When looking at the Microsoft Authenticator installations on MFATest1 and MFATest2 there are accounts present on the devices.
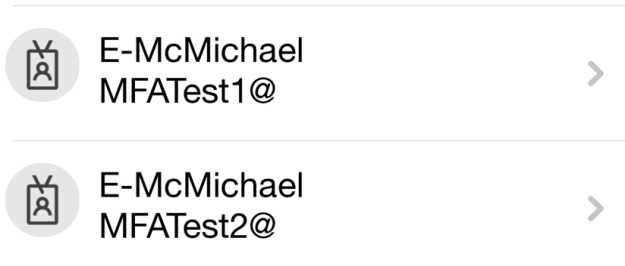


If both users MFATest1 and MFATest2 followed the same directions to register security information and enable multi-factor authentication, then why are we seeing a difference? In the case of MFATest2 the user successfully scanned the QR code and registered the strong authentication method but closed the browser windows before completing the verification. For a strong authentication method to be registered and usable the user must complete the verification by entering the code provided. In the case of MFATest1 the full procedure was followed, and the strong authentication method was added and verified.


This scenario has exposed two particular challenges.

  1. The https://myaccount.microsoft.com page showed that a valid MFA device was registered in both user cases but could only actually be utilized by one of the users.
  2. Administratively the presence of a strong authentication method does not provide insight in the ability to use that method to satisfy multifactor authentication.


Our product engineering team is aware of both scenarios. There are active work items to allow end users to not only see what authentication methods are registered but also provide feedback to the end user regarding their ability to be utilized for multifactor authentication. On the administrative side work continues in our graph and powershell integration to not only display the strong authentication methods but provide the same insight that the Azure portal does when making a determination of the users strong authentication methods and their ability to satisfy multi-factor authentication.


With this scenario there was little that could be done to mitigate the outcome other than ensuring that users followed the directions as published. When configuring conditional access the policy could have been rolled out over time by using group membership thereby lessoning the overall impact to the organization. As our product engineering engagements finish and our interfaces evolve more information allowing the accurate assessment of this situation will be available.
Office 365: More information required…

In Azure Active Directory users of Office 365 may be required to enroll in multi-factor authentication and self service password reset. During an interactive logon request users will be prompted to enter the enrollment and configuration process.


I recently worked with a customer where a user that was fully enrolled in multi-factor authentication was receiving the dialog “More Information Required” and “Your organization needs more information to keep your account secure.”


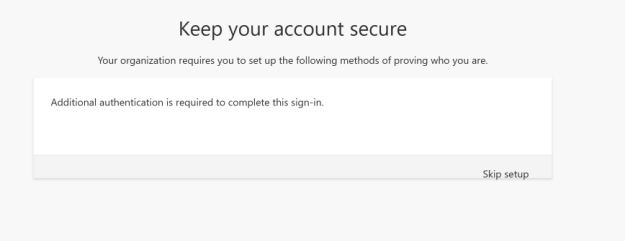
When selecting the next option, the user was prompted with the following dialog. “Additional authentication is required to complete this sign-in.”


This screen is fairly familiar as it is usually seen when performing combined registration for new users enabling multi-factor authentication and self-service password reset. What is odd about this dialog is that it is not presenting what options need to be enabled to complete security registration. The only option to proceed is skip setup. Skipping setup allows the user to authenticate successfully and access the service. If the user ends up in a loop at this stage selecting sign in with another account then selecting the same account already signed in will break this loop. The same dialog sequence is present on any interactive logon that occurs to Office 365.


On the surface there was nothing out of the ordinary with the account in question. The necessary security registrations were present to satisfy multi-factor authentication and the user was able to log in where MFA was required. The one item that did stand out was that the account did have administrator rights. If multi-factor authentication was not an issue the next logical place to review was self-service password reset.


When looking at the self-service password reset settings within the tenant this organization choose to disable SSPR for administrator accounts.

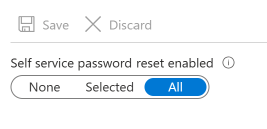
The SSPR policies were applied to all users.


The prompt that is being displayed was due to the conflicting settings between the scope of SSPR application and administrators being excluded from the policy. When the administrator policy has been disabled the self-service password reset settings need to be changed to “selected” and applied to a group that does not include administrator accounts. The other method to mitigate this issue is to migrate from legacy per user MFA and self-service password reset to new authentication policies. The new authentication policies allow more fine-grained control of authentication methods and groups / users are applicable too. How to migrate to the Authentication methods policy – Microsoft Entra | Microsoft Learn


My suggestion in this case was to set up a custom attribute on administrator accounts. Using an Azure dynamic group all users where the custom attribute was not present were added to the group. This group was then selected for targeted self-service password reset application. This removed the all scope and excluded administrators from SSPR application.

Office 365: Distribution List Migrations Version 2.0 – Part 38

Enabling support for migrations with pre-defined name prefix and suffix.

In Azure Active Directory administrators have access to a group naming policy. This allows administrators to enforce a naming policy for Microsoft 365 groups that are created by end users. The group naming policy does not apply to mail enabled distribution or mail enabled security groups. Customers who are considering migrating distribution lists to Office 365 may want to implement something similar for their mail enabled security or distribution groups. The desire was to utilize the migration process to begin implementing this naming convention.


Version 2.9.8.14 implements two new switches that administrators may use to implement a name prefix or suffix during the migration. The prefix switch -dlNamePrefix allows any string to be specified as the name prefix. The suffix switch -dlNameSuffix allows any string to be specified as the name suffix. When using a prefix or suffix this value is appended to not only the distribution group name but also the distribution group display name. This enforces the same name in both directory queries and global address list queries. Generally speaking the name and display name match. If you’re display name does not match the directory name of the group the same names will be preserved but with the prefix.


The directory name assigned to a group may not exceed 64 characters. When specifying a prefix, suffix, or both if the combined string length is greater than 64 characters the migration will fail and the administrator will be informed of an error in the log.


[PS] C:\>$group = Get-DistributionGroup “defdefdefdefdefdefdefdefdefdefdefdefdefdefdefdefdefdefdefdefdefd”

[PS] C:\>$group.name

defdefdefdefdefdefdefdefdefdefdefdefdefdefdefdefdefdefdefdefdefd

[PS] C:\>$group.name.Length

64

[PS] C:\>$group.Alias

defdefdefdefdefdefdefdefdefdefdefdefdefdefdefdefdefdefdefdefdefd

[PS] C:\>$group.Alias.Length

64


In the above example adding any prefix or suffix will cause the migration to fail.


[7/19/2023 2:33:48 PM] – ********************************************************************************

[7/19/2023 2:33:48 PM] – +++++

[7/19/2023 2:33:48 PM] – Pre-requist checks failed. Please refer to the following list of items that require addressing for migration to proceed.

[7/19/2023 2:33:48 PM] – +++++

[7/19/2023 2:33:48 PM] –

[7/19/2023 2:33:48 PM] – =====

[7/19/2023 2:33:48 PM] – Alias:

[7/19/2023 2:33:48 PM] – Name: defdefdefdefdefdefdefdefdefdefdefdefdefdefdefdefdefdefdefdefdefd

[7/19/2023 2:33:48 PM] – PrimarySMTPAddressOrUPN:

[7/19/2023 2:33:48 PM] – RecipientType:

[7/19/2023 2:33:48 PM] – GroupType:

[7/19/2023 2:33:48 PM] – RecipientOrUser:

[7/19/2023 2:33:48 PM] – ExternalDirectoryObjectID:

[7/19/2023 2:33:48 PM] – OnPremADAttribute:

[7/19/2023 2:33:48 PM] – DN:

[7/19/2023 2:33:48 PM] – ParentGroupSMTPAddress:

[7/19/2023 2:33:48 PM] – isAlreadyMigrated: False

[7/19/2023 2:33:48 PM] – isError: True

[7/19/2023 2:33:48 PM] – isErrorMessage: NAME_LENGTH_EXCEPTION: The DL Name plus the prefix and / or suffix exceeds 64 characters. To complete migration wih the prefix and / or suffix the group name must be shortened to prefix + name + suffix to less than 64 characters.

[7/19/2023 2:33:48 PM] – =====

[7/19/2023 2:33:48 PM] – Pre-requist checks failed. Please refer to the previous list of items that require addressing for migration to proceed.

out-logfile : [7/19/2023 2:33:48 PM] – Pre-requist checks failed. Please refer to the previous list of items that require addressing for migration to proceed.

At C:\Repository\DLConversionV2\DLConversionV2.psm1:2904 char:13

+ out-logfile -string “Pre-requist checks failed. Please r …

+ ~~~~~~~~~~~~~~~~~~~~~~~~~~~~~~~~~~~~~~~~~~~~~~~~~~~~~~~~~

+ CategoryInfo : NotSpecified: (:) [Write-Error], WriteErrorException

+ FullyQualifiedErrorId : Microsoft.PowerShell.Commands.WriteErrorException,Out-LogFile


If the name, prefix, and suffix combinations are less than 64 characters the migration is allowed to proceed. The module does not automatically truncate the name or replace characters in order to accommodate a prefix or suffix.


At the conclusion of the migration the Office 365 distribution list will have the prefix and / or suffix added to the name and display name attribute.


PS C:\> Get-DistributionGroup defdefdefdefdefdefdefdefdefdefdefdefdefdefdefdefdefdefdefdefdefd | fl name,displayname


Name : DL-defdefdefdefdefdefdefdefdefdefdefdefdefdefdefdefdefdefdefd-DL

DisplayName : DL-defdefdefdefdefdefdefdefdefdefdefdefdefdefdefdefdefdefdefd-DL


At the conclusion of the migration the group is still retained on premises. The renaming operation occurs with the ! added to the end of the name. The name prefix or suffix is not utilized in the renamed group or any hybrid mail flow objects that are created to satisfy the migration.


[PS] C:\>Get-DynamicDistributionGroup defdefdefdefdefdefdefdefdefdefdefdefdefdefdefdefdefdefdefd | fl name,alias


Name : defdefdefdefdefdefdefdefdefdefdefdefdefdefdefdefdefdefdefd

Alias : defdefdefdefdefdefdefdefdefdefdefdefdefdefdefdefdefdefdefdefdefd


[PS] C:\>Get-MailContact defdefdefdefdefdefdefdefdefdefdefdefdefdefdefde-MigratedByScript | fl name,alias


Name : defdefdefdefdefdefdefdefdefdefdefdefdefde-MigratedByScript

Alias : defdefdefdefdefdefdefdefdefdefdefdefdefdefdefde-MigratedByScript


[PS] C:\>Get-Group defdefdefdefdefdefdefdefdefdefdefdefdefdefdefdefdefdefdefd! | fl name,samaccountname


Name : defdefdefdefdefdefdefdefdefdefdefdefdefdefdefdefdefdefdefd!

SamAccountName : defdefdefdefdefdefdefdefdefdefdefdefdefdefdefdefdefdefdefdefdefd!


By allowing administrators to manage a prefix or suffix during the migration process as groups are created they can match their desired naming conventions moving forward.

Office 365: Graph, Dirsync, and Attribute Modifications

Microsoft Graph can be used to modify and manage properties of objects created in Azure Active Directory. In order for graph to modify and manage properties the object in Office 365 should be a cloud only object. Objects that are synchronized have their source of authority set to on-premises locking out certain attribute sets from modification in the cloud.


I recently worked with a customer that had a custom synchronization solution. This solution utilized Microsoft Graph to manage user properties from a directory they controlled. Each object provision in Azure as a cloud only object. Their application would manage attributes including manager, proxy addresses, and custom attributes. These are the same attributes that are accessible through Exchange Online Powershell.


Due to a misconfiguration directory synchronization was enable. The solution that was utilized to provide the sync interface successfully matched each user in Azure to their corresponding entry in the database. This in turn converted the objects from cloud only to directory synchronized. When this change occurred the graph application that was previously managing the attributes was no longer able to manage them.


Once this misconfiguration was determined the customer disabled directory synchronization. The directory synchronization disablement process can take several hours to complete but was successful in converting all objects back to cloud only. Although the objects were cloud only the subsequent graph updates failed. Specifically, attributes that would typically be set through Exchange Online Powershell interfaces such as custom attributes were failing. Other attributes such as name were successful.


This is a sample error in the graph application.

Operation failed

Error:

Error executing request. An Azure Active Directory call was made to keep object in sync between Azure Active Directory and Exchange Online. However, it failed. Detailed error message: Unable to update the specified properties for on-premises mastered Directory Sync objects or objects currently undergoing migration. DualWrite (Graph) RequestId: 689d3418-cce2-4de1-9d8a-bc8399be91f4 The issue may be transient and please retry a couple of minutes later. If issue persists, please see exception members for more information.


This error is counter intuitive as we have successfully confirmed that directory synchronization was disabled. Why would we receive an error that the object is mastered on-premises? The issue is that the object was cloud only, converted to directory synchronized, and then converted to cloud only. When the conversion process between states occurs there are certain attributes that are attributed to the workloads that they were designed for. In this case extension attributes are not natively available in Azure Active Directory but are there to service Exchange Online. These attributes are added to a hidden attribute set which locks their editing to the platform they are linked to. In this case extension attributes are present for Exchange Online so they can no longer be edited in Azure Active Directory but must be edited in Exchange Online. We were able to demonstrate that the attributes were successfully modified using Exchange Online.


If you have software that depends on utilizing the graph interfaces to manage all users attributes do not convert them to directory synchronized. There are future architectural changes to Azure Active Directory pending which will remove this limitation and allow graph updates to continue for attributes belonging to other workloads if the users are converted between cloud synchronization states.

Office 365: Unable to add and validate a subdomain linked to a viral tenant

In Office 365 end users can sign up for trial subscriptions for service. These services may include PowerBI or Azure Rights Management as an example. The services that users were trialing often required cloud storage or services in order to service the trial. Prior to October 2021 when users signed up for these trials a “viral” or “unmanaged” Office 365 tenant was created on behalf of the trial and the user. The email domain utilized for the trial, if not associated with another Office 365 tenant, would be added to this unmanaged Office 365 instance. After October 2021 this behavior no longer occurs and has been replaced with a one time passcode process. For more information see Email one-time passcode authentication on by default starting October 2021 | Azure updates | Microsoft Azure.


Many administers discover that there exists a viral tenant when they choose to use the domain in the unmanaged tenant within their Office 365 instance. If the domain exists in an unmanaged tenant, it cannot be added and validated to another tenant through the standard domain add process. We have two self-service options that allow administrators to assume ownership of this domain. Admin takeover of an unmanaged directory – Microsoft Entra | Microsoft Learn. In many cases the self-service options are sufficient to allow the administrator to remove the domain and successfully validate it in the tenant of their choice.

Administrators may also test for the existence of a domain registered in Office 365 using the following link:

https://login.microsoftonline.com/common/userrealm/domain.com?api-version=2.1

Administrators replace domain.com with the domain they wish to test. If the domain is not found the following is displayed:


{

“NameSpaceType”: “Unknown”,

“Login”: “domain.com”,

“cloud_instance_name”: “microsoftonline.com”

}


If the domain is found the following information is displayed:


{

“NameSpaceType”: “Managed”,

“Login”: “contoso.com”,

“DomainName”: “contoso.com”,

“FederationBrandName”: “Contoso, Ltd”,

“TenantBrandingInfo”: null,

“cloud_instance_name”: “microsoftonline.com”

}


I recently encountered an interesting scenario where the self service options did not work. The customer that I worked with had a registered domain in their production tenant contoso.com. They also had a subdomain domain.consoto.com that they had previously used for other purposes. This domain had a legitimate external DNS namespace and an MX record pointing to Office 365. In Exchange Online the customer has configured an accepted domain contoso.com and enabled the option to accept email for this domain and all subdomains. In essence email should have been routed correctly into Office 365 and the email addresses at this subdomain functioning.


When the customer chooses to utilize this sub domain they noted that NDRs were generated to these addresses.


451 4.4.4 Mail received as unauthenticated, incoming to a recipient domain configured in a hosted tenant which has no mail-enabled subscriptions. ATTR5 [DM3NAM02FT022.eop-nam02.prod.protection.outlook.com 2023-05-10T16:06:51.301Z 08DB5127CEBAA8D8]


Why did this NDR occur? In this case the customer was relying on the accept mail for all subdomains feature to accept mail into their Exchange Online environment where the subdomains were not verified and added to the tenant explicitly. When mail arrives in Exchange Online, we attempt to attribute the mail to a particular tenant. In this instance the message arrived in Exchange Online due to the MX record pointing to the MX of the customers production tenant and parent domain, but the domain was attributed to the viral tenant. The viral tenant had no mail enable subscriptions, so the message was not delivered.


It was the non-delivery report that started the investigation of the domain and the determination it was registered to a viral tenant. The customer, having researched this began the process of asserting ownership of the domain to their production tenant. In order to assert ownership of the domain you must be able to receive email at the domain or be able to add the domain and validate it forcefully with a DNS entry. This is where things got slightly complicated.


The domain namespace was set to route email to the customers only email solution Exchange Online. Exchange Online was already rejecting the requests. This prevented the customer from using the internal takeover method and simply providing validation and accessing the viral tenant. To use the email option the customer would have had to find another place to route the domain email and subsequently receive it. This was not an option.


This led us to investigate the user of the external admin takeover method. I generally prefer the external takeover method myself as it does not involve accessing the original tenant, cleaning it up, and then removing the domain. The external method essentially just allows us to add the domain, validate it, and move on. If this method exists, why did it not work in this particular instance. In Office 365 when you add a subdomain where the parent domain is registered the domain is automatically validated. The domain has the presence of the RootDomain attribute signifying the parent / child domain relationship exists in Office 365. Attempting to add the domain with new-msolDomain generated an “unknown error”. The error was actually known in that the domain could not be added and automatically validated since it existed in an unmanaged viral tenant. If you are unable to add the domain, you are unable to get the proof of domain ownership, and therefore unable to forcefully takeover the domain.


Add and verify custom domain names – Microsoft Entra | Microsoft Learn


Add subdomains of a custom domain

If you want to add a subdomain name such as ‘europe.contoso.com’ to your organization, you should first add and verify the root domain, such as contoso.com. The subdomain is automatically verified by Azure AD. To see that the subdomain you added is verified, refresh the domain list in the browser.

If you have already added a contoso.com domain to one Azure AD organization, you can also verify the subdomain europe.contoso.com in a different Azure AD organization. When adding the subdomain, you are prompted to add a TXT record in the DNS hosting provider.


The self-service instructions were not going to easily work in this instance. Where there is a will there is a way! In order to self service the takeover of this domain where email could not be received by another solution we needed to use a tenant where the parent / child relationship did not exist. Fortunately for us the customer we were working with had a development tenant where the parent domain contoso.com did not exist (obviously because it existed in their production tenant). We were able to use the development tenant to add the domain, secure the ownership validation, and verify domain ownership forcefully using the external admin takeover method. Once the domain was successfully added to the development tenant it was then removed. Removing the domain freed the domain from all tenants. The customer could then add the domain explicitly to their production tenant where automatic validation was able to succeed, and the domain was added as an automatically verified subdomain of an existing parent domain. We also assume that if necessary, a trial tenant could have been utilized in place of the development tenant for these purposes.


I decided to write this up because it was a first for me. When I saw this in the past the customers I was working with had the ability to receive email at an alternate location for the domain. This allowed us to proceed with the internal admin takeover. The inability to receive email was a unique variable to this scenario. Although there is not necessarily a best practice recommendation, I encourage customers to add the domains to their tenants that they want to ensure are protected from being registered in other tenants. This was more of a relevant recommendation prior to October 2021 when domains would be added to unmanaged tenants but doing so even after ensures that domain ownership has been validated and is locked to the tenant where the domain resides. This may or may not be possible depending on the number of domains that a customer owns as there is an upward limit of 5000 domains.

Office 365: Distribution List Migrations Version 2.0 – Part 35

Improved handling of mailbox folder permissions, full mailbox access permissions, and send as permissions.

Distribution lists are often utilized to provide permissions in Exchange Online. DLConversionV2 allows administrator to audit these permissions for evaluation during the migration. As a part of the migration process the original group is mail disabled and moved to an organizational unit that does not synchronize to Office 365. The results of this operation is that the group is deleted from Azure Active Directory and Exchange Online.


If full mailbox access, send as, or mailbox folder permissions were assigned to the group that was deleted this results in an orphaned SID remaining on the object. The presence of the orphaned SID may result in the Exchange Control Panel failing to enumerate permissions on the object for administrators leveraging these tools for administration. PowerShell is not impacted by this.


Version 2.9.8.7 has new behavior where the original permission is removed, and the new permission is added. This prevents the introduction of orphaned SIDs which result in management tools failing on migrated distribution lists or objects that had dependencies on migrated distribution lists.

Office 365: Generate a mailbox locations report…

In Office 365 recipients may have different mailbox types. A mailbox enabled user may have one or more archive mailboxes or a guest user that you have invited to interact with organization groups may have a component shared mailbox.


I recently participated in an escalation where there was a need to understand how many mailboxes were enabled with archives and how many of those archives had been auto expanded.


Prior to the release of the Exchange Management PowerShell version 3.0 administrators had access to a command called Get-MailboxLocations. In the new PowerShell this command was replaced with Get-MailboxLocation. (Notice the subtle difference). The usage of the command has also changed significantly allowing for the passing of either an identity or user object and allowing the scoping of the command to return either all or specific mailbox types. Information on get-mailboxLocation can be found at: Get-MailboxLocation (ExchangePowerShell) | Microsoft Learn


I have published a sample script to the following location: timmcmic/MailboxLocationsReport (github.com)


To utilize the script an Exchange Management PowerShell session must be opened and authenticated. When running the script, the administrator is presented with six predefined options.

  1. Collect all recipients that can have a mailbox. This covers primary mailboxes, archive mailboxes, auxiliary archive mailboxes, and component shard mailboxes.
  2. Collect all primary mailbox enabled recipients (may or may not have an archive enabled).
  3. Collect all primary mailbox enabled recipients only if an archive is enabled.
  4. Collect all recipients only if an archive is enabled.
  5. Collect all Office 365 / Unified Groups.
  6. Collect all guest recipients.


When the script has concluded a CSV file is generated at the path contained in the script. (This may be adjusted prior to execution.).


#Define user variables – please update as appropriate prior to running code.


[string]$outputFileName = “mailboxLocation.csv”
#Define the CSV file name.

[string]$outputFilePath = “C:\temp\”
#Define the output file path


Here is a sample entry in the csv file.


ExternalDirectoryObjectID

PrimarySMTPAddress

LocationCount

HasPrimaryMailbox

HasMainArchive

HasComponentShard

HasAuxArchive

NumberOfAuxArchives

RecipientType

RecipientTypeDetails

28cd9c67-a21a-4c49-aff1-58b5cbbebfc9

user@domain.com

1

TRUE

FALSE

FALSE

FALSE

0

UserMailbox

UserMailbox


The CSV file can be opened in Excel and the columns filtered if necessary to parse information.