Author Archives: TIMMCMIC

Office 365 – Distribution List Migrations Version 2.0 – Part 34

*IMPORTANT* Preparing for MS Graph Implementations

The DLConversionV2 PowerShell Module has dependencies on Azure Active Directory PowerShell commands. The Azure AD PowerShell commands are started a phased deprecation. The commands are being replaced by Microsoft Graph Commands.


When version 2.9.8 releases to the PowerShell Gallery using Microsoft Graph will be the standard method for querying and capturing information from Azure Active Directory. The necessary Microsoft Graph modules will be installed when either a current build is upgraded, or a new build installed.


When running DLConversionV2 administrators may use either interactive authentication for graph or certificate authentication. Unfortunately, the method of passing non-interactive credentials for authentication from scripts is not available in the Microsoft Graph modules.


DLConversionV2 now has the following switches included to establish the MSGraph session.


#Define Microsoft Graph Parameters

        [Parameter(Mandatory = $false)]

        [ValidateSet(“China”,“Global”,“USGov”,“USGovDod”)]

        [string]$msGraphEnvironmentName=“Global”,

        [Parameter(Mandatory=$true)]

        [string]$msGraphTenantID=“”,

        [Parameter(Mandatory=$false)]

        [string]$msGraphCertificateThumbprint=“”,

        [Parameter(Mandatory=$false)]

        [string]$msGraphApplicationID=“”,


$msGraphEnvironmentName = The specific Office 365 environment if connecting outside of the Global environment.


$msGraphTenantID = The Azure Active Directory / Office 365 tenant ID associated with your tenant. This can be obtained from the Azure Portal -> Azure Active Directory.


$msGraphCertificateThumbprint = The certificate thumbprint assigned to the local user profile and also assigned to the Microsoft Graph application created in Azure AD.


$msGraphApplicationID = The application of the application created in Azure Active Directory for Microsoft Graph.


The above four switches are required to have a migration performed in a non-interactive authenticated session. If performing a single distribution list migration the switches can be omitted at which time an interactive authentication prompt will be presented.


To use Microsoft Graph either the application you are connecting to or the user account you are using has to consent to access and request certain rights. The minimum rights required for the DLConversionV2 module are Group.Read.All and User.Read.All. You may have to work with others in your organization to consent to these rights when connecting to Microsoft Graph.


As most migrations are performed in a non-interactive format I suggest reading the following blog post: Using Certificate-based Authentication with the Microsoft Graph PowerShell SDK | Practical365


The blog post by Tony Redmond presents an easy process for establishing your Azure Active Directory application and implementing certificate authentication for connections to Microsoft Graph. It also provides a simple command structure to test your installation.


I know for many this will break processes that are already in flow. The decision is not taken lightly but is required to allow sufficient time to move forward on supported APIs and continue the development of the modules.


Happy migrating!

Office 365: Enabling mail users results in duplicate proxy address errors

A mail user is a user security principle that is extended with mail attributes. These accounts typically are utilized when there is a need to access Active Directory but email for the account should be sent to another mail system. Mail routing to the foreign mail system occurs by setting the externalEmailAddress property (targetAddress Active Directory property) on the mail user object.


The externalEmailAddress that is defined on the mail user does not have to be external. There are circumstances were administrators may want to define the externalEmailAddress as an internal address assigned to a mailbox. I recently worked with some organizations that were provisioning administrator accounts within Active Directory. The organizations wanted to have the administrator accounts be mail enabled objects, have unique email addresses, and have the email arrive in the primary mailbox assigned to the same administrators standard account. This resulted in the extenralEmailAddress property being an internal address. It was after enabling these accounts with an internal email address that a duplicate proxy address error occurred.


Let us explore the circumstances of this scenario.


In Active Directory an account exists that is synchronized to Azure Active Directory and Exchange Online. Executing get-User in the on-premises Exchange Management Shell shows that the object is a user object.


[PS] C:\>Get-User UserAdmin0


Name RecipientType

—- ————-

User Admin0 User


The same command in Exchange Online confirms that the object is not mail enabled and appears as a user object.


PS C:\> Get-User “User Admin0” | fl Name,RecipientType,DisplayName


Name : 3f15d3d8-4cbd-4457-bb9c-5a5fe58535eb

RecipientType : User

DisplayName : User Admin0


The administrator executes enable-mailUser with an externalEmailAddress that exists on an object within the directory.


[PS] C:\>Enable-MailUser UserAdmin0 -ExternalEmailAddress sharon@domain.com

The proxy address “SMTP:sharon@domain.com” is already being used by the proxy addresses or LegacyExchangeDN of

“home.domain.com/E-McMichael Objects/Users/Sharon User”. Please choose another proxy address.

+ CategoryInfo : NotSpecified: (home.domain…est/User Admin0:ADObjectId) [Enable-MailUser], ProxyAdd

ressExistsException

+ FullyQualifiedErrorId : [Server=Azure-Mail-0,RequestId=eebf023a-54ce-45eb-be36-c0b498bfe065,TimeStamp=3/14/2023

2:33:35 PM] [FailureCategory=Cmdlet-ProxyAddressExistsException] 35F8ADFF,Microsoft.Exchange.Management.RecipientT

asks.EnableMailUser

+ PSComputerName : azure-mail-0.home.domain.com


In this case an error is immediately returned. This is expected and by design. Enable-MailUser expects to set the externalEmailAddress specified as a primary proxy on the account. It is unable to do so since this primary SMTP address already exists on a mailbox object within the directory. To get around this behavior the enable-MailUser command is executed with the -primarySMTPAddress switch. When specifying the primary SMTP address the logic to add the users externalEmailAddress is bypassed.


[PS] C:\>Enable-MailUser UserAdmin0 -ExternalEmailAddress sharon@domain.com -PrimarySmtpAddress useradmin0@domain.com


Name RecipientType

—- ————-

User Admin0 MailUser


A review of the users properties shows a correct proxy address and external email address set based on the command executed.


[PS] C:\>get-mailUser UserAdmin0 | fl emailAddresses,externalEmailAddress


EmailAddresses : {SMTP:useradmin0@domain.com}

ExternalEmailAddress : SMTP:sharon@domain.com


When synchronization has completed an error in the portal is noted indicating that a duplicate proxy address collision exists. This is viewed on the error record of the object using get-msolUser.


The proxy address “SMTP:sharon@domain.com” is already being used by the proxy addresses or LegacyExchangeDN of “Sharon”. Please choose another proxy address.


Reviewing the output of the user on premises does not show a proxyAddress collision. Why then do we have a collision in Office 365? In this instance the user account existed prior to enabling the mail user. When enabling a mail user if the user object does not already have a primary SMTP address assigned the externaEmaillAddress is set as the primary SMTP address. This is very similar to executing the same command on premises and not using -primarySMTPAddress as we demonstrated initially. In summary if the user already exists as a user object in Exchange Online, the user is later mail enabled as a mail user, the externalAddress exists on another object in Exchange Online, the user will enter a validation failure state and the mail user will not provision.


What are some potential solutions to this scenario?


Provision the user and mail user at the same time.


When a new user object is created in Active Directory and immediately mail enabled the synchorinization into the service provisions the object with both a primarySMTPAddress and and externalEmailAddress at the same time. In this instance there is no address collision as the object did not already exist in Exchange Online.


New-MailUser -Name “InitialTest” -DisplayName “InitialTest” -FirstName “Initial” -LastName “Test” -UserPrincipalName “initialtest@domain.com” -ExternalEmailAddress “sharon@domain.com” -OrganizationalUnit “OU=MigrationTest,OU=DLConversion,DC=home,DC=domain.com,DC=com” -PrimarySmtpAddress “initialtest@domain.com”

WARNING: A script or application on the remote computer AZURE-MAIL-0.HOME.domain.com is sending a prompt request.

When you are prompted, enter sensitive information, such as credentials or passwords, only if you trust the remote

computer and the application or script that is requesting the data.


cmdlet New-MailUser at command pipeline position 1

Supply values for the following parameters:

Password: ***********


Name RecipientType

—- ————-

InitialTest MailUser


When synchronization is completed the object will be represented in Exchange Online as a mail user.


PS C:\> Get-MailUser InitialTest | fl emailAddresses,externalEmailAddress


EmailAddresses : {SMTP:initialtest@domain.com, smtp:initialtest@tenant.onmicrosoft.com,

X500:/o=domain Home/ou=Exchange Administrative Group

(FYDIBOHF23SPDLT)/cn=Recipients/cn=05ae6f37202b4fad96247c32875a3565-Initial}

ExternalEmailAddress : SMTP:sharon@domain.com


Provision the existing user account as a mail user with a temporary external email address.

If the user account already exists in Exchange Online as a user the object can be converted to a mail user by specifying a temporary target address that does not exist in Exchange Online. When this occurs Exchange Online will provision a primary SMTP for the object. Once the primary SMTP address has provisioned the target address can be updated on-premises to the desired value. Updating the value does not trigger logic to re-evaluate the primarySMTPAddress since the address is already present.


To being validate that the user object exists in Exchange Online as a USER.


PS C:\> Get-User “User Admin1”


Name RecipientType

—- ————-

50075348-a3e5-4a2d-a142-5ec9fd9a72ee User


Using the Exchange Management tools the object may be mail enabled as a user. An external email address that is temporary is utilized.


[PS] C:\>Enable-MailUser “UserAdmin1” -ExternalEmailAddress totallyNotAnAddress@contoso.com

Name RecipientType

—- ————-

User Admin1 MailUser


Using Exchange Online Powershell the object conversion from user to mail user is validated using get-mailUser. The proxy addresses is populated and the external email address reflects the temporary address specified in the enable command.


PS C:\> Get-MailUser “User Admin1” | fl DisplayName,RecipientType,EmailAddresses,ExternalEmailAddress


DisplayName : User Admin1

RecipientType : MailUser

EmailAddresses : {smtp:UserAdmin1@domain.com, smtp:UserAdmin1@domain.mail.onmicrosoft.com,

smtp:UserAdmin1@timmcmic.onmicrosoft.com, X500:/o=domain Home/ou=Exchange Administrative

Group (FYDIBOHF23SPDLT)/cn=Recipients/cn=328ebabf60834005be26d5a28e4ba850-User Ad…}

ExternalEmailAddress : SMTP:totallyNotAnAddress@contoso.com


Using the Exchange Management Tools the user is mail disabled and re-enabled using the desired external address. This is necessary as set-Mailuser -externalEmailAddress checks for uniqueness of the external address and an error is returned. This disable / enable needs to be done within a single sync cycle.


[PS] C:\>Disable-MailUser UserAdmin1


Confirm

Are you sure you want to perform this action?

Disabling mail user “UserAdmin1” will remove the Exchange properties from the Windows user object.

[Y] Yes [A] Yes to All [N] No [L] No to All [?] Help (default is “Y”): a


[PS] C:\>Enable-MailUser “UserAdmin1” -ExternalEmailAddress sharon@domain.com -PrimarySmtpAddress useradmin1@domain.com


Name RecipientType

—- ————-

User Admin1 MailUser


The change is validated in Exchange Online using get-mailUser.


PS C:\> Get-MailUser “User Admin1” | fl DisplayName,RecipientType,EmailAddresses,ExternalEmailAddress


DisplayName : User Admin1

RecipientType : MailUser

EmailAddresses : {SMTP:useradmin1@domain.com, X500:/o=domain Home/ou=Exchange Administrative Group

(FYDIBOHF23SPDLT)/cn=Recipients/cn=4ced80a1c0b04fe89c04c84fa1e53ca0-User Ad,

smtp:UserAdmin1@timmcmic.onmicrosoft.com}

ExternalEmailAddress : SMTP:sharon@domain.com


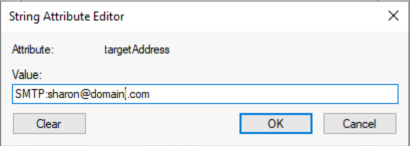
If you are comfortable with Active Directory Users and Computers attribute editor an alternative is to locate the object and modify the property directly. The targetAddress attribute of the object holds the externalEmailAddress.


Updating this address in the correct format will result in the same change in Exchange Online without disabling and re-enabling the mail user object.


What if I already have the duplicate proxy failure?

If the duplicate proxy failure already exists the object must be mail disabled and the synchronization allowed to complete. Once the sync has completed the option outlined above to mail enable an existing user account may be performed.


The workarounds described here should allow administrators to create mail user objects where the external email address specified exists in Exchange Online.

Office 365: Attempting to use integrated apps returns something went wrong

In the Office 365 Portal administrators have the ability to mange, deploy, and remove published applications for their clients. This is achieved through the integrated applications management pane of the Office 365 Admin Portal. Information regarding integrated applications maybe found here Deploy add-ins in the admin center – Microsoft 365 admin | Microsoft Learn.


When using the Office 365 Admin Portal and selecting integrated applications some administrator are presented with a warning in the portal. The warning indicates “Something went wrong” and includes a GUID. When this happens please ensure the following settings are in place.


  1. Go to Azure Portal. Choose “Azure Active Directory” under Azure Services.
  2. In Azure Active Directory portal, choose Manage > Enterprise Applications.
  3. Select “Microsoft Applications” under Application Type and click Apply.
  4. Search application id ‘0517ffae-825d-4aff-999e-3f2336b8a20a’ in search bar. You should see the application name – M365 App Management Service. Select M365 App Management Service.
  5. Choose Manage > Properties > Enabled for users to sign-in?. Click on “Yes” and Save.


With the M365 App Management Service enabled administrators should now have access to the integrated applications experience in the Office 365 Admin portal.

Office 365: Users or guest accounts cannot access resources due to risk assigned

Organizations may configure conditional access policies that evaluate if users are at risk when accessing resources hosted in Office 365. There are a variety of risks that can be assigned to users that may impact their ability to access resources.


For information regarding risk assignment and detection see What is risk? Azure AD Identity Protection – Microsoft Entra | Microsoft Learn.


For information regarding conditional access application to risk see Sign-in risk-based multifactor authentication – Azure Active Directory – Microsoft Entra | Microsoft Learn.


When risk has been identified on a user and conditional access applied this may result in the user being blocked. Users may receive a message during the authentication process stating

“We’ve detected suspicious activity on your account. Sorry, the organization you are trying to access restricts at-risk users. Please contact your …”


When users receive this message there is also an associated entry in the Azure Sign In Logs that shows the sign on failure and that risk was the reason the sign on was blocked. It’s important to note that risk application can either be in the tenant where the user resides or when the user is accessing resources in another tenant based on a guest invitation.


I’ve recently worked some investigations where users were being blocked from signing into guest tenants. When reviewing the Azure sign in logs of the home tenant we were able to validate that the block occurred in the home tenant due to risk being assigned. What we were not able to do was locate this user as a risky user. The tenant that hosted the account did not have conditional access policies that evaluated risk only the tenant hosting the guest resource was evaluating risk. There are several options to remediate risk assigned to a user one of them being administrator dismissal of risk. Unfortunately, that was not possible because the user was not showing as having any risk assigned in the Azure portal. (For information on remediating risk see Remediate risks and unblock users in Azure AD Identity Protection – Microsoft Entra | Microsoft Learn)


Why was a user blocked for risk yet not showing as a risky user? As we continued our investigation, we discovered that the risk that was assigned to the user was assigned in December of 2020. As there were no conditional access policies previously evaluating risk there was never an identification of risk. As risk continued to develop in Azure there were essentially two risk platforms. For simplicity I’ll refer to it as V1 risk and V2 risk. The current risk platform is the V2 risk platform. Users that are assigned risk detections today are assigned under the V2 platform and our management tools display this information. In this case the risk assigned to the user was assigned under the V1 platform and is not immediately discoverable in our tools. I will note that having V1 risk assigned to users is not something that is common but could happen and result in access denied to resources being assigned risk administrators cannot see.


How do you fix this? Fortunately, administrators have access to a set of tools for dismissing user risk via the Microsoft Graph API. The tools may be located here GitHub – AzureAD/IdentityProtectionTools: Sample PowerShell module and scripts for managing Azure AD Identity Protection service. The following instructions outline how to utilize the tools.


  • Prepare MS Graph
    • Open powershell as administrator.
    • Execute install-module Microsoft.Graph.Authentication (this assumes that the full Microsoft.Graph module is not already installed)
    • Execute install-module Microsoft.Graph.Identity.SignIns (this assumes that the full Microsoft.Graph module is not already installed)
    • Execute install-module Microsoft.Graph.Users (this assumes that the full Microsoft.Graph module is not already installed)
    • Execute $scopes = @(“Identity.RiskyUser.ReadWrite.All”,”IdentityRiskyUser.Read.All”,”User.Read.All”)
    • Execute Connect-MGGraph -scopes $scopes
      • At this point you may be prompted to consent to this applications use and permissions.
      • It may be possible you do not have rights to do this and may have to have someone perform consent on your behalf.
      • This is required to establish the MSGraph permissions necessary to complete this work.
  • Prepare the Identity Protection Module
    • Download the code zip file from the GitHub repository.
    • Expand the zip file to a folder.
    • Navigate to the extracted folder \ src \ modules \ IdentityProtectionTools with Powershell.
    • Run unblock-files * to remove any restrictions on downloaded Powershell files.
    • Run import-module IdentityProectionTools.psd1
  • Revoke User Risk
    • In order to revoke user risk you must have the object IDs of the users to revoke. An example search via user principal name:
      • Get-MGUser -search ‘”UserPrincipalName:user@domain.com”‘ -consistencyLevel eventual
      • The ID column lists the object ID of the user.
    • Create an array of users to revoke risk.
      • $users = @()
      • $users += “ID1”
      • $users += “ID2”
      • If only a single user there is only a single add to the array creating an array of 1 users.
    • Revoke the risk assigned to the users.
      • Invoke-AzureADIPDismissRiskyUser -userIDs $users

This will perform a risk dismissal on one or more users. After dimissing risk the user should wait 30 minutes before attempting the sign on again. If the sign on is still unsuccessful due to risk assignment and the risk cannot be otherwise located or remediated in the Azure portal please open a case with support for assistance.

Office 365 – Distribution List Migrations 2.0 – Part 33

Testing a distribution list for pre-migrations…

When migrating distribution lists to Office 365 there is a series of health checks performed to ensure that the migration will be successful. Through the enumeration and normalization process each recipient that appears on the property of the distribution list is tested for presence in Office 365.


Prior to version 2.9.6.6 the only way to predict success or failure of the migration was to attempt and perform the migration. If the group contained a nested distribution list, a member of a property was not present, or the group was not directory synchronized the migration would fail and allow the administrator to review the logs. At the end of each migration is a failure table with exception codes that allow administrators to analyze the failure and take actions.


Version 2.9.6.6 introduces several test functions to offer administrators the opportunity to test pre-requisites before performing a migration. These commands include Test-PreMigration, Test-PreMigrationO365Group, and Test-PreO365GroupConversion. Each of the test commandlets performs the tests based on the type of migration that will be performed.


TEST-PREMIGRATION

This commandlet allows the administrator to test a standard on-premises to Office 365 distribution list migration.


Test-PreMigration -groupSMTPAddress atestgroup178@domain.com -globalCatalogServer azure-dc-0.home.domain.com -activeDirectoryCredential $cred -activeDirectoryAuthenticationMethod kerberos -exchangeOnlineCredential $cred -azureADCredential $cred -logFolderPath c:\temp


In this instance the group failed the test, and the folder was renamed to reflect failure.


[2/21/2023 7:11:46 PM] – FAILED – renaming directory.

[2/21/2023 7:11:46 PM] – PreReqTest-20230221T1911466009-atestgroup178-FAILED

[2/21/2023 7:11:46 PM] – c:\temp\PreReqCheck\


When reviewing the failure table contained at the end of the log file the following is noted.


[2/21/2023 7:11:45 PM] – +++++

[2/21/2023 7:11:45 PM] – Pre-requist checks failed. Please refer to the following list of items that require addressing for migration to proceed.

[2/21/2023 7:11:45 PM] – +++++

[2/21/2023 7:11:45 PM] –

[2/21/2023 7:11:45 PM] – =====

[2/21/2023 7:11:45 PM] – Alias: domainAdmin

[2/21/2023 7:11:45 PM] – Name: domainAdmin

[2/21/2023 7:11:45 PM] – PrimarySMTPAddressOrUPN: domainAdmin@domain.com

[2/21/2023 7:11:45 PM] – RecipientType: user

[2/21/2023 7:11:45 PM] – GroupType:

[2/21/2023 7:11:45 PM] – RecipientOrUser: Recipient

[2/21/2023 7:11:45 PM] – ExternalDirectoryObjectID:

[2/21/2023 7:11:45 PM] – OnPremADAttribute: managedBy

[2/21/2023 7:11:45 PM] – DN: CN=domainAdmin,CN=Users,DC=home,DC=domain,DC=com

[2/21/2023 7:11:45 PM] – ParentGroupSMTPAddress: atestgroup178@domain.com

[2/21/2023 7:11:45 PM] – isAlreadyMigrated: False

[2/21/2023 7:11:45 PM] – isError: True

[2/21/2023 7:11:45 PM] – isErrorMessage: OFFICE_365_DEPENDENCY_NOT_FOUND_EXCEPTION: A group dependency was not found in Office 365. Please either ensure the dependency is present or remove the dependency from the group.

[2/21/2023 7:11:45 PM] – =====

[2/21/2023 7:11:45 PM] – Pre-requiste checks failed. Please refer to the previous list of items that require addressing for migration to proceed.


In this instance the managedBy attribute has a manager that is not present in Office 365. This creates a property that cannot be recreated in the service.


TEST-PREMIGRATIONO365GROUP

When migrating from an on premises group to an Office 365 group there are different sets of properties to test for. This commandlet allows administrators to test for pre-requisits associated specifically with an on-premises to Office 365 group migration.


Test-PreMigrationO365Group -groupSMTPAddress atestgroup178@domain.com -globalCatalogServer azure-dc-0.home.domain.com -activeDirectoryCredential $cred -activeDirectoryAuthenticationMethod kerberos -exchangeOnlineCredential $cred -azureADCredential $cred -logFolderPath c:\temp


In this instance the group failed the test, and the folder was renamed to reflect failure.


[2/21/2023 7:39:02 PM] – FAILED – renaming directory.

[2/21/2023 7:39:02 PM] – PreReqTest-20230221T1939022343-atestgroup178-FAILED

[2/21/2023 7:39:02 PM] – c:\temp\PreReqCheck\


When reviewing the failure table at the end of the log file the following errors are noted.


[2/21/2023 7:39:01 PM] – +++++

[2/21/2023 7:39:01 PM] – Pre-request checks failed. Please refer to the following list of items that require addressing for migration to proceed.

[2/21/2023 7:39:01 PM] – +++++

[2/21/2023 7:39:01 PM] –

[2/21/2023 7:39:01 PM] – =====

[2/21/2023 7:39:01 PM] – Alias: aTestGroup178

[2/21/2023 7:39:01 PM] – Name: aTestGroup178

[2/21/2023 7:39:01 PM] – PrimarySMTPAddressOrUPN: aTestGroup178@domain.com

[2/21/2023 7:39:01 PM] – RecipientType: group

[2/21/2023 7:39:01 PM] – GroupType: -2147483640

[2/21/2023 7:39:01 PM] – RecipientOrUser: Recipient

[2/21/2023 7:39:01 PM] – ExternalDirectoryObjectID:

[2/21/2023 7:39:01 PM] – OnPremADAttribute: SecurityGroupCheck

[2/21/2023 7:39:01 PM] – DN: CN=aTestGroup178,OU=MigrationTest,OU=DLConversion,DC=home,DC=domain,DC=com

[2/21/2023 7:39:01 PM] – ParentGroupSMTPAddress: atestgroup178@domain.com

[2/21/2023 7:39:01 PM] – isAlreadyMigrated: N/A

[2/21/2023 7:39:01 PM] – isError: True

[2/21/2023 7:39:01 PM] – isErrorMessage: UNIFIED_GROUP_MIGRATION_GROUP_IS_SECURITY_EXCEPTION: To perform an Office 365 Unified Group migration of a mail-enabled security group on premsies the administrator must use -overrideSecurityGroupCheck acknolwedging that permissions may be lost in Office 365 as a result of the migration.

[2/21/2023 7:39:01 PM] – =====

[2/21/2023 7:39:01 PM] – =====

[2/21/2023 7:39:01 PM] – Alias: domainAdmin

[2/21/2023 7:39:01 PM] – Name: domainAdmin

[2/21/2023 7:39:01 PM] – PrimarySMTPAddressOrUPN: domainAdmin@domain.com

[2/21/2023 7:39:01 PM] – RecipientType: user

[2/21/2023 7:39:01 PM] – GroupType:

[2/21/2023 7:39:01 PM] – RecipientOrUser: Recipient

[2/21/2023 7:39:01 PM] – ExternalDirectoryObjectID:

[2/21/2023 7:39:01 PM] – OnPremADAttribute: managedBy

[2/21/2023 7:39:01 PM] – DN: CN=domainAdmin,CN=Users,DC=home,DC=domain,DC=com

[2/21/2023 7:39:01 PM] – ParentGroupSMTPAddress: atestgroup178@domain.com

[2/21/2023 7:39:01 PM] – isAlreadyMigrated: False

[2/21/2023 7:39:01 PM] – isError: True

[2/21/2023 7:39:01 PM] – isErrorMessage: UNIFIED_GROUP_MIGRATION_MANAGER_NOT_MEMBER_EXCEPTION: Office 365 Groups require all owners to be members. ManagedBY is mapped to owners – this manager is not a member of the group. The manage must be removed, use the switch -addManagersAsMembers to add all managers, or manually add this manager as a member.

[2/21/2023 7:39:01 PM] – =====

[2/21/2023 7:39:01 PM] – =====

[2/21/2023 7:39:01 PM] – Alias: Tim

[2/21/2023 7:39:01 PM] – Name: Tim McMichael

[2/21/2023 7:39:01 PM] – PrimarySMTPAddressOrUPN: Tim@domain.com

[2/21/2023 7:39:01 PM] – RecipientType: user

[2/21/2023 7:39:01 PM] – GroupType:

[2/21/2023 7:39:01 PM] – RecipientOrUser: Recipient

[2/21/2023 7:39:01 PM] – ExternalDirectoryObjectID:User_6004ad19-6c4c-4ea5-83a2-7d10afc5e3a1

[2/21/2023 7:39:01 PM] – OnPremADAttribute: msExchBypassModerationLink

[2/21/2023 7:39:01 PM] – DN: CN=Tim McMichael,OU=Users,OU=domain Objects,DC=home,DC=domain,DC=com

[2/21/2023 7:39:01 PM] – ParentGroupSMTPAddress: atestgroup178@domain.com

[2/21/2023 7:39:01 PM] – isAlreadyMigrated: False

[2/21/2023 7:39:01 PM] – isError: True

[2/21/2023 7:39:01 PM] – isErrorMessage: UNIFIED_GROUP_MIGRATION_BYPASS_MODERATION_FROM_SENDERS_OR_MEMBERS_EXCEPTION: Office 365 Unified Groups do not have BypassModerationFromSendersOrMembers. To migrate to an Office 365 Unified Group the bypass moderation from senders or members must be cleared.

[2/21/2023 7:39:01 PM] – =====


In this instance the tests failed, indicating three different exceptions that apply only to Office 365 Group migrations. The first being the source group is a security group, the second that the manager is not a member, and lastly the group has BypassModerationFromSendersOrMembers rights. These are all issues that would prevent successful migration from on-premises to Office 365 Group.


TEST-PREO365GROUPCONVERSION

This test allows the administrator to test the pre-requisites associated with converting a cloud only distribution group to an Office 365 Group. As with migrations from on-premises groups the conversion process tests for the same requirements that the on-premises migration has. This allows administrators to predict the success or failure of a group conversion.


test-preO365GroupConversion -groupSMTPAddress zCloudOnlyMemberOfMailDistribution41@domain.com -exchangeOnlineCredential $cred -azureADCredential $cred -logFolderPath c:\temp -addManagersAsMembers:$TRUE


In this instance there are no pre-requisites that would not allow the conversion to succeed.


[2/21/2023 7:53:51 PM] – Success – renaming directory.

[2/21/2023 7:53:51 PM] – PreReqTest-20230221T1953517076-zCloudOnlyMemberOfMailDistribution41-Success

[2/21/2023 7:53:51 PM] – c:\temp\PreReqCheck\


The test commandlets allow administrators to run pre-requisite checks and test for the probability of migration success or failure without actually running the migration process.
Office 365 – Distribution List Migrations Version 2.0 – Part 32

Enabling support for a custom routing domain…

In an Office 365 installation the hybrid routing domain is provisioned when the tenant is initially created. The hybrid routing domain is what is utilized to secure mail flow from on premises installations to Office 365 in a co-existence scenario. The hybrid routing domain is typically mail.tenantName.onmicrosoft.com.


When migration distribution lists a contact object is always provisioned for each group migrated. The contact object has a target address utilizing the mail.tenantName.onmicrosoft.com email address either assigned to the migrated distribution list or created as a part of the migration. This is done to ensure that cross premises mail flow is secure using the standard security applied to the hybrid send connector. For information on hybrid mail flow please see the following article: Office 365 – Distribution List Migrations Version 2.0 – Part 7 | TIMMCMIC (wordpress.com)


It is possible that customers may have customized the domain that they use for hybrid routing. This was not necessarily uncommon in very early Office 365 tenants and those that may have been upgraded from legacy live.edu tenants. In some instances the mail.tenantName.onmicrosoft.com domain is not utilized on send connectors since there is a custom routing domain in place. This would mean that post distribution list migration emails from on-premises applications could use an internet route and messages may arrive as externally non-secured.


Version 2.9.6.6 of the DLConversionV2 module now supports the ability to specify a custom routing domain. The switch -customRoutingDomain is optional and available in both single, multiple, and multiple machine migrations. When the custom routing domain is specified the module will post migration look for the presence of this address in the SMTP proxy address list. If the address is not present an attempt to create the address using the alias of the distribution list and the custom routing domain is attempted. If the stamping of this address is successful, the migration will proceed. If an address collision is detected then a random prefix is generated and combined with the remote routing domain.


Once the remote address is determined the mail contact on-premises for the migrated distribution list will utilize this address as a target address. If all send connectors are properly configured mail that uses this custom routing domain and target address will arrive in Office 365 as trusted and secure.


Here is an example of implementing custom routing domains with a migration. To begin prior to migration this is the list of email addresses assigned to the group being migrated in Office 365.


PS C:\> Get-DistributionGroup atestgroup416 | fl *emailaddresses*


EmailAddresses : {SMTP:aTestGroup416@domain.com, smtp:aTestGroup416@domain.mail.onmicrosoft.com,

smtp:aTestGroup416@timmcmic.onmicrosoft.com, X500:/o=domain Home/ou=Exchange Administrative Group

(FYDIBOHF23SPDLT)/cn=Recipients/cn=4be6ea76f04b48f5bdfad29be341b41a-aTestGr}


In this migration our custom routing domain is domain.net. The command utilized to migrate the distribution group:


Start-DistributionListMigration -groupSMTPAddress atestgroup416@domain.com -globalCatalogServer azure-dc-0.home.domain.com -activeDirectoryCredential $cred -activeDirectoryAuthenticationMethod kerberos -aadConnectServer azure-dirsync-0.home.domain.com -aadConnectCredential $cred -aadConnectAuthenticationMethod kerberos -exchangeServer azure-mail-0.home.domain.com -exchangeCredential $cred -exchangeAuthenticationMethod kerberos -exchangeOnlineCredential $cred -azureADCredential $cred -logFolderPath c:\temp -dnNoSyncOU “OU=DoNotSync,OU=MigrationTest,OU=DLConversion,DC=home,DC=domain,DC=com” -enableHybridMailflow:$TRUE -customRoutingDomain “domain.net”


At the conclusion of the distribution list migration the list of email addresses on the migrated distribution group now includes an address @domain.net.


PS C:\> Get-DistributionGroup atestgroup416 | fl *emailaddresses*


EmailAddresses : {smtp:aTestGroup416@domain.net, X500:/o=domain Home/ou=Exchange Administrative Group

(FYDIBOHF23SPDLT)/cn=Recipients/cn=4be6ea76f04b48f5bdfad29be341b41a-aTestGr,

smtp:aTestGroup416@timmcmic.onmicrosoft.com, SMTP:aTestGroup416@domain.com…}


At the conclusion of the migration the mail contact on-premises is created. In this case the enableHybridMailFlow option was set to true which triggers the full mail enablement of this contact. The target address is set to match the secondary SMTP addressed added at the custom routing domain.


[PS] C:\>Get-MailContact atestgroup416-migratedbyscript | fl *address*


ExternalEmailAddress : SMTP:ATESTGROUP416@domain.NET

AddressListMembership : {}

EmailAddresses : {SMTP:aTestGroup416-MigratedByScript@domain.com}

HiddenFromAddressListsEnabled : True

EmailAddressPolicyEnabled : False

PrimarySmtpAddress : aTestGroup416-MigratedByScript@domain.com

WindowsEmailAddress : aTestGroup416-MigratedByScript@domain.com


This change is specific to environments that already have a custom routing domain defined for cross-premises mail flow in a hybrid environment. If you do not have a customized configuration the defaults should be utilized. In environments that have run the updated hybrid configuration wizard and have a custom routing domain the default routing domain of mail.tenantName.onmicrosoft.com should be on the appropriate send connector allow you to utilize defaults.

Office 365 – Distribution List Migrations Version 2.0 – Part 31

Enabling support for interactive credentials and single list migrations…

In previous version of the Distribution List Migration 2.0 module the ability to use interactive credentials that required MFA or other approvals was not available to administrators. The module always took credentials provided on the command line and attempted non-interactive authentication. If MFA or another provider intercepted this authentication the migration could not be performed. This often required administrators to either temporarily bypass MFA, use an account that did not require MFA, or utilize certificate based authentication for Exchange Online.


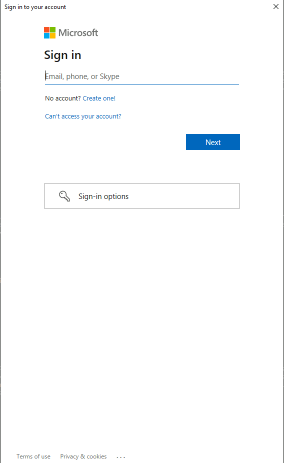
In version 2.9.6.6 the need to specify credentials on a single distribution list migration command has been made optional for cloud services. Credentials for Azure Active Directory Connect, Active Directory controllers, and Exchange on-premises installations are still required to be specified on the command line. When a distribution list migration occurs, and credentials are not specified on the command line the interactive authentication dialog is generated on the initial connection to Exchange Online.


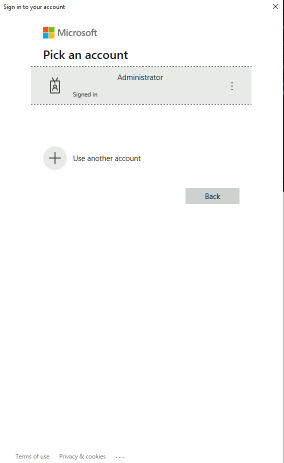
At the completion of the initial interactive logon the administrator is prompted again to log into Azure Active Directory. At this time the interactive logon should display the account already signed in and the administrator should be able to select this account.


This will complete the interactive authentication flow and allow the migration to complete.


Will interactive authentication be supported with multiple distribution list migrations? No – at this time this will not be supported. In order to do multiple distribution list migrations Powershell jobs are utilized. When jobs are provisioned, they are provisioned without interaction. Customers leveraging multiple machine or list migrations will need to use specified credentials or certificate authentication.


It is my desire that this change will allow more administrators to test the functionality of the module without the need to request authorization to bypass conditional access.

Office 365: Directory synced mail users, guest accounts, and validation errors…

In Azure Active Directory administrators have the ability to create accounts in two types. They can create user accounts that are members or guests. Typically when I am speaking with customers regarding guest accounts it is usually in the context of B2B invited guest accounts created directly in Office 365 or Azure Active Directory.


Guest accounts also serve a purpose in regard to conditional access. Administrators may configure conditional access policies to only require certain conditions be applied to accessing our cloud services when the user type is a guest. For example administrators may want to force MFA to be applied to guest and external accounts but not in other conditions. (Require MFA for guest users with Conditional Access – Azure Active Directory – Microsoft Entra | Microsoft Learn)


Guest accounts are no just limited to accounts created in our cloud services. Azure Active Directory Connect has the ability to provision the user type for synced accounts. In a default implementation the user type for all synchronized accounts to Azure Active Directory is Member. There could be certain circumstances where you would like a population of your synchronized accounts to appear as guests in Azure AD. This may be to simply filter out those users who might not have a direct relationship to your organization or for the purposes of applying different conditional access policies to synchronized accounts.


The implementation of guest accounts for synchronized objects require the implementation of custom synchronization rules. The rules modify the Azure AD attribute userType and submits the value Guest. This results in a guest user object being provisioned in Azure AD. The following article describes some scenarios and rule examples for creating guest accounts. (Azure AD Connect sync: Make a change to the default configuration – Microsoft Entra | Microsoft Learn)


I recently worked on an escalation with a customer where they were leveraging rules to provision guest accounts in Azure. What we were observing is that after the guest accounts were provisioned a validation error would result in the objects in Azure AD. This would essentially imply that there was a failure on the account where other services may have issues provisioning or using that account. Let’s examine a demonstration of this issue and how we resolved it.


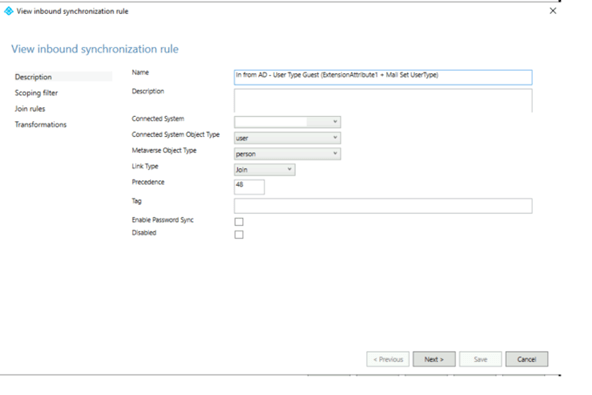
In Azure Active Directory Connect a new rule was created to provision the accounts user type. The rule was given a name that made sense and outlined what the rule should accomplish. I also retained the cloned rules name so that it was apparent what the basis of the rule is for. (I highlight this not because it is required but after supporting many of these installations and attempting to reverse engineer what others were trying to accomplish the little things can be really helpful). The basis for this rule was the disabled rule In from AD – User Type.


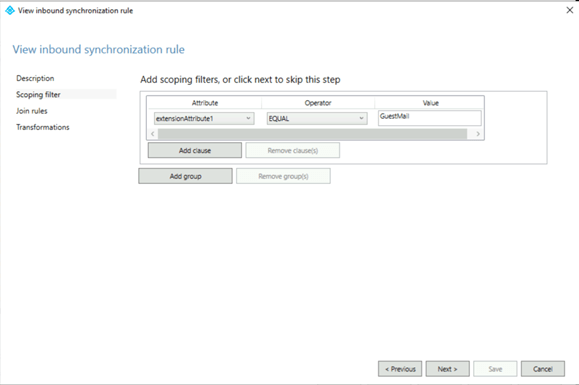
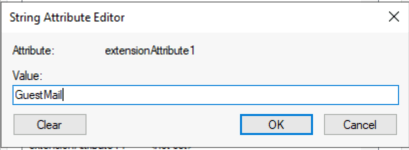
The scoping filter is where we defined the objects where the rule should apply. In this instance we used an attribute that was already defined in the Azure AD Connect schema extensionAttribute1. If you use a custom attribute or an attribute that is not included in the default attribute sync set you may need to alter the attributes imported on the Active Directory connector. In this instance if extensionAttribute1 = GuestMail the user will be included in this rule.


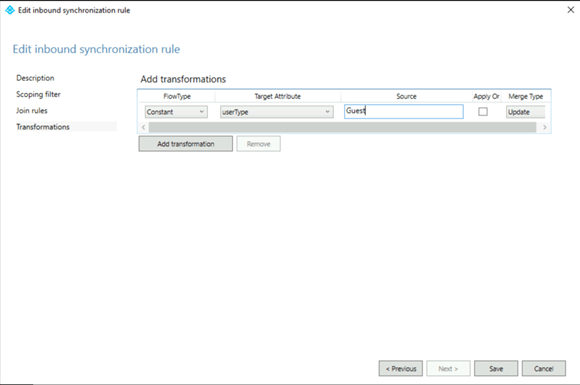
The join rules will remain unmodified. The final settings are to define what attributes will be transformed. On the transformation tab we will statically define the attribute UserType with the value Guest.


In the customers environment accounts were being provisioned in the following manner.

  • The account is created in the local active directory.
  • The accounts have a valid user principal name registered in the Office 365 tenant.
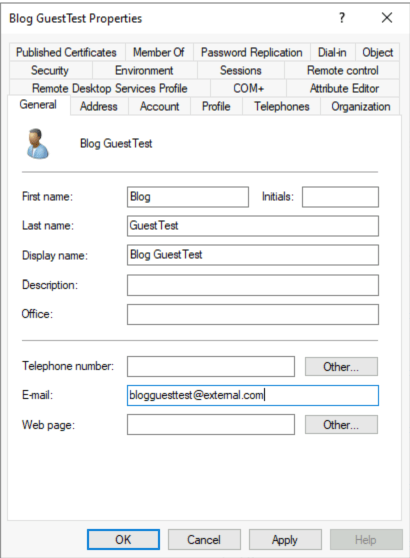
  • The mail address of the object was the users external email address.
  • The necessary attributes to provision the account as a guest were set.


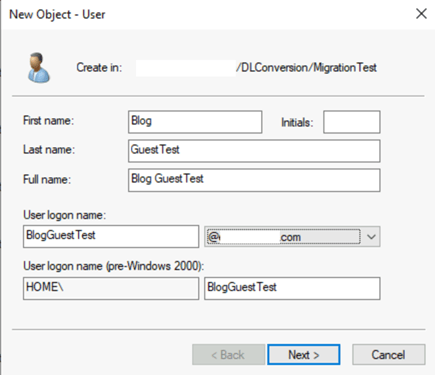
In this demonstration the user account is created in the same manner with extensionAttribute1 set to “GuestMail”.


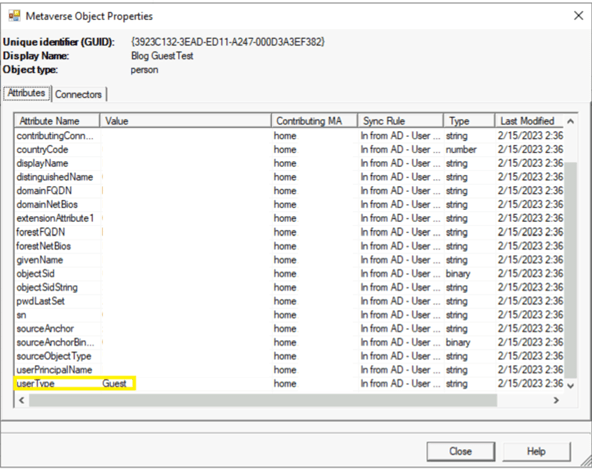
To validate the successful application of this rule a metaverse search in the Azure AD Connect Synchronization Manager can be performed. The search demonstrates the calculated attributes and shows that user type is set to Guest.


At the completion of the synchronization cycle and subsequent export the user will be created in Azure AD. Using get-AzureADUser the attributes for this object can be reviewed.


Get-AzureADUser -SearchString BlogGuestTest | fl objectType,DirSyncEnabled,DisplayName,Mail,MailNickName,ProxyAddresses,UserPrincipalName

ObjectType : User

DirSyncEnabled : True

DisplayName : Blog GuestTest

Mail : blogguesttest@external.com

MailNickName : blogguesttest

ProxyAddresses : {SMTP:blogguesttest@external.com}

UserPrincipalName : BlogGuestTest@registeredDomain.com

UserType : Guest


The outcome is as expected, and a synchronized guest account is now present in Azure AD. The Azure AD object is not the only object that is provisioned as a result of this synchronization. When a guest account is created in Azure AD and the email address is not a registered accepted domain in Exchange Online the Exchange Online provisioning process provisions a guest mail user object. The guest mail user has an external email address set to match the mail attribute synchronized from Azure AD and will appear in the global address list by default. Using get-Recipient in the Exchange Online Management PowerShell the attributes of this object can be reviewed.


PS C:\> Get-Recipient blogguesttest | fl DisplayName,Alias,PrimarySMTPAddress,EmailAddresses,RecipientType,RecipientTypeDetails

DisplayName : Blog GuestTest

Alias : blogguesttest

PrimarySmtpAddress : blogguesttest@external.com

EmailAddresses : {SMTP:blogguesttest@external.com}

RecipientType : MailUser

RecipientTypeDetails : GuestMailUser


It is common in Azure AD Connect installations with Exchange Online to enable a feature called Exchange Hybrid Deployment. When this feature is enabled certain attributes from Exchange Online are written back to Active Directory. This feature is not required when migrating to Exchange Online or co-existing in an Exchange On-Premises to Exchange Online deployment but is most commonly enabled in these scenarios. It is the enablement of this feature combined with synchronizing guest accounts that have external email addresses that ultimately leads to the validation failures. Let’s observe why this happens.


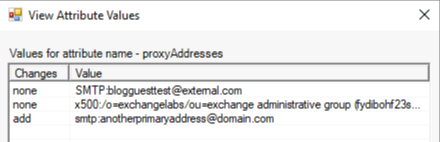
With Exchange Hybrid Deployment enabled in Azure AD Connect one of the attributes written back is the proxyAddresses attribute. When an object is provisioned in Exchange Online an attribute cloudLegacyExchangeDN is written to Azure AD. The hybrid rules take this value from Azure AD and append X500: to it. This combined value is then written to the proxyAddresses attribute in Active Directory. This is where our issue begins. When the user was provisioned the proxyAddresses attribute in Active Directory was NULL. Now this attribute has a value stamped in it.


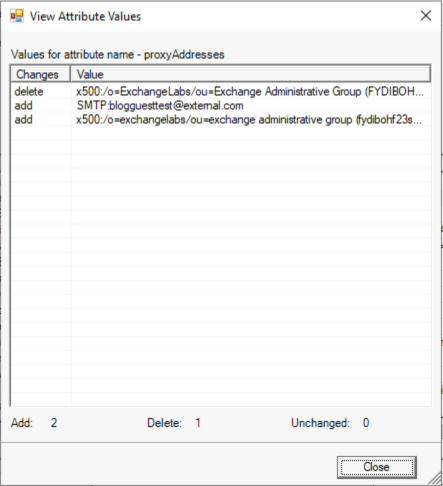
When attribute are written back through Azure AD Connect the next import cycle re-imports these values. With a fully mail enabled object that already has proxy addresses this causes the X500 address to be added to the values already present and the newly updated proxy addresses attribute written to Azure AD. In this example proxy addresses were originally NULL and now has a value. This results in the importation of only the X500 address and then the X500 address written to Azure AD. This is a sample from the export operation in the synchronization manager.


Using get-AzureADUser and reviewing the users properties demonstrates the results of this change.


PS C:\> Get-AzureADUser -SearchString BlogGuestTest | fl objectType,DirSyncEnabled,DisplayName,Mail,MailNickName,ProxyAddresses,UserPrincipalName,UserType

ObjectType : User

DirSyncEnabled : True

DisplayName : Blog GuestTest

Mail :

MailNickName : blogguesttest

ProxyAddresses : {x500:/o=ExchangeLabs/ou=Exchange Administrative Group

(FYDIBOHF23SPDLT)/cn=Recipients/cn=7997929e49124a90b9c061b619c58fd8-53a5ba8b-2e}

UserPrincipalName : BlogGuestTest@registeredDomain.com

UserType : Guest


The proxy addresses of the user object have changed from the SMTP address previously determined by mail to only the X500 address written back to the Active Directory. Technically this is by design as the Active Directory is the source of authority for this attribute when the object is directory synchronized.


The object will now appear in the portal with a validation failure. Using get-AzureADUser the provisioning error is now present on the object.


ProvisioningErrors : {class ProvisioningError {

ErrorDetail: <ServiceInstance Name=”exchange/NAMPRD04-001-01″

xmlns=”http://schemas.microsoft.com/online/error/2010/07″&gt;

<ObjectErrors>

<ErrorRecord>

<ErrorCode>ExFD1C0C</ErrorCode>

<ErrorParameters>

<ErrorParameter>53a5ba8b-2e31-450b-a5cc-5adbbe393a2d</ErrorParameter>

</ErrorParameters>


<ErrorDescription>The mailbox 53a5ba8b-2e31-450b-a5cc-5adbbe393a2d doesn’t have

a SMTP e-mail address.</ErrorDescription>

</ErrorRecord>

</ObjectErrors>

<LinkErrors />

</ServiceInstance>

Resolved: false

Service: exchange

Timestamp: 2/15/2023 3:44:19 PM

}

}


In this instance the error text displayed is exactly what the issue is. The object as synchronized from the Active Directory does not have an SMTP address. The error is essentially expected in this configuration.


What are the options to clear the validation failure?


The first option is to evaluate the need to keep the feature Exchange Hybrid Deployment enabled in Azure AD Connect. This feature is what triggers the issue to occur. If this feature was not enabled proxy addresses would not be written to the Active Directory and subsequently imported into Azure Active Directory overwriting the calculated values between Azure AD and Exchange Online. You will want to carefully consider this as a solution as it could have impacts if mail flow is still processed through the Exchange on-premises installation or if you intend to have the ability to migrate mailboxes back to the Exchange On-Premises installation. This will also not fix objects that are in this state as the proxy addresses attribute has already been stamped and processed in the metaverse.


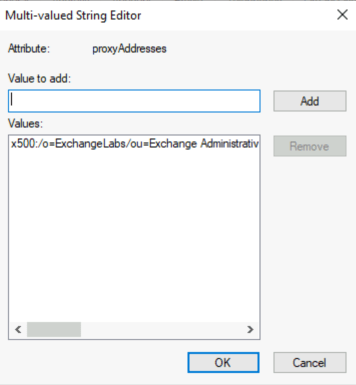
The second option is to provision the objects with the proxy addresses stamped. This can be used to prevent the issue from occurring as well as to rectify the issue once it occurs. To fix this issue the administrator would manually stamp SMTP:MAIL where mail is the Active Directory mail field. In our example the proxy addresses attribute would have the added address SMTP:blogguesttest@external.com added. When this is added to the proxy addresses field it will be submitted to Azure AD and the validation error will eventually clear now that the object has a defined proxy address. This may require manual administrator intervention or a change in the user provisioning process in Active Directory. In addition it requires that the Exchange on-premises schema be present in Active Directory. The proxyAddresses field is added by the Exchange on-premises schema updates.


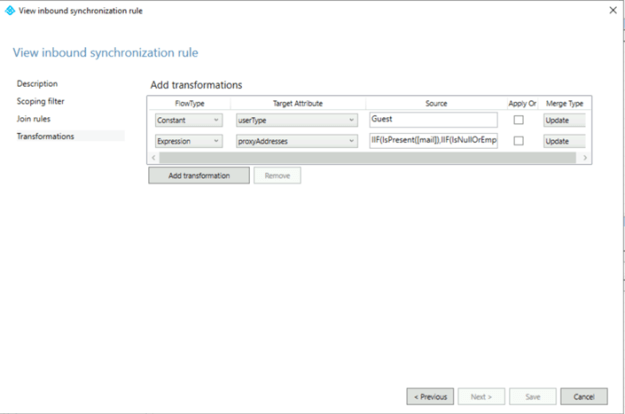
The last option is more complicated and requires the addition of an additional transformation to the guest rule in Azure AD Connect. This transformation calculates the proxy addresses for the administrator when the user is evaluated and synced by Azure AD Connect. Here is a sample of the updated rule.


This is the source rule crafted to correct this issue.


IIF(IsPresent([mail]),IIF(IsNullOrEmpty([proxyAddresses]),NULL,RemoveDuplicates(Split(“SMTP:” & LCase([mail]) & “,” & LCase(Join([proxyAddresses],”,”)), “,”))) ,NULL)


The rule sets out to do the following:

  1. Operate if the mail attribute is present.
  2. Take the mail attribute for the user and convert it to a primary SMTP address by adding SMTP: to the value.
  3. Take any existing proxy addresses that exist on the object, convert them to lower case, and join them to the calculated mail value.
    1. This ensures that none of the existing addresses can be accidentally interpreted as an additional primary proxy address.
  4. Write the entire calculated mult-valued attribute to the proxy addresses field in Azure AD.


The rule syntax is structured as follows:

  • If the mail field on the object is present:
    • Value True
      • If the proxy addresses field is null or empty
        • Value False
          • Make the mail field lower case.
          • Add SMTP: to the mail filed.
          • Join all addresses in the proxy addresses field with “,”
          • Take all addresses field and make the lower case.
          • Split the concatenated strings of addresses by the delimiter “,”. This creates a multi valued attribute.
          • Remove all duplicates from the list.
        • Value True
          • Do nothing / NULL
    • Value False
      • No nothing / NULL


This rule structure automatically populates the proxy addresses field without administrator intervention beyond updating the rule. It also ensures that addresses that were written back are included in the proxy addresses submitted as well as any manually set proxy addresses that may exist in the proxy addresses attribute.


Here is an example of this rules application after the transformation has been updated.


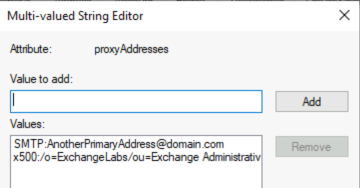
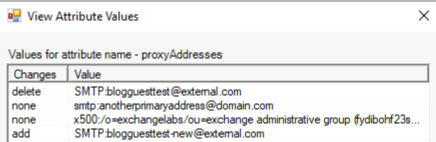
If the administrator adds an additional proxy address as primary to the proxyAddresses attribute transformation application adds the address as a secondary proxyAddress.


If the administrator changes the mail address to a new external address the proxyAddress transformation coverts the primary SMTP address for the object. Note: It does not retain the original external email address as a proxy address as that would not typically occur on a mail user object.


Implementation of these options should allow the seamless provisioning of guest accounts in Azure AD from a synchronized Active Directory account where the mail field is set to an external address.

Office 365: Get-DistributionGroup and determining recipient privileges…

Distribution groups have a variety of settings on them that allow administrators to control use and privileges. Administrators may choose to restrict who can send to a distribution list by altering the accept messages from senders or members property, enable moderation and bypass moderation rights, or reject messages from individual senders or members to a group.


When using the get-distributionGroup commandlet to interrogate these settings a list of recipients that have been granted the rights or privileges is returned.


PS C:\> Get-DistributionGroup zCloudonlySendAsSecurity9 | fl *accept*

AcceptMessagesOnlyFrom : {Tim McMichael}

AcceptMessagesOnlyFromDLMembers : {}

AcceptMessagesOnlyFromSendersOrMembers : {Tim McMichael}


The list of recipients that is returned shows the names of individual assigned those rights. These names are not fully recipient objects in that it does not identify the specific recipient assigned the rights. Using the get-Recipient command “Tim McMichael” demonstrates that two recipients are returned.


PS C:\> Get-Recipient “Tim McMichael”


Name RecipientType

—- ————-

Tim McMichael MailUser

8c6f3197-070d-4785-af94-8f091a1f510e MailUser


How do we determine which object has been assigned the rights if the output appears ambiguous? The name listed here is the actual name property of the recipient object. If more than one object is returned, we can simply filter on the exact name and determine the exact recipient object the rights are applied to.


PS C:\> Get-Recipient -Filter {name -eq “Tim McMichael”}


Name RecipientType

—- ————-

Tim McMichael MailUser


With the recent changes in the provisioning process this will become less ambiguous with time. The new provisioning logic defaults the name field to the external directory object ID associated with the recipient. The external directory object ID is unique and specific to that recipient. This is an example where external directory object ID is now present.


PS C:\> Get-DistributionGroup zCloudonlySendAsSecurity9 | fl *accept*


AcceptMessagesOnlyFrom : {8c6f3197-070d-4785-af94-8f091a1f510e, Tim McMichael}

AcceptMessagesOnlyFromDLMembers : {}

AcceptMessagesOnlyFromSendersOrMembers : {8c6f3197-070d-4785-af94-8f091a1f510e, Tim McMichael}


With the external directory object ID it becomes unnecessary to utilize a filter as the recipient return is guaranteed to be unique.


PS C:\> Get-Recipient 8c6f3197-070d-4785-af94-8f091a1f510e


Name RecipientType

—- ————-

8c6f3197-070d-4785-af94-8f091a1f510e MailUser


When using command that return multiple objects filterable properties will assist in identifying the correct recipient.

Office 365 – Distribution List Migration Version 2.0 – Part 30

Converting a cloud only distribution list to an Office 365 Unified Group

Office 365 administrators have the ability to create distribution lists directly in Office 365. As the service evolves and service adoption continues administrators may desire to preserve the groups they have created in Office 365 directly but covert them to the new Office 365 Unified Group experience.


In Exchange Online administrators had the ability to process a conversion of a cloud only distribution list to a modern Office 365 Unified Group. This feature is documented at the following location:


Upgrade distribution lists to Microsoft 365 Groups in Exchange Online – Microsoft 365 admin | Microsoft Learn


This feature is being deprecated and will no longer be available within Office 365. The ability to convert cloud only distribution lists to Office 365 Unified Groups is now available in the DLConversionV2 migration module. Administrators now have access to the command convert-Office365DLToUnifiedGroup.


The conversion command captures the settings of the Office 365 distribution list and uses them as the basis for deleting and recreating the group as an Office 365 Unified Group. There are some pre-requisites that must be met before a distribution list can be converted. These include:

  • The group cannot have any rights on itself or other groups that require a security principle. For example, the group may not have full mailbox access rights, send as rights, mailbox folder permissions, or group manager rights on itself or any other object.
  • The group must have at least one manager but no more than 100 managers.
  • All managers must be members of the group.
  • The group may not contain any mail enabled groups or contacts. Only mailbox and mail user objects are supported for membership.
  • The group being migrated may not be a room distribution list type.
  • The group being migrated may not have any bypassModerationFromSendersOrMembers properties specified on-premises as this attribute is not supported on Office 365 Unified Groups.


To perform a group conversion, use the following command:

Convert-Office365DLtoUnifiedGroup -groupSMTPAddress address@domain.com -exchangeOnlineCredential $cred -azureADCredential $cred -logFolderPath c:\temp -overrideSecurityGroupCheck:$TRUE -addManagersAsMembers:$TRUE


The command also supports the utilization of data precollection commands for permissions evaluation. If you encounter any issues with this new feature please open an issue on GitHub or contact me at dlconversionV2@service.microsoft.com.