Category Archives: Uncategorized

Office 365: Users have both a cloud and on premises mailbox.

In Office 365 our provisioning logic generally prevents the existence of a mailbox on premises and in the service.  You can imagine the confusion of cloud messages delivering to a mailbox in the cloud and on premises messages delivering to a mailbox on premises.


When a mailbox is provisioned on premises the azure active directory synchronization process is responsible for synchronizing the attributes into Azure AD and Office 365.  One of the attributes synchronized from on premises to Azure AD is the ExchangeGUID.  Here is an example of a test account on premises.


[PS] D:>Get-Recipient RecipientTest | fl name,recipienttype,exchangeGuid

Name          : Recipient Test
RecipientType : UserMailbox
ExchangeGuid  : f20047a9-3fd1-4906-8d98-188feacdd5b7


When AAD Connect has completed a synchronization cycle the same can be verified on the mail user object created in the service.  Any on premises mailbox should be represented by a mail user object within the service.


PS C:> Get-Recipient RecipientTest | fl name,recipienttype,exchangeguid,skuAssigned

Name          : Recipient Test
RecipientType : MailUser
ExchangeGuid  : f20047a9-3fd1-4906-8d98-188feacdd5b7

SKUAssigned   :


In most cases the mail user object is originally unlicensed.  The presence of the immutableID value demonstrates a link to an on premises active directory account.


PS C:> Get-MsolUser -UserPrincipalName recipienttest@domain.com | fl displayName,userprincipalname,immutablid,isLicensed,Licenses

DisplayName       : Recipient Test
UserPrincipalName : RecipientTest@domain.com
ImmutableId       : XSLPV65jKEqTyWafMqX8LA==
IsLicensed        : False
Licenses          : {}


In this example we will assign an Exchange Online license via the portal.


image


The license assignment can be validated with get-MSOLUser.


PS C:> Get-MsolUser -UserPrincipalName recipienttest@DOMAIN.com | fl displayName,userprincipalname,immutablid,isLicensed,Licenses


DisplayName       : Recipient Test
UserPrincipalName : RecipientTest@domain.com
ImmutableId       : XSLPV65jKEqTyWafMqX8LA==
IsLicensed        : True
Licenses          : {ORGANIZATION:STANDARDWOFFPACK}


The replication of the license status can be validated with get-recipient and reviewing the skuAssigned.  In this case the object continues to be retained as a mail user with a SKUAssigned.


PS C:> Get-Recipient RecipientTest | fl name,recipienttype,exchangeguid,skuAssigned

Name          : Recipient Test
RecipientType : MailUser
ExchangeGuid  : f20047a9-3fd1-4906-8d98-188feacdd5b7
SKUAssigned   : True


The presence of the ExchangeGUID and license has signified to the provisioning process that a mailbox object should not be provisioned.  This test has concluded as expected.


If the presence of an ExchangeGUID + a license signifies that no mailbox should be provisioned how is it possible that a mailbox could be provisioned in both locations?  Let us take a look at an example presented by a customer I recently worked with…


In this instance I have created a CLOUD ONLY account.  The account has been provisioned with a UPN that matches an on premises UPN suffix and no licenses.


PS C:> Get-MsolUser -UserPrincipalName testDuplicate@DOMAIN.com | fl displayName,userPrincipalName,isLicensed,Licenses

DisplayName       : Test Duplicate
UserPrincipalName : TestDuplicate@DOMAIN.com
IsLicensed        : False
Licenses          : {}


When a license is assigned via the portal that contains an Exchange Online option – mailbox object would be provisioned in Exchange Online.  This is the expected behavior – no ExchangeGUID is replicated from on premises.  In addition the immutableID is not populated demonstrating no link to an on premises AD account (therefore a cloud only account).


PS C:> Get-MsolUser -UserPrincipalName testDuplicate@domain.com | fl displayName,userPrincipalName,immutableID,isLicensed,Licenses

DisplayName       : Test Duplicate
UserPrincipalName : TestDuplicate@domain.com
ImmutableId       :
IsLicensed        : True
Licenses          : {ORGANIZATION:STANDARDWOFFPACK}


PS C:> Get-Recipient TestDuplicate | fl name,recipienttype,exchangeguid,skuAssigned

Name          : TestDuplicate
RecipientType : UserMailbox
ExchangeGuid  : 9e58304a-ed80-416a-8eac-f2e769056e52
SKUAssigned   : True


At this point everything looks to be working as expected.  Here is where the issue could come into existence.  The customer I worked with was testing Office 365.  In this instance they took and intentionally mirrored some key on premises accounts prior to having directory synchronization enabled in their tenant.  That is to say that the customer created cloud only accounts for testing that utilized the same on premises user principal name and same proxy addresses as accounts on premises.  Using our example this is the on premises account representation.


[PS] D:>Get-Recipient TestDuplicate | fl name,recipienttype,exchangeGuid

Name          : Test Duplicate
RecipientType : UserMailbox
ExchangeGuid  : 064e1a94-3199-49a7-9cb3-3ce3412424d6


In this example you will note that the ExchangeGUID of the mailbox on premises does not match the ExchangeGUID of the account within the service.  This is to be expected since there is no directory sync relationship


At this time the customer has decided to enabled directory synchronization on the accounts.  In preparation for this the licenses on the accounts were removed.


PS C:> Get-MsolUser -UserPrincipalName testDuplicate@domain.com | fl displayName,userPrincipalName,immutableID,
isLicensed,Licenses

DisplayName       : Test Duplicate
UserPrincipalName : TestDuplicate@domain.com
ImmutableId       :
IsLicensed        : False
Licenses          : {}


The license change replicates into Exchange Online resulting in the associated mailbox no longer being valid.


PS C:> Get-Recipient TestDuplicate | fl name,recipienttype,exchangeguid,skuAssigned
The operation couldn’t be performed because object ‘TestDuplicate’ couldn’t be found on
‘CO1PR06A002DC01.NAMPR06A002.prod.outlook.com’.
    + CategoryInfo          : NotSpecified: (:) [Get-Recipient], ManagementObjectNotFoundException
    + FullyQualifiedErrorId : [Server=BY1PR0601MB1402,RequestId=5faf2d1c-dc9a-4fd7-8395-db766ca0cf0b,TimeStamp=9/10/20
   17 3:53:46 PM] [FailureCategory=Cmdlet-ManagementObjectNotFoundException] 10E01848,Microsoft.Exchange.Management.R
  ecipientTasks.GetRecipient
    + PSComputerName        : ps.outlook.com


It was at this time that a very important and often overlooked attribute was set.  Although the license was removed rendering the Exchange Online mailbox inaccessible the users representation within the Exchange Online Active Directory was not removed.  This can be seen with the get-user command.


PS C:> Get-User TestDuplicate

Name          RecipientType
—-          ————-
TestDuplicate User


An attribute of the user object within the Exchange Online Active Directory is the previous recipient type.  In this case the license removal resulted in this attribute being populated as user mailbox – as the previous recipient type for the linked account was mailbox.


PS C:> Get-User TestDuplicate | fl name,recipienttype,previousrecipienttypedetails

Name                         : TestDuplicate
RecipientType                : User
PreviousRecipientTypeDetails : UserMailbox


Prior to the existence of previous recipient type details the provisioning process, when handling license additions and removals, would attempt to guess at what the previous recipient type was.  This could lead to mailbox reconnect issues, wrong object provisioning, and other miscellaneous issues when provisioning accounts after license removal and addition.  The previous recipient type details no exists to track the status of the recipient in Exchange Online.  Administrators do not have access to modify the previous recipient display type.


In our case the administrator is now proceeding with the process of soft matching cloud only accounts to accounts that exist on premises.   The following is after a directory sync cycle where soft matching occurred.  We can now verify that the immutableID field is stamped indicating the account is linked to an on premises active directory account.


PS C:> Get-MsolUser -UserPrincipalName testDuplicate@domain.com | fl displayName,userPrincipalName,immutableID,isLicensed,Licenses

DisplayName       : Test Duplicate
UserPrincipalName : TestDuplicate@domain.com
ImmutableId       : YcQouGWUS0Ww3XyDegtu6g==
IsLicensed        : False
Licenses          : {}


With the directory synchronization cycle completed the administrator then assigned licenses to the accounts. 


PS C:> Get-MsolUser -UserPrincipalName testDuplicate@domain.com | fl displayName,userPrincipalName,immutableID,
isLicensed,Licenses

DisplayName       : Test Duplicate
UserPrincipalName : TestDuplicate@domain.com
ImmutableId       : YcQouGWUS0Ww3XyDegtu6g==
IsLicensed        : True
Licenses          : {ORGANIZATION:STANDARDWOFFPACK}


When the license status replicates to Exchange Online an appropriate recipient object will be provisioned.


PS C:> Get-Mailbox TestDuplicate | fl name,recipientType,exchangeGUID,skuAssigned

Name          : Test Duplicate
RecipientType : UserMailbox
ExchangeGuid  : 17d89853-ec3e-4bb3-9bf8-a7d022818fb0
SKUAssigned   : True


In this example a recipientType of user mailbox has been provisioned.  This is NOT the expected recipient type.  In this example we should have expected a mail user object to be created.  Why did this occur?  Although the on prmises ExchnageGUID is populated and replicated by directory synchronization the users previous recipient type was user mailbox.  The provisioning process ignores the presence of the replicated ExchangeGUID and creates in this instance a new blank mailbox for the user within Exchange Online since the previous recipient display is stamped.


ExchangeGuid  CLOUD : 17d89853-ec3e-4bb3-9bf8-a7d022818fb0

ExchangeGuid  ON PREMISES : 064e1a94-3199-49a7-9cb3-3ce3412424d6


If the licenses is removed from the account the object reverts to a mail user object with the matching Exchange GUID on premises.


PS C:> Get-Recipient TestDuplicate | fl name,recipienttype,exchangeguid,skuAssigned

Name          : Test Duplicate
RecipientType : MailUser
ExchangeGuid  : 064e1a94-3199-49a7-9cb3-3ce3412424d6

SKUAssigned   : False


ExchangeGuid  CLOUD : 064e1a94-3199-49a7-9cb3-3ce3412424d6

ExchangeGuid  ON PREMISES : 064e1a94-3199-49a7-9cb3-3ce3412424d6


The combination of previous recipient display type as user mailbox and a license triggers the mailbox provisioning process even if ExchangeGUID is stamped.  This can lead to a condition where an on premises mailbox and Exchange Online mailbox exist at the same time.
Handling Migrations – StalledDueToTarget_MdbFull or TargetDatabaseFullPermanentException

When an administrator provisions a migration batch to Office 365 and adds users, objects known as migration users are created, which you can view using Get-MigrationUser. When migration users and the corresponding move requests (Get-MoveRequest) are created an Exchange Online mailbox database is assigned to each mailbox that will be migrated.  Exchange Online uses an algorithm to review available databases within the service and subsequently select the best target database. Among other data points, one of the criteria considered in the algorithm is the amount of available free space the database file is allowed to consume.


Some customers have recently reported that during the mailbox finalization process, the mailbox move may stall with the following error: StalledDueToTarget_MDBFull or TargetDatabaseFullPermanentException.


Why does this stall occur?


As mailbox data is migrated into the database space within the database file. Exchange Online servers cap the size of mailbox database files to ensure that sufficient free space exists in the database to process mail and client transactions, and to prevent a single database file from consuming more disk space than expected.


StalledDueToTarget_MDBFull is our way of notifying the administrator that we have reached the threshold for the minimum free space remaining in the database, or that the database file has reached its maximum allowable size. 


TargetDatabaseFullPermanentException is similar in nature.  Often the move reports will include space information regarding the state of the target database.  Here is an example:


Message           : Target database GUID cannot be used:
                    Current database file size: 1464986501120
                    Current space available inside database: 1743781888
                    Allowed database growth percentage: 90
                    Maximum database file size limit: 1622722691784
                    Is database excluded from provisioning: ‘False’.


The service will allow a database to grow to 90% space utilization.  The reserve ensures that users already utilizing the database are safe and further database operations would not impact the stability of the service.  In this case 146498956501120 / 1622722691784 = 90.2% (therefore greater than the 90% limit imposed).


How does the administrator handle this scenario?


There are three options available for an administrator to deal with this scenario.


The first option is to do nothing.  Within Exchange Online, there are service processes that dynamically move mailboxes to redistribute load across multiple databases. Exchange Online is aware of pending migrations and in the background, redistributes mailboxes to allow the free space to decline below the stalled threshold.  When the free space has increased to a level that would safely allow for migrations to complete – the stall condition will be resolved, and the migration will complete. This could take several hours or days between when the stall is first encountered and when free space is below the threshold to allow for continued moves.


The second option that may help is to lower the amount of time between the initial synchronization of the mailbox and the finalization of the mailbox move.  In most customer engagements there were several days to weeks between the initial synchronization of the mailbox and when the administrator issued the finalization of the mailbox move.  The stall is then encountered in the incremental synchronization process that attempts to finalize the move and copy the remaining data.  When shortening the time between the initial synchronization and the finalization, you decrease the likelihood that the space has been consumed by other migration and client activity, thereby increasing the success rate of mailbox move finalizations. 


The third option is to delete and recreate the move.  In this case, all previously migrated data is deleted, and the migration starts over again.  This can be time-consuming and does not guarantee that you will not see this issue again should you have a longer delay between initial synchronization and finalization.

DNS Errors and Warnings in the Office 365 Portal


The Office 365 portal often offers information regarding the status and health of your services. 


The DNS checks are not performed on each administrator logon to the portal.  The checks are performed by our Azure DNS infrastructure determining the Source of Authority (SOA) records for the registered domains.  This will return the list of name servers responsible for hosting the domain.  You can utilize NSLookup to determine the same for your domain.


C:>nslookup
Default Server:  internalDNSServer.internal.contoso.com
Address:  10.10.1.10

> set type=soa
> contoso.com
Server:  internalDNSServer.internal.contoso.com
Address:  10.10.1.10

Non-authoritative answer:
contoso.com

        primary name server = ns29.domaincontrol.com
        responsible mail addr = dns.jomax.net
        serial  = 2017100901
        refresh = 28800 (8 hours)
        retry   = 7200 (2 hours)
        expire  = 604800 (7 days)
        default TTL = 600 (10 mins)

ns29.domaincontrol.com  internet address = 216.69.185.15
ns29.domaincontrol.com  AAAA IPv6 address = 2607:f208:206::f


In this example only a single SOA server is returned – ns29.domaincontrol.com.  When the list of SOA servers has been determined we will begin a DNS query against each of those servers.  The DNS library utilized for this operation allows for a 12 second timeout before the next server in the list is attempted.  If all servers fail and timeout – the DNS error will be reported in the portal.


Once a responding SOA server has been determined – the DNS query issued against the server is based off of the domain capabilities of the domain in Office 365.  With previous revisions of our management portal administrators could add a domain and select the capabilities.  For example, the domain contoso.org will only serve email – therefore that would be the only capability in the portal.  With the current portal when a domain is registered it is automatically registered for all services.  We do not provide a method to only enable or disable selected services at this time.  You can utilize the get-msolDomain command to view the capabilities associated with a given domain.


PS C:> Get-MsolDomain -DomainName contoso.org| fl

ExtensionData      : System.Runtime.Serialization.ExtensionDataObject
Authentication     : Managed
Capabilities       : Email, OfficeCommunicationsOnline, OrgIdAuthentication, Intune
IsDefault          : True
IsInitial          : False
Name               : contoso.org
RootDomain         :
Status             : Verified
VerificationMethod : DnsRecord


In this example we will query the SOA server for all records associated with all of the services provided.  If the capabilities were just EMAIL for example, we would only query for the email records necessary for the service.  Mobile device management and Skype for Business would not be queried even though the records are provided through the portal.


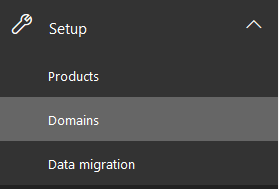
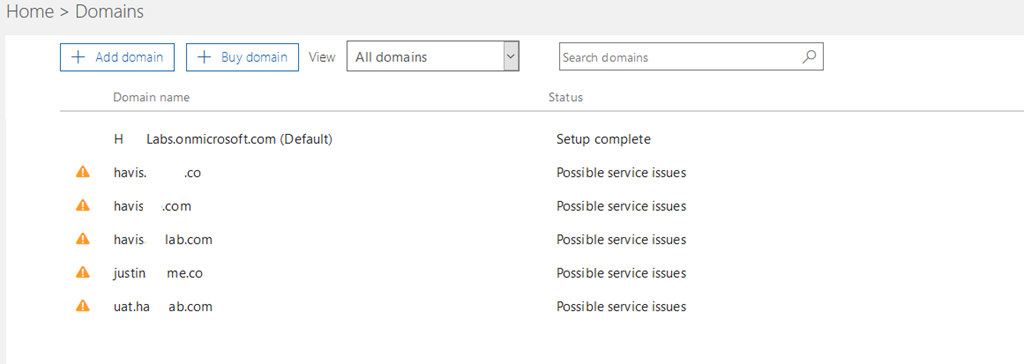
You can observe this health reporting by accessing setup –> Domains.


image


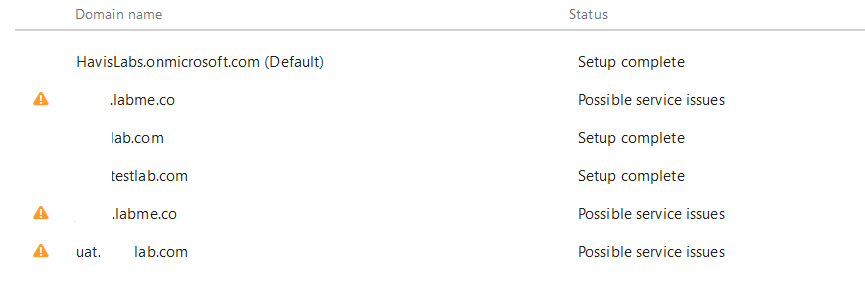
Your domains will be listed and domains that are currently flagged for issues display a warning symbol and are flagged for possible service issues.


image


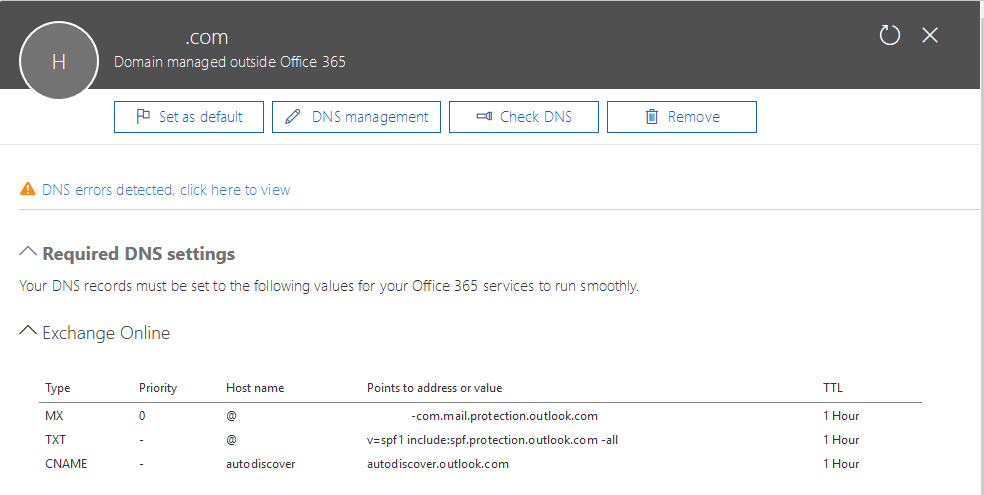
To review the individual issues identified the domain can selected in the previous screen.  The next screen displays the individual DNS associated with the domain selected.


image


With the DNS records displayed we can select DNS Errors detected, click here to view.


image


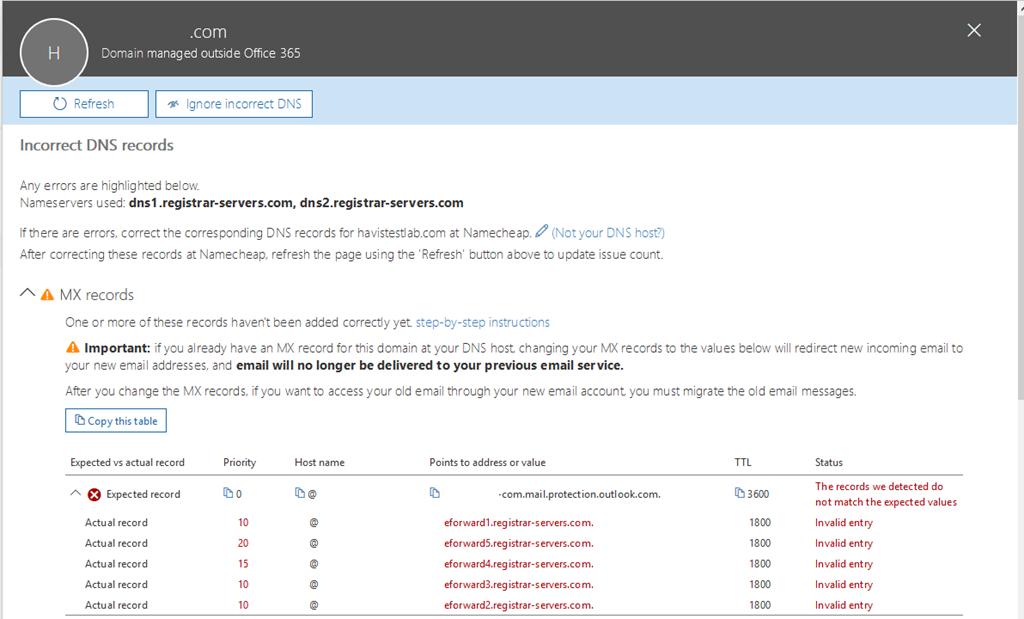
With this option selected we will see the individual DNS errors that were detected for the domain selected.  Here is a sample for the MX records.


image


In this example our health logic has queried DNS and determined that the MX record provisioned for your domain is not the MX record found in the DNS registrations. 


There are situations where this is perfectly acceptable.  The DNS health checking mechanism does not know the specifics of your installation and any customizations that may be present.  For example, it is not uncommon in a hybrid configuration to have your autodiscover record pointing to an on premises Exchange environment.  This would trigger a health check failure on the CNAME records as autodiscover does not point to the Office 365 service.  It is also not uncommon to have inbound mail flow for your MX record point to a solution other than Office 365 – for example a third party gateway device <or> an on premises email environment.  This would produce a DNS health check failure on the MX record similar to the errors seen above.


When the health check has found an error it is important that the records be manually reviewed and an understanding of any discrepancies explained.  If they are due to customizations the errors can be safely ignored.  If they are due to legitimate DNS errors it would be recommended to fix the discrepancies as soon as possible to prevent any forms of service outage.


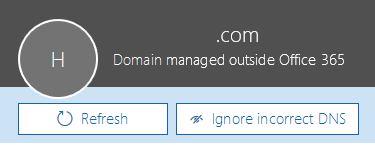
If you analysis has determined that the DNS errors are benign you can discontinue warning about them by selecting the ignore incorrect dns button.  This is found on the same page where the individual DNS record errors are displayed.


image


If the administrator has selected the ignore incorrect dns option the domain will no longer appear with a warning symbol on the domains page and the status will show setup complete verses possible service issues.


image


It is important to note that the ignore function is only good for the current administrator session.  DNS is evaluated on every administrator logon – therefore the DNS errors may appear on the next logon even if ignored.  This is a departure from previous versions of the portal where the ignore function would ignore DNS errors for up to 7 days before the status was reset and tested again.


If at a later time you decide you want to have DNS re-evaluated for any reason you can select the specific domain and utilize the CHECK DNS button to initiate a DNS health check.  This will issue an immediate re-evaluation of the DNS records associated with the domain. 


image


With an understanding of your DNS implementation and a review of the service issues identified administrators and make an accurate determination if the errors are safe to ignore or if actionable steps need to be taken.


What happens when I keep getting recurring errors but everything is established to my satisfaction?  Unfortunately the only remedy is to ignore the errors in the portal once an understanding of why the domain has been flagged has been established.

Configure Auto Reply for a Mailbox

Administrators can view and configure auto reply settings for an Exchange Online mailbox using the Set-MailboxAutoReplyConfiguration and Get-MailboxAutoReplyConfiguration PowerShell cmdlets.


Using Set-MailboxAutoReplyConfiguration, you can schedule an automated reply to start at a specific time.  For example, to create a scheduled auto reply that starts at 6:00 pm Eastern Daylight Time (EDT) on August 16 and ends at 6:00 pm EDT on August 17, I would run the following command: 


Set-MailboxAutoReplyConfiguration -Identity tmcmichael -AutoReplyState Scheduled -StartTime “18:00 8/16/2017” –EndTime “18:00 8/17/2017”


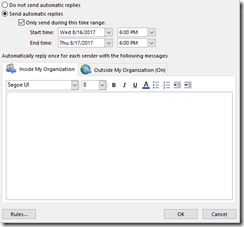
When the command has completed successfully, you can verify the settings in Outlook, as shown below. 


image


Interestingly, Outlook indicates a start and end time of 2:00 pm, not 18:00 (6:00 pm).  Get-MailboxAutoReplyConfiguration also shows 2:00 pm as the configured start/stop times.


PS C:> Get-MailboxAutoReplyConfiguration -Identity tmcmichael

RunspaceId                       : 1a9aa7f0-e144-4b66-b799-ef1bb329a4c5
AutoDeclineFutureRequestsWhenOOF : False
AutoReplyState                   : Scheduled
CreateOOFEvent                   : False
DeclineAllEventsForScheduledOOF  : False
DeclineEventsForScheduledOOF     : False
EventsToDeleteIDs                :
EndTime                          : 8/17/2017 2:00:00 PM
ExternalAudience                 : All
ExternalMessage                  :
InternalMessage                  :
DeclineMeetingMessage            :
OOFEventSubject                  :
StartTime                        : 8/16/2017 2:00:00 PM
MailboxOwnerId                   : Timothy McMichael
Identity                         : Timothy McMichael
IsValid                          : True
ObjectState                      : Unchanged


Both Outlook and the PowerShell output are correct. This is because Set-MailboxAutoReplyConfiguration uses the time zone on the Exchange server.  All Exchange Online servers use GMT for their time zone settings. 18:00 GMT is 14:00 EDT.


So how do I get the auto reply to start and stop at 6:00pm?  The easiest way is to simply convert the desired time to GMT.  In my example, the user is in EDT which is GMT-4.  Since I want to have the auto reply start and stop at 18:00 EDT, I add 4 hours to get the time in GMT (in this case, 22:00 GMT):


Set-MailboxAutoReplyConfiguration -Identity tmcmichael -AutoReplyState Scheduled -StartTime “22:00 8/16/2017” –EndTime “22:00 8/17/2017”


Outlook now shows 6:00pm: 


image


And so does Get-MailboxAutoReplyConfiguration: 


PS C:> Get-MailboxAutoReplyConfiguration -Identity tmcmichael

RunspaceId                       : 1a9aa7f0-e144-4b66-b799-ef1bb329a4c5
AutoDeclineFutureRequestsWhenOOF : False
AutoReplyState                   : Scheduled
CreateOOFEvent                   : False
DeclineAllEventsForScheduledOOF  : False
DeclineEventsForScheduledOOF     : False
EventsToDeleteIDs                :
EndTime                          : 8/17/2017 6:00:00 PM
ExternalAudience                 : All
ExternalMessage                  :
InternalMessage                  :
DeclineMeetingMessage            :
OOFEventSubject                  :
StartTime                        : 8/16/2017 6:00:00 PM
MailboxOwnerId                   : Timothy McMichael
Identity                         : Timothy McMichael
IsValid                          : True
ObjectState                      : Unchanged


One last note…Get-MailboxAutoReplyConfiguration will always show the time converted to the time zone of the machine used to run the command.  In this example, the management session was established from a machine in EDT, thereby displaying the time in EDT.  If the machine was in Mountain Standard Time (MST) the time would be converted to MST.

Office 365: Clutter Enabled and Outlook Web Access

As most administrators are aware the clutter feature of Office 365 has been automatically enabled within their tenants.  End users manage the clutter feature through Outlook Web Access.  For example – https://support.office.com/en-us/article/Turn-off-Clutter-in-Outlook-a9c72a77-1bc4-40e6-ba6d-103c1d1aba4c?ui=en-US&rs=en-US&ad=US


Recently a customer presented with a tenant where clutter was not automatically enabled for them.  The users were not recently migrated, had well over 1,000 items so initial usage patterns could be analyzed, yet reviewing get-clutter showed the option as disabled.


PS C:> Get-Clutter -Identity ALIAS

RunspaceId      : e1028943-b6dd-44b6-ae1e-36fc1f6aea67
IsEnabled       : False
MailboxIdentity : CN=Tim McMichael,OU=domain.onmicrosoft.com,OU=Microsoft Exchange Hosted
                  Organizations,DC=NAMPR06A002,DC=prod,DC=outlook,DC=com
Identity        :
IsValid         : True
ObjectState     : New


Initially we believed that an anomaly had occurred and that a tenant was missed in the enablement process.  When reviewing the situation further – we noted that Outlook Web Access was disabled on the users.


PS C:> Get-CASMailbox ALIAS | Fl name,OwaEnabled

Name       : Tim McMichael
OWAEnabled : FALSE


When Outlook Web Access is disabled – the end user has no ability to manage the clutter service.  OWA is the only interface to access the clutter settings of a mailbox by the end user.  If OWA is disabled at the time that clutter would have normally been automatically enabled we will not enable clutter.  If OWA is disabled after clutter has been enabled we will not disable clutter. 


With OWA access being blocked, and the user being prevented from managing this setting themselves, the decision was made to not automatically enable clutter in this scenario.

Exchange – No log files can be truncated.

In Exchange 2007 we introduced the ability to perform passive replica backups of an Exchange database.  In conjunction with this change we introduced a new method of determining when log files can be truncated.  Starting with Exchange 2007 log files are either truncated through the Information Store service or through the replication service.


The information store service method of log truncation handles databases that do not have passive copies.  This is true for all versions of Exchange never than Exchange 2007. 


The replication service method of log truncation handles databases that have passive copies.  This may be Cluster Continuous Replication in Exchange 2007 or Database Availability Groups in Exchange 2010 and Exchange 2013.  Some customers have reported that during backup operations log files do not truncate.  The reason for the lack of truncation may vary, but the following event is noted and often attributed to the log truncation failure.


Log Name:      Application
Source:        ESE
Date:          8/22/2015 12:08:14 AM
Event ID:      225
Task Category: ShadowCopy
Level:         Information
Keywords:      Classic
User:          N/A
Computer:      MBX-1.domain.com
Description:
Information Store – DAG-DB0 (1444) DAG-DB0: No log files can be truncated. 

For more information, click http://www.microsoft.com/contentredirect.asp.
Event Xml:
<Event xmlns="http://schemas.microsoft.com/win/2004/08/events/event">
  <System>
    <Provider Name="ESE" />
    <EventID Qualifiers="0">225</EventID>
    <Level>4</Level>
    <Task>16</Task>
    <Keywords>0x80000000000000</Keywords>
    <TimeCreated SystemTime="2015-08-22T04:08:14.000000000Z" />
    <EventRecordID>6500729</EventRecordID>
    <Channel>Application</Channel>
    <Computer>MBX-1.domain.com</Computer>
    <Security />
  </System>
  <EventData>
    <Data>Information Store – DAG-DB0</Data>
    <Data>1444</Data>
    <Data>DAG-DB0: </Data>
  </EventData>
</Event>


When a database has a passive copy and a backup is performed, a do not truncate flag is passed into the information store service.  This is by design since the information store processes no longer handle truncation.  This invokes the event ID 225 to be logged via the ESE / information store process indicating that no log files will be truncated.  When reviewing further events after the 225 the following event is logged:


Log Name:      Application
Source:        MSExchangeRepl
Date:          8/23/2015 12:05:15 AM
Event ID:      2046
Task Category: Exchange VSS Writer
Level:         Information
Keywords:      Classic
User:          N/A
Computer:      MBX-1.domain.com
Description:
The Microsoft Exchange Replication service VSS Writer instance 293bac52-7e3a-4600-8c21-784e6dc2d0c9 has successfully completed the backup of database 'DAG-DB0'. 

Database log truncation has been requested for this database. Log truncation will occur on the active copy after the next log generation is created. Log truncation will occur automatically on the passive copies after that log file is copied.
Event Xml:
<Event xmlns="http://schemas.microsoft.com/win/2004/08/events/event">
  <System>
    <Provider Name="MSExchangeRepl" />
    <EventID Qualifiers="16388">2046</EventID>
    <Level>4</Level>
    <Task>2</Task>
    <Keywords>0x80000000000000</Keywords>
    <TimeCreated SystemTime="2015-08-23T04:05:15.000000000Z" />
    <EventRecordID>6514781</EventRecordID>
    <Channel>Application</Channel>
    <Computer>MBX-1.domain.com</Computer>
    <Security />
  </System>
  <EventData>
    <Data>293bac52-7e3a-4600-8c21-784e6dc2d0c9</Data>
    <Data>DAG-DB0</Data>
  </EventData>
</Event>


This event comes from the replication service VSS writer and confirms that log truncation will occur if all pre-requisites are meant.


The ESE 225 event can be safely ignored and is not an indication of the potential success or failure of log truncation for replicated databases.

Office 365 / Exchange Online – Disable One Drive for Business Integration

Exchange Online has been extended to take advantage of One Drive for Business as a location to access or store email attachments.  Users of Outlook Web Access may notice that they have the ability to now attach files from One Drive for Business (ODFB) when composing a new message.


image 


image


In addition to the ability to attach files directly from ODFB when a user attaches a file from a local source, for example their laptop, and that attachment is over the allowable size limit the user may choose to store the attachment directly on ODFB. 


image


When the file has been successfully uploaded to ODFB the message recipient receives an email with a link to the file.


image 


There could arise a need for administrators to disable this functionality for any number of reasons.  It is important to remember that ODFB is derived from storage in SharePoint.  Administrators may disable ODFB integration not only in Exchange Online but also in other areas – for example the quick access items.  To disable ODFB the administrator must access the portal and select SharePoint administration.


image


This will take administrators to the SharePoint admin center.  The ODFB settings can be accessed by selecting the settings option.


image


In the settings option, “Top of Navigation Bar User Experience” is the “One Drive for Business” options.  By default the show option is selected.  To hide one drive as well as disable integration select the hide option. 


image


In the lower right hand corner is the OK option.  This commits the setting.


image


When the setting has been committed it can take several minutes for it to become hidden in the tenant.  The administrator can verify success by verifying that the one drive settings are no longer present when attaching a file or attempting to attach a file over the size limit.


image


image


It is important to note that when ODFB has been hidden – it is hidden from all areas within Office 365.  There are no options to de-integrate ODFB from Outlook Web Access while maintaining access to it from the quick access area or from within Office applications.

Exchange and Office 365: Mail Forwarding

Exchange Server and Office 365 offer many different options for forwarding messages to different recipients. Some of these options exist for users and others are for administrators. Administrators can also control how forwarding is handled within the organization.


The forwarding options available to clients and administrators are described below. Each of these methods has both pros and cons when implemented:


  • Users can create a forwarding rule within Outlook or Outlook Web App
  • An administrator can create a client rule for forwarding
  • An administrator can set the ForwardingSMTPAddress parameter on a mailbox
  • Users can set the ForwardingSMTPAddress parameter on a mailbox
  • An administrator can set the ForwardingAddress parameter on a mailbox


In this post, I’m going to review each of these methods, the pros and cons, and the administrator controls in place for these options.


Forwarding rule within Outlook and Outlook Web App:


Users can create Inbox rules in both Outlook and Outlook Web App (OWA). One of the options is a rule to forward messages to a different recipient, which can be an internal or external recipient. In the example below, a rule has been created that forwards all messages received in the mailbox to an external recipient.


image


Client-side rules allow a great deal of flexibility when establishing forwarding. For example, say you want to forward emails to another internal or external recipient based on who sent the messages. The rules wizard allows this level of granularity. From an administrative standpoint client-side rules can also be helpful since they can be managed by the user. This obviates the need for administrators to be involved in the day-to-day management of these rules.


Client-side rules though are not immediately obvious to administrators. This may cause issues in environments that want to control where their data is stored and how it is transmitted. No specific permissions are required for users to create rules and there exists no method to limit this type of rule. Messages received by the destination mailbox look like forwarded messages; they have the same presentation as if the end-user selected the forward option on the message and specified the recipient.


image


Message tracking also confirms that the sender is the mailbox with the forwarding rule enabled and the recipient is the address specified on the forwarding rule.


image 


This may cause issues in message handling, as subsequent replies would go to the mailbox the message was forwarded from rather than the original sender of the message.


When a message is forwarded by a client-side rule an additional header is added to the message: X-MS-Exchange-Organization-AutoForwarded. When the value of this header is set to TRUE this signifies the message was created by auto-forwarding.


Forwarding rule created by the administrator:


In Exchange 2010 and Exchange 2013, administrators have the New-InboxRule cmdlet, which allows them to create client-side rules within a mailbox. To create a forwarding rule that matches the previous rules wizard example you would run a command similar to the following:


PS C:> New-InboxRule -Name ForwardSharon -Mailbox 2148 -ForwardTo:SHARON@domain.com

Name                          Enabled                       Priority                      RuleIdentity
—-                          ——-                       ——–                      ————
ForwardSharon                 True                          1                             11219471045587107842


When using the Outlook client and viewing the rules in this mailbox, the administrator-created rule is present.


image


This rule has the same considerations and outcomes as a rule created by a user in Outlook; the only difference is that an administrator added it to the mailbox.


Forwarding using the forwardingSMTPAddress parameter of a mailbox created by the administrator:


Each mailbox has a parameter named forwardingSMTPAddress. This parameter is set by the administrator using Set-Mailbox. Any SMTP address can be specified in this parameter.


PS C:> Set-Mailbox 2148 -ForwardingSmtpAddress sharon@domain.com


PS C:> Get-Mailbox 2148 | fl name,forwardingSMTPAddress,delivertomailboxandforward

Name                       : Tim McMichael
ForwardingSmtpAddress      : smtp:sharon@domain.com
DeliverToMailboxAndForward : False


When this type of forwarding is used, the user has no control and the forwarding process must be administratively managed. In addition, there is no granularity with this implementation; all messages for the mailbox are forwarded to the specified SMTP address. Because the field allows any SMTP address to be specified there is no need to create a mail-enabled object within your directory to establish this type of forwarding.


Messaging handling is also different with this type of forwarding. When the message arrives in the destination mailbox it appears as if it was sent directly to this mailbox.  The TO field of the message reflects the original recipient, and the FROM field reflects the original sender. The message does not appear as forwarded. 


image


Message tracking shows that the sender of the message is the original sender and the recipient is the forwarding address.


image


This allows the recipient to reply to the message and have the message sent directly to the original sender. It is important to understand this behavior in scenarios where compliance or journaling is used, as subsequent replies will bypass the original organization thereby bypassing journaling and compliance processes.


The message header also has appended the X-MS-Exchange-Organization-AutoForwarded header. When the value of this header is set to TRUE, in indicates that the message was created by auto-forwarding.


Forwarding using the forwardingSMTPAddress parameter of a mailbox created by the user:


Individual users may set the forwardingSMTPAddress parameter by using Outlook Web Access.  When logged into Outlook Web Access access to this feature is available under options.


image


When the options menu is displayed selecting accounts –> forwarding will present the dialog to establish a forwarding address.  Note:  As the options pane may be subject to modification this setting may move to different areas within options.


image


In the forwarding dialog the user may select to enable forwarding and enter any SMTP address.


image


When reviewing the settings of the user via powershell we can observe that the forwardingSMTPAddress property is set. 


Get-Mailbox <ALIAS>| fl name,*forwarding*

Name                  : <NAME>
ForwardingAddress     :
ForwardingSmtpAddress : smtp:bob@contoso.com


The user setting the forwarding address has the same considerations and concerns as if the administrator had set the property.


Forwarding using the forwardingAddress parameter of a mailbox:


The forwardingAddress parameter of a mailbox is also managed by an administrator using Set-Mailbox. Unlike forwardingSMTPAddress, the forwarding address parameter must be an object that is defined within the directory. Attempting to set this value to an object not within the directory returns an error.


PS C:> Set-Mailbox 2148 -ForwardingAddress sharon@domain.com
Couldn't find object "sharon@domain.com". Please make sure that it was spelled correctly or specify a different
object.
    + CategoryInfo          : NotSpecified: (:) [Set-Mailbox], ManagementObjectNotFoundException
    + FullyQualifiedErrorId : [Server=BN1PR06MB101,RequestId=3374349c-1924-43b2-bb21-d2243774a1d4,TimeStamp=7/20/2014
   5:37:29 PM] [FailureCategory=Cmdlet-ManagementObjectNotFoundException] F2A1EE0E,Microsoft.Exchange.Management.Reci
  pientTasks.SetMailbox
    + PSComputerName        : pod51043psh.outlook.com


The forwarding address parameter can be another mailbox-enabled object, a mail-enabled user, or a mail contact.  In this example, I have created a mail contact for my external recipient. 


PS C:> New-MailContact -Name Sharon -ExternalEmailAddress sharon@domain.com

Name                      Alias                                          RecipientType
—-                      —–                                          ————-
Sharon                    Sharon                                         MailContact


I then enabled the forwardingAddress parameter on the mail contact.


PS C:> Set-Mailbox 2148 -ForwardingAddress Sharon


The setting was validated with Get-Mailbox.


PS C:> Get-Mailbox 2148 | fl name,forwardingAddress,delivertomailboxandforward

Name                       : Tim McMichael
ForwardingAddress          : Sharon
DeliverToMailboxAndForward : False


Similar to the fowardingSMTPAdderss parameter the forwardingAddress parameter must be managed by the administrator. The end-user has no control over this specific parameter and the end-user will not know that forwarding is enabled. Unlike client rules, the use of the forwardingAddress parameter applies to all messages received to the destination mailbox; there is no way to allow this function to work on specific messages.


Messaging handling is also similar to using the fowardingSMTPAddress parameter. The message arrives in the destination mailbox as if it was addressed directly to that mailbox. The TO address shows the original recipient and the FROM address shows the original sender. 


image


This allows the forwarded recipient to reply to the message and have it returned directly to the original sender. Messaging tracking also shows that the sender is the original sender and the recipient is the address configured for forwarding.


image


It is important to understand this behavior in scenarios where compliance or journaling is used as subsequent replies will bypass the original organization thereby bypassing journaling and compliance processes.


In this scenario the X-MS-Exchange-Organization-AutoForwarded header is not stamped on the message.


Autoforwarding and delivertoandforward:


Each mailbox also has a parameter called deliverToAndForward. This allows the administrator to specify if the message should also be delivered to the mailbox where forwarding is enabled. This setting applies ONLY to forwarding that is configured by using the forwardingAddress or forwardingSMTPAddress parameters. Client-side rules are unaware of this setting.


Autoforwarding and remoteDomains:


Within Exchange and Office 365, administrators can create remote domains. By default, every tenant leverages the ‘*’ domain. When a specific remote domain does not exist, the ‘*’ remote domain setting are applied to the message.


A property of a remote domain is autoForwardEnabled property. This allows administrators to define if auto-forwarding is allowed on messages destined to the domain specified.


PS C:> Get-RemoteDomain  | fl name,domainname,autoForwardEnabled

Name               : Default
DomainName         : *
AutoForwardEnabled : True


By default auto-forwarding is allowed to all domains. Administrators can use the remote domain settings to control how forwarding outside their organization is handled. Please note: this does not change how forwarding is handled within the organization.


In this example, I am creating a specific remote domain rule and have disabled auto-forwarding. 


PS C:> New-RemoteDomain -Name ExternalDomain -DomainName domain.com

Name                           DomainName                                   AllowedOOFType
—-                           ———-                                   ————–
ExternalDomain                 domain.com                                   External


PS C:> Set-RemoteDomain -Identity ExternalDomain -AutoForwardEnabled:$FALSE


The settings can be verified with get-remoteDomain:


PS C:> Get-RemoteDomain ExternalDomain | fl domainname,autoforwardenabled

DomainName         : domain.com
AutoForwardEnabled : False


To test this feature I set the forwardingAddress on the mailbox to a recipient in the domain.com domain. When a message is addressed to the mailbox where forwarding is enabled, it never makes it to the destination. The same behavior would occur if a client-side forwarding rule is used.


When a client-side rule or the forwardingSMTPAddress is used, the mail flow process stamps the X-MS-Exchange-Organization-AutoForwarded to TRUE. This header is not viewable on a message as the transport header firewall removes it. When the message is processed by the Transport service, if the remote domain specifically blocks auto-forwarding and the auto-forward header is present and set to TRUE, the message is turfed, and no NDR is generated. If no form of journaling is present and the deliverToAndForward setting of the mailbox is set to FALSE, the message is effectively lost.


When looking at message tracking we can see that the message failed to reach its destination. The message delivery status is NONE and no send events are noted.


image


Using the same remote domain, the mailbox is configured with a forwardingAddress instead. The mail contact used as the forwardingAddress object has an external email address in domain.com. When sending a message to the mailbox where forwarding is enabled, the mail is successfully delivered. This is also confirmed by message tracking.


image


In this example, the transport process does not use the X-MS-Exchange-Organization-AutoForwarded but instead adds the forwarded address as a recipient during a different stage of message processing. As the message traverses the transport stack it is not detected as a forwarded message and is therefore allowed to arrive at desired recipient.


Utilizing the forwardingAddress scenario is an excellent way for an administrator to bypass forwarding settings on remote domains while controlling when message forwarding is allowed.


We routinely receive requests on how to enable granular message forwarding or only allow specific users to use auto-forwarding capabilities. Unfortunately, with the forwarding settings being tied to remote domains it is very difficult to enable forwarding for only a subset of users or where granular forwarding on messages attributes is desired. To allow clients to create auto-forwarding rules would mean the remote domain would have to allow auto-forwarding for everyone. Administrators can attempt to discover and remove auto-forwarding rules using Get-InboxRule. 


In my experience, in most scenarios forwarding is disallowed on remote domains and enabling of forwarding is restricted to administrator configuration using the forwardingAddress parameter.

Office 365: Manage distribution groups that I own…

In Office 365 Outlook Web Access allows for individuals to manage distribution groups that the own.  Originally the distribution groups option was found by selecting the GEAR in the upper right hand corner and selecting the options menu.


image


When selecting options the subsequent dialog has a GROUPS feature where individual users can manage the distribution groups they own.


image


In the current release of Outlook Web Access ( May 2015 ) when selecting the options button a new set of options is displayed.  The groups option is not a top level option or sub-option.


image


How does an individual access the groups option to manage the groups they own?  In this new options dialog is the OTHER selection.  When selecting OTHER the following is displayed:


image


The OTHER –> GO TO EARLIER VERSION presents the original dialog to the user.  This restores access to the groups function.


image


Using this new path individuals can access the functions to manage distribution groups they own.

Office 365: Bulk update email addresses

In Office 365 there may be a need to perform a bulk update to email addresses across accounts.  The accepted domain may need updating as new domains are added or the email address prefix may be changing. 


In an on-premises environment the bulk modification of email addresses can be performed through adjustments in the recipient update service and recipient policies.  When directory synchronization is used with Office 365 this is still a viable method – as proxy addresses is sourced on premises.  (Note:  If no on premises server exists proxy addresses must then be manually modified in the Active Directory).  As the proxy addresses are changed on premises the directory synchronization process will replication the changes into Office 365.


If mailbox and user accounts are created directly in Office 365 then administrators must adjust the email addresses in Office 365.  Within Office 365 there is no recipient update service or recipient policies that can be adjusted to perform these modifications in bulk.  Each email address modification must occur directly on the user.  If a small number of users are involved in the change then using the Exchange portal may be the easiest method to process the change.  When the change must occur over a bulk of users then it may be helpful to script these changes.


In this scripting example the desire is to change the email address from alias@acceptedDomain.com to firstInitial.lastName@acceptedDomain.com.  To begin the list of mailboxes that require the change need to be parsed into a variable.  To gather the recipients we will use the get-recipient command.  The get-recipient command returns the list of proxy addresses on the users which will be helpful in further script steps.  The command in this example should only return recipients that are mailboxes. 


#Get a list of recipients.  Command may be further scoped as necessary to include only a subset of mailboxes.

$recipients=get-recipient –resultSize:UNLIMITED –recipientType:USERMAILBOX


With the recipients extracted we must now iterate through them.  In this iteration we will collect the email addresses off the user into a variable.  We will then construct the new email addresses for the user by first converting the primary proxy address of the user signified with SMTP: to a secondary address signified by smtp:.  The new email address will then be constructed, set as primary, and added to the list of email addresses.  The list of email addresses is then committed to the mailbox.


#Iterate through the list of mailboxes

$recipients | foreach {

#Extract email addresses to a variable

$emailAddress = $_.emailAddresses

#Convert exist primary proxy address to a secondary email address

$newEmailAddress = $emailAddress.replace(“SMTP”,”smtp”)

#Construct the new email address, set it as primary, and add it to the list of existing email addresses.

#The use of SMTP: signifies primary email address.

#Substring is utilized to extract the first initial of the users first name.

$newEmailAddress=$newEmailAddress + (“SMTP:” + ($_.firstName).substring(0,1) + “.” + $_.lastName + “@acceptedDomain.com”)

#Commit the new set of email addresses to the mailbox.

set-mailbox –identity $_.alias –emailAddresses $newEmailAddress

}


When constructing the new email addresses different variations may be utilized.  The current primary SMTP address must always be converted to secondary prior to creating new primary addresses.  For example, if firstName.lastName was the desired email address the following syntax could be used:


$newEmailAddress=$newEmailAddress+ (“SMTP:” + $_.firstName + “.” + $_.lastName + “@acceptedDomain.com”)


The script blocks used here can be combined into a single *.ps1 file. 


A special thanks to Matt Byrd for assisting in the final syntax.